A Nervous Rebel's Guide to Social Media
Some of us just aren't as tech savvy as others. So here I am collating some resources to help those of us who are less confident at social media to be able to use it to boost outreach and support our rebels in online spaces.
If you are social media savvy then please add to this book! No Rebel Left Offline!
- General Terms and Actions
- Facebook - The Basics
- Facebook - Events and co-hosts
- Want an event in your listings but don't have a co-host request?
- Twitter - The Basics
- Adding to this Resource
- Guide to Twitter, Instagram and Facebook
General Terms and Actions
Since the mainstream media refuse to cover the majority of our work, the primary way we can share our message is through social media such as Facebook, Twitter and Instagram.
We use social media for the following things:
Boosting Posts
Therefore, it is key to know how we can effectively boost our posts so they are seen by more people. The algorithms on social media are such that the more popular posts appear higher up on the feeds. Thus, the more we interact with posts the more they are seen by people!
In this book we will have sections on each of our main social media platforms which will cover how to be more effective in boosting posts. Eg. on Facebook a comment boosts more than a “like.”
Directing Posts at specific People or Groups
When making or sharing posts it is best to mention specific people and/or groups. This directs the post to those people as well as their following. Otherwise a post you make is only seen by your friends or followers.
In general this is done by “@-ing” or “AT-ing” a person. This means putting the “@” in front of their username or handle. Eg. if I want to direct a post at XRUK on twitter I would include @XRebellionUK.
Often when you first type the “@” symbol a drop down of popular accounts or friends will appear and as you type it will narrow down to the person you are aiming for.
HINT: keep a note of accounts you want to commonly “@” somewhere handy!
What is a Hashtag?
A “Hashtag” refers to the “#” symbol when used on social media. We have several hashtag such as #ExtinctionRebellion #WeWantToLive #ActNow the list goes on. Any phrase can be a hashtag is it starts with the “#” and has no spaces between the words. Often they will appear highlighted or in a different colour when typed correctly.
A hashtag allows you to tag a trend on social media. So instead of linking your post to the account @XRebellionUK you may instead what to include your post in the trend #ExtinctionRebellion.
A common way to browse social media is to search for hashtags or trends, so by tagging your posts with one of these trends you are adding your voice to it and your post will show up in the search. (As mentioned before the more interactions on a post the higher up it will be in the search results!)
What Tags do I use?
XR has a whole bunch of tags we use all the time: #ExtinctionRebellion #ActNow #TellTheTruth #BeyondPolitics #XR #ClimateEmergency We also have tags for the Rebellion or for specific campaigns: #WeWantToLive #StopHS2 #CEEBill #LightShipGreta #FreeTheTruth
For accounts to tag it really depends on your post and platform, but we recommend tagging: XR Accounts - like XR UK, XR Cambridge, XR Jews, XR Youth ... Politicians - Find Boris Johnson, Priti Patel, Domanic Cummings, Caroline Lucas ... Organisations - friendly or not - Greenpeace, BLM, Met Police, BBC ... Find the accounts for these on the platform you are using and make note of them!
Staying Safe & Other Questions
- Do I need to enter my bank details?
NO NEVER, to engage on social media you should never be asked for your bank details and if you are hit that back button because you probably don’t want to be there! (There are ways to interact with money on these sites but my advice is DON’T DO IT)
The Basics, Creating events and accepting co-hosts
Facebook - The Basics
All the basics of making, boosting and sharing posts, hashtags and tips on dealing with trolls.
Navigation
Facebook has lots of different places you can go - timelines, pages, groups, profiles... it can be easier to get lost if you are new to the platform. But there will always be that “F” in the top left which will take you back home!
If you are new to facebook we recommend typing “Extinction Rebellion” into the search bar and following a few pages and maybe even join your local group if you can find it! Then you can pretty much stay on the home page and scroll through posts to boost!
Making a Post
When on the homepage of facebook, which you can return to by clicking the “F” in the top left you should see a box at the top which asks “What’s on your mind?” This is where you type in a post.
There is no limit on the size of Facebook posts (to my knowledge) but you want the important bit in the first 2-3 lines so it doesn’t get hidden by the “See More” button. So in practice you want a 2-4 line post with a bunch of tags under the cut off.
Boosting a Post
There are 3 main interactions on Facebook which can be found under any post, you can “React” to the Post, you can “Comment” on the post or you can “Share” the post (more on that later!).
-
Reacting is the minimal way to interact with a post, you can “like” it or give another reaction. This doesn’t boost the post much but will typically show how controversial it is. But if you really want to help us on Social media go beyond liking!
-
Commenting on a post really boosts it in the algorithm! It doesn’t take much, a simple “Thank You” or “Well Done” is great, add to it with a hashtag #WeWantToLive or #TellTheTruth or go even further by starting a conversation!
If you ask a question in the comments you are likely to get a response, or you can respond to other people’s questions! Here the strategy is to have a conversation to boost the numbers of comments! If you post a hashtag then that’s one comment but if you engage a bunch of others on the thread that can get up to 10-20 comments and that is a huge boost!
Stay Safe & Don’t Feed the Trolls!
Starting conversations can be a great way to engage with people and boost our social media, but you are likely to encounter some trolls. These are people (or robots) who comment incorrect, offensive or just nonsense things to annoy people. There is no point to Trolls, we recommend you do not engage. Often they are bots that if you reply to their nonsense comment they will simply post more of that same comment elsewhere… The best thing to do is to be polite and to report any offensive comments.
Sharing a Post
There are several ways to boost posts by sharing them on Facebook. You can share on your Timeline, this is automatic if you click “Share Now” but we recommend clicking “Share…” or you can share in your “Story” or in a Group you are in.
So what happens when you share a post on...
Your Timeline
It will pop up on your page and be viewable by all your friends
Your Story
It will appear for 24hrs in your story which can be found in a bubble on your friend’s homepage or in messenger.
A friend’s Timeline
It will appear on their page and be viewable by all of their friends
A Group. It will appear on the group page and be seen by members of that group
Hashtags & Accounts
As we mentioned in the first section you will want to use tags to make sure that your post can be seen by people beyond your own following - especially if you are new to Facebook!
We recommend always using #ExtinctionRebellion, to add 1-2 tags for the campaign or location you are talking about and “@” 1-2 accounts to aim your post - especially if you are asking a direct question!
For Example
if you see a powerful image of mother earth in handcuffs then you can click the Share button and select “Share…” tag the @metpoliceuk and ask them if this indicated their view of the #ClimateEmergency. This will then alert them to your interaction as you have now publicly asked them a question!
Facebook - Events and co-hosts
How to create a Facebook event, create and accept co-host requests.
Watch the tutorial in video (10 minutes) or read below:
Creating an event
Disclaimer: never ever create an XR event from your personal profile or a Facebook group (as it uses your personal profile and not the group's name), always use a page. Otherwise, the police will flag you as an organiser which is the last thing you want.
1. Create a cover for your event
If you have a graphic designer in your team, ask them! Otherwise head to Viz Gen / Aktivisda to create your cover (if it's an event that happened in the past, try reusing the same cover, no need to reinvent the wheel!). The correct Facebook event photo size has the dimensions of 1920 x 1005 pixels. You can find a step by step tutorial to use Viz Gen / Aktivisda here.
Good practice: centre your title so it looks better on the events menu, avoid writing too much text (your text should be inside the event, not on the cover), make sure your text is easy to read (use a simple background, pick contrasted colours, for example black on yellow or white on dark blue).
2. Create your event
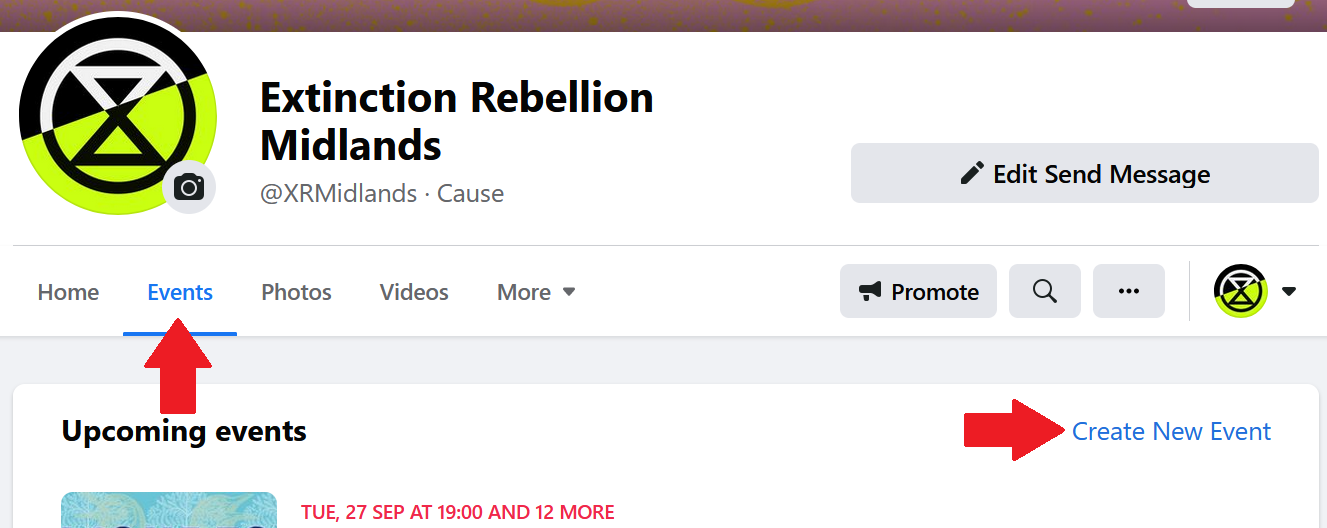
For traditional pages
Go to the event tab of your Facebook page and click "Create New event".
 Facebook is going to ask you if your event is online or in-person. Select the option that works for you.
If you picked "online", then select "General", then "Free" (unless it's an event you have to pay for to access, which is quite rare within XR).
Facebook is going to ask you if your event is online or in-person. Select the option that works for you.
If you picked "online", then select "General", then "Free" (unless it's an event you have to pay for to access, which is quite rare within XR).
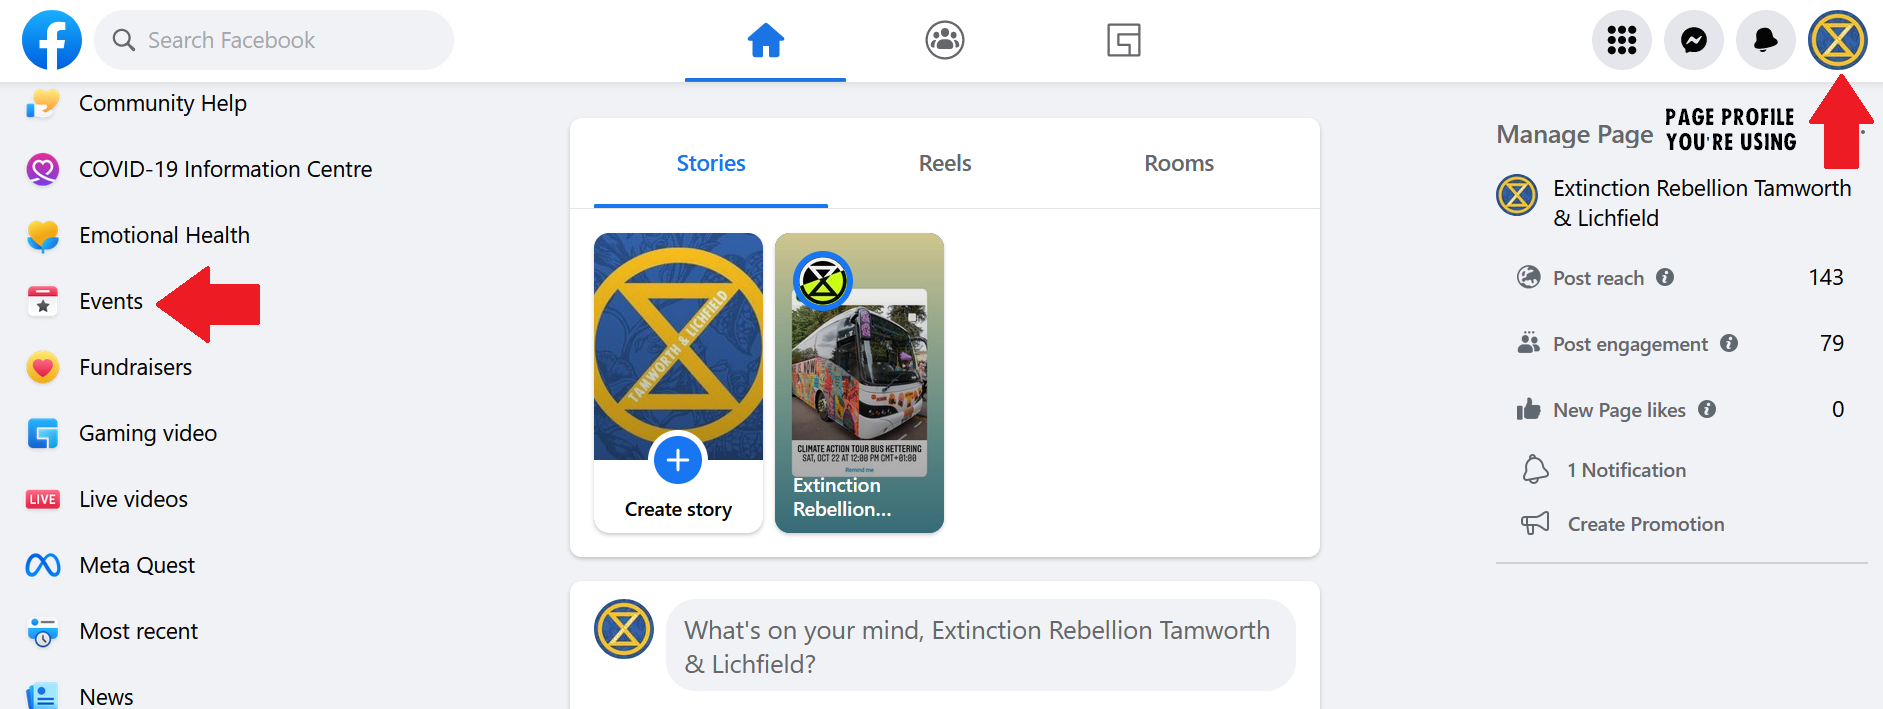
If you switched to the New Page format
Go to facebook.com and not your page straight away. Make sure you're using the right page "profile" (top of your screen, righ hand side: click your profile picture or the logo of your page to switch between profiles). Once you're using the right profile, scroll down a bit on the left hand side menu until you find "events".
Don't see the menu on the left hand side? Try to change the size of your window with the Zoom, on small screens, the menu doesn't necessarily show up but it's there! Or try visiting this page.
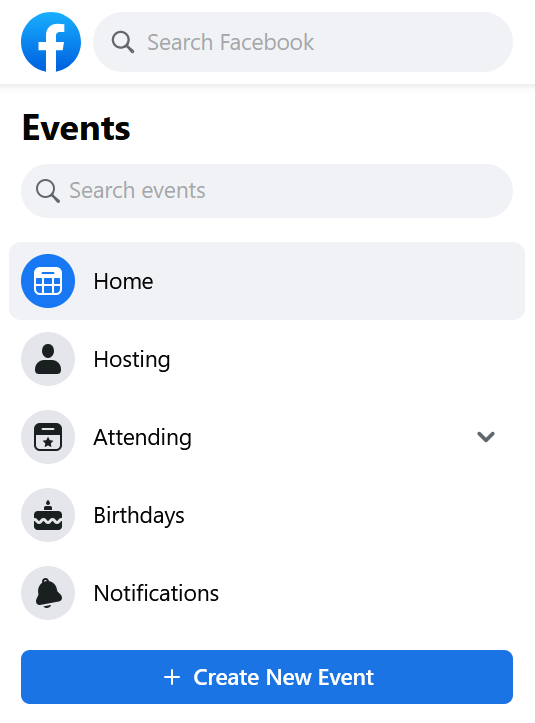
Then click "Create New Event"
Recurring event (for both page formats): if you want to set up an event happening on multiple dates and/or times, select "in person" even if your event is happening online (note: theoretically Facebook should ofere you the "recurring event" for both online and in-person events, but sometimes the platform is glitchy and will only offer it for "in-person" events).
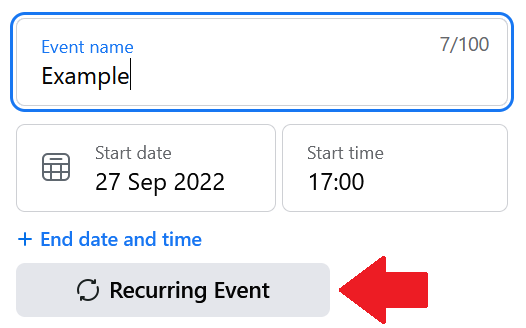
3. Fill the details
Name: give your event a clear name (it'll depend on who is your target: other Rebels or the general public?)
Examples :
- Action Wellbeing & First Aid - Open Call
- Help the Rebellion from Home
- Welcome to Extinction Rebellion
Avoid something like "Beyond Politics" by itself which has no clear meaning (your audience won't click on it if it's obscure!)
Date: fill your start and end date, as well as the time your event will start and end (people like to know how long the session is!)
If it's a recurring event, click on "recurring event":
Then select the frequency of your event (daily, weekly or custom):
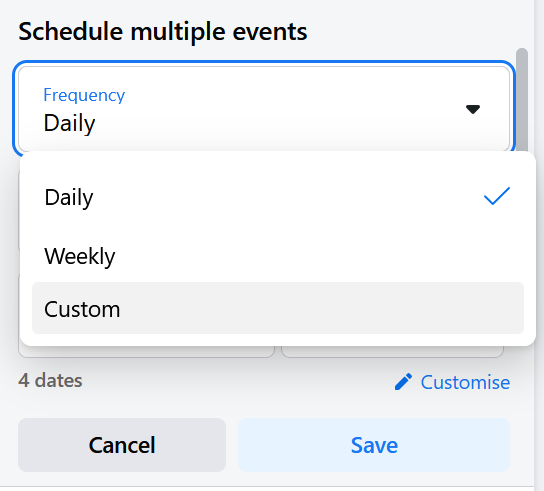
If you picked "custom", select the dates when your event is happening, then select the start and end time (tick the box "Add this time to all dates" if relevant, otherwise fill in the specific times for each dates, don't forget to click the blue button "Add" once the time is filled)
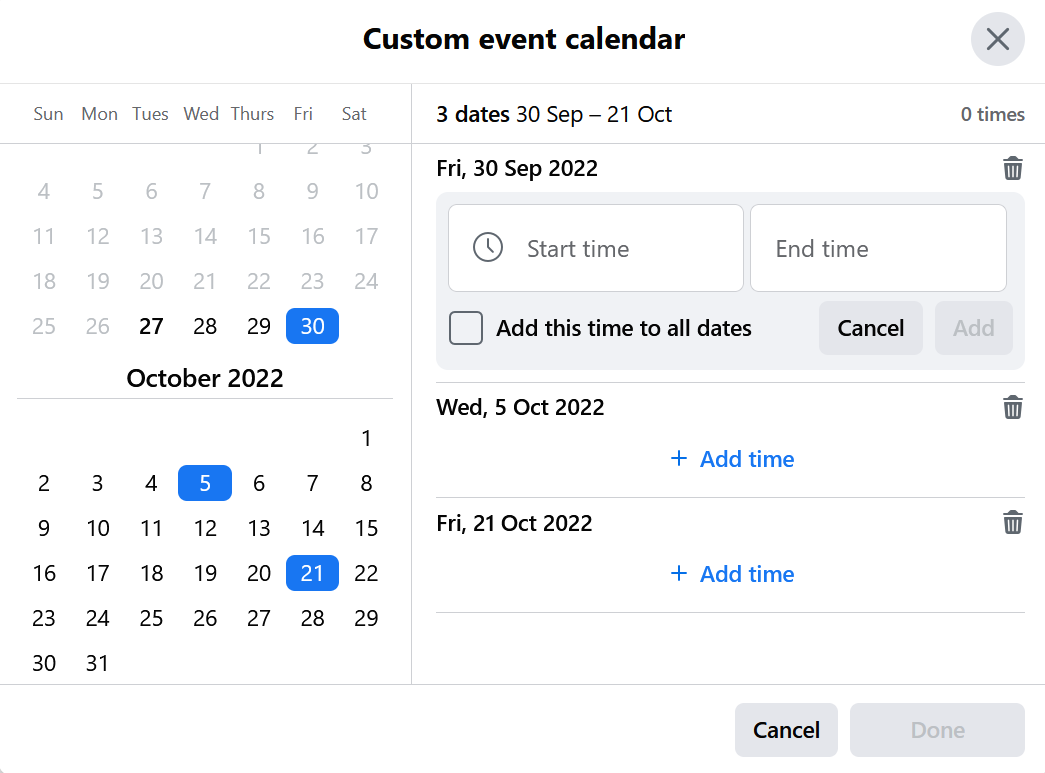 All the dates and time can be edited later on (for example if the time change or if you want to add more dates or cancel one)
Description: what is your event about?
- Short and clear text
- What will be happening? What should people expect if they join?
- Where? (Zoom registration link if it's online, address if in person)
- When? You can repeat in the description when your event is happening (and maybe draw attention to the multiple dates if it's a recurring one)
- Other relevant information: do people need to attend another training before attending yours? Do they need to read a specific document?
- Short URL: if possible, turn your long URL into short ones. Otherwise Facebook doesn't display them entirely and they can't be copied by someone who might want to share the registration link to a friend for example. Use XR URL shortener to do so.
- Emoji: you can add some within your text you show the start of a paragraph or highlight a title. Here is great source to find some (search for what you'd like to use, then copy it and paste it in your description)
Category: usually we use "causes" or "social issues" but depending on Facebook regular updates, they are not always available so just pick the closest relevant one (eg "crafts" if you're doing some block printing, "professional networking" for a workshop...)
Once you're done, click "next" (don't worry you can go back whenever needed!)
4. Location
Add the address where your event is happening. You can also paste a link there if relevant.
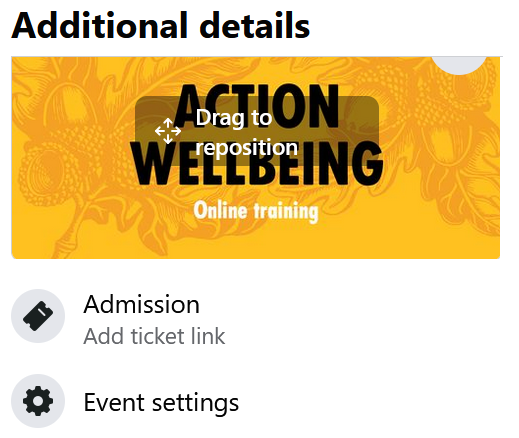
5. Additional details
This is the place where you're going to upload your cover!
Then you can save it as a draft if you're missing some information and wish to finish setting up later, or click "Publish Event".
6. Send co-host requests
If you are planning a national event or training, it might be relevant to add it to XR UK Website. To do so, you will need to send a co-host request to the XR UK Facebook page.
You might also want to make other pages aware of your event or showcase who are the organisers (for example, if you are organising an action with another local group, it's absolutly relevant to add this LG as a co-host).
Watch Out: all the co-hosts can edit your event as well as you, so make sure you only co-host trustworthy pages! If you're the admin of a local group's page, you can send a co-host request to your Nation or Region's Facebook page to grab the attention of a larger audience.
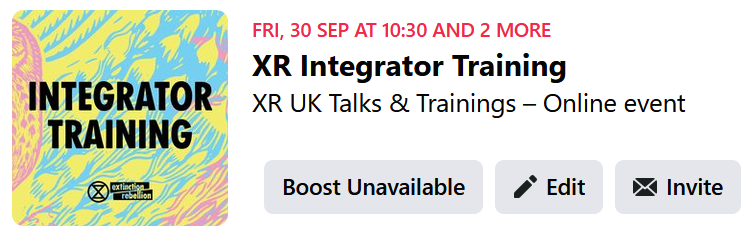
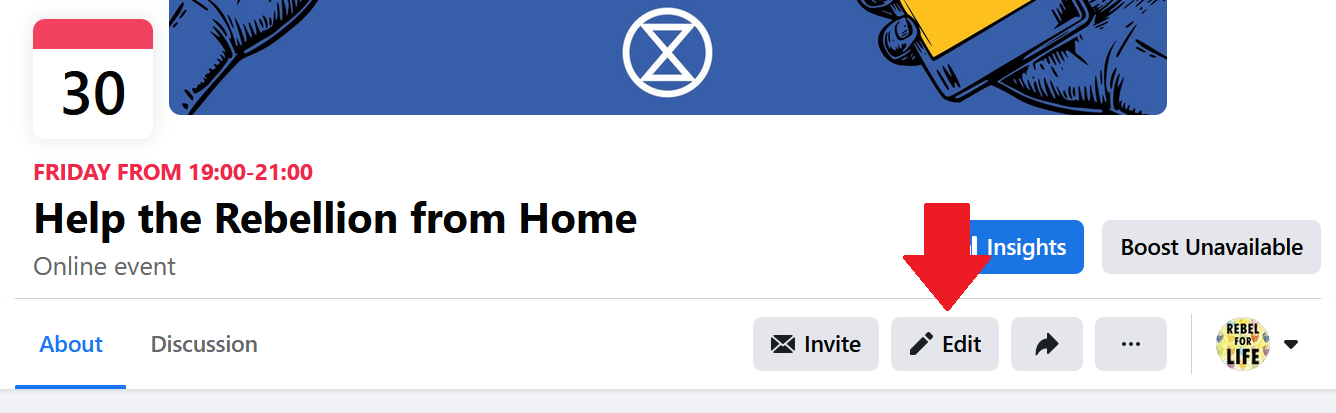
Good practice: make sure to publish your event first and check that everything looks good and is in the right place. Once you're sure everything is fine, click "Edit".
This is a very important step. If you were to add co-hosts before publishing your event, you would encounter an annoying Facebook glitch. Facebook would tell you an error happen and the page would look as if your event hasn't been published. If that happened to you: open a new tab on your browser, go to the events ;enu of your Facebook page and check the list of events to come. It's very likely your event is actually there (despite the error message!) and your cover is missing. In that case, click on this event then "edit" and resume the process.
Don't click again on "publish event" on the page where the error is showing, the more you click, the more you're duplicating your event, and the more co-host requests you're sending to other pages!
If it happened, finish to edit one of these duplicated events properly, then delete the other ones as soon as possible.
Add the co-host(s)
Now that you clicked "edit", you have access to the same information as before and can edit everything as needed.
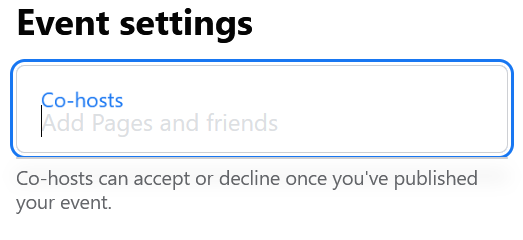
Click "next" twice until you see the space where you added your cover earlier ("Additional Details"). Click "Event Settings".
The easiest way to add a co-host is to know the username of the Facebook page you want to add. For example, Extinction Rebellion UK's username is xrebellionuk. You can also search with the full name of the page but sometimes (often...) Facebook mess with us and doesn't help us find what we're looking for.
How to find a username
Look at this spreadsheet to find the Nations and Regions ones.
Ask your regional / national coordinator if an equivalent spreadsheet exists for your area with all the local group's usenames.
Otherwise, make your own, you'll want to reuse it!
Visit the Facebook page of your fellow co-host (do it on a computer) and take a look at the URL. For example:
- For facebook.com/xrMidlands/ the username is xrMidlands
- For facebook.com/xrukTalksandTraining/ the username is xrukTalksandTraining
- For facebook.com/Extinction-Rebellion-Herefordshire-103048437853397 the username is Extinction-Rebellion-Herefordshire-103048437853397
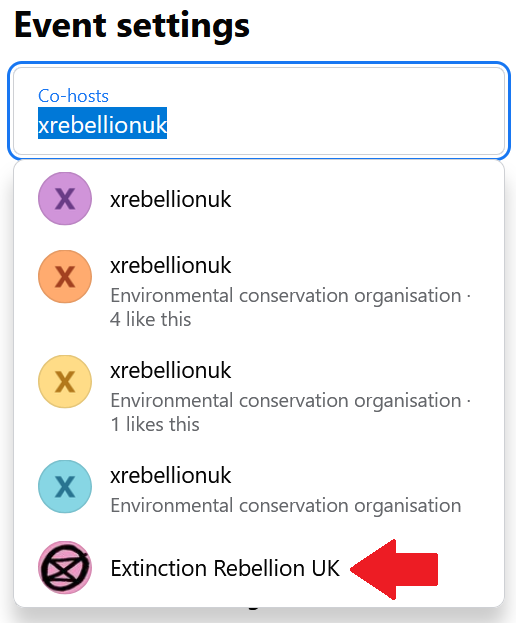
Copy the username, and paste it in the co-host box called "add pages and friends"", once you've added all the usernames, click "save", then "update".
Good practice: make sure that the pages you're adding as a co-host has a profile picture, that's a good sign it's a real page (and not a fake or just a Facebook glitch, see example below)
Accepting an event co-host request
When somebody makes an event - sometimes they will add other Facebook pages as co-hosts. They might tell you to 'pick up your co-host'. It can be tricky to find where to do this - as often Facebook doesn't seem to send you a notification.
How to accept Go to your Facebook Page, view your events and make sure you are viewing the page as the the page owner (not your personal account) - see both red circles on image below.
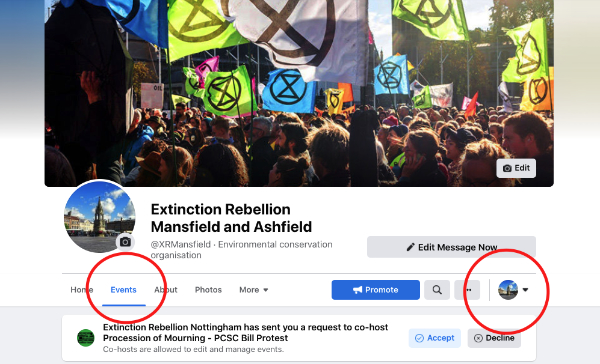
Then click the blue button 'Accept' and the event will be added to your list of events.
Add an event to your page
You can add an event to your events menu without the need of being a co-host. Go to an event you'd like to add (for example: next Rebellion, Welcome to XR...), then clicked the 3 dots on the right side of your screen, then "Add to page":
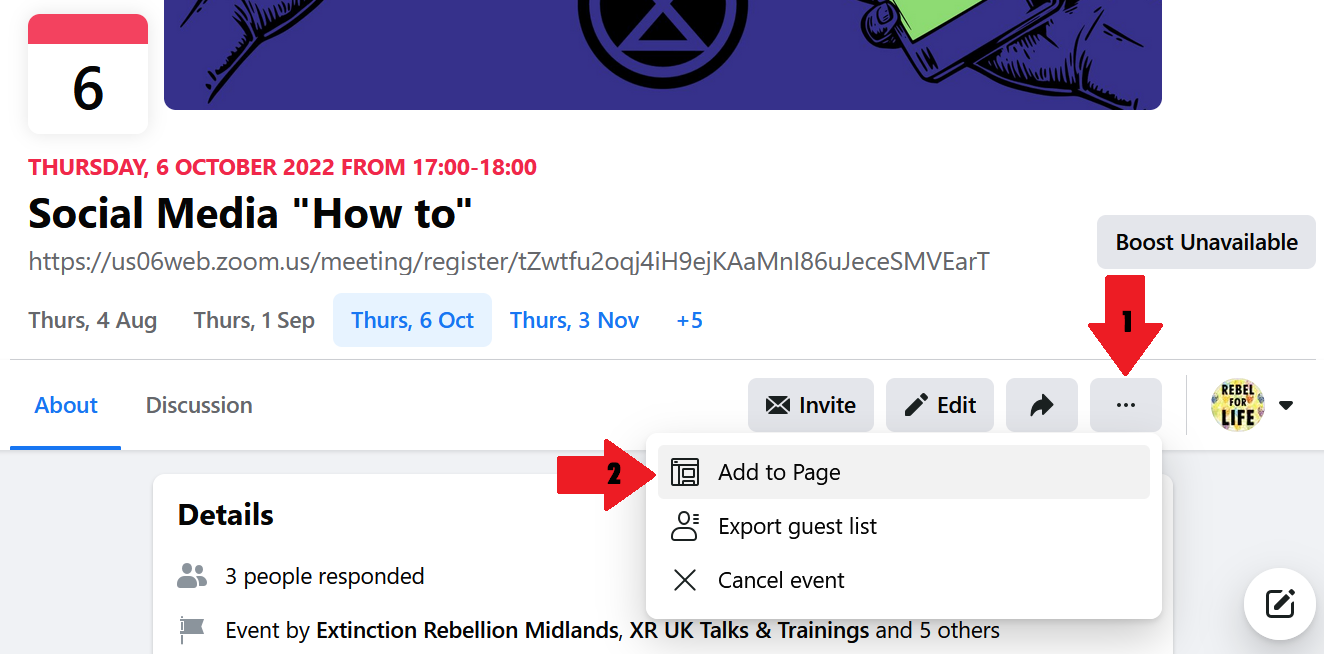
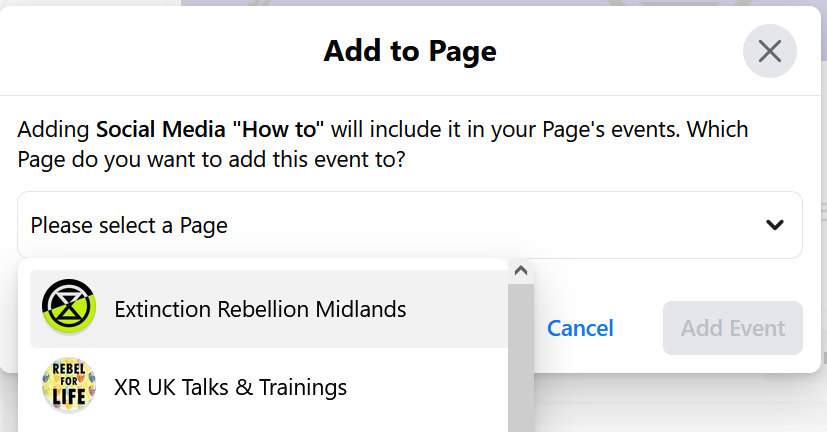
If you're an admin for multiple pages, pick the ones you want to add the event to:
Want an event in your listings but don't have a co-host request?
Don't worry - you can add any event to a Facebook PAGE or GROUP!
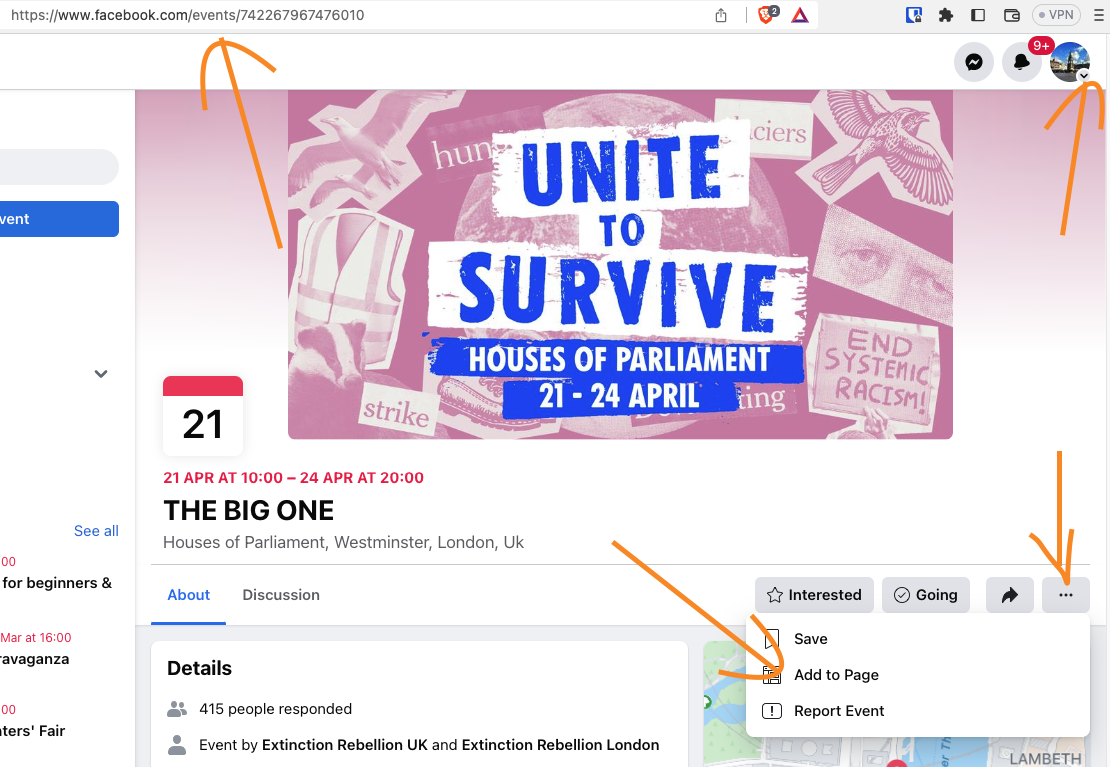
How to add to a PAGE
There are currently two types of 'Page'
If you have the NEW version. First go to the event that you want to add and copy the URL. Then switch to your page profile, paste in the event URL and then click the three dots and 'add to page'.
It should look like this...
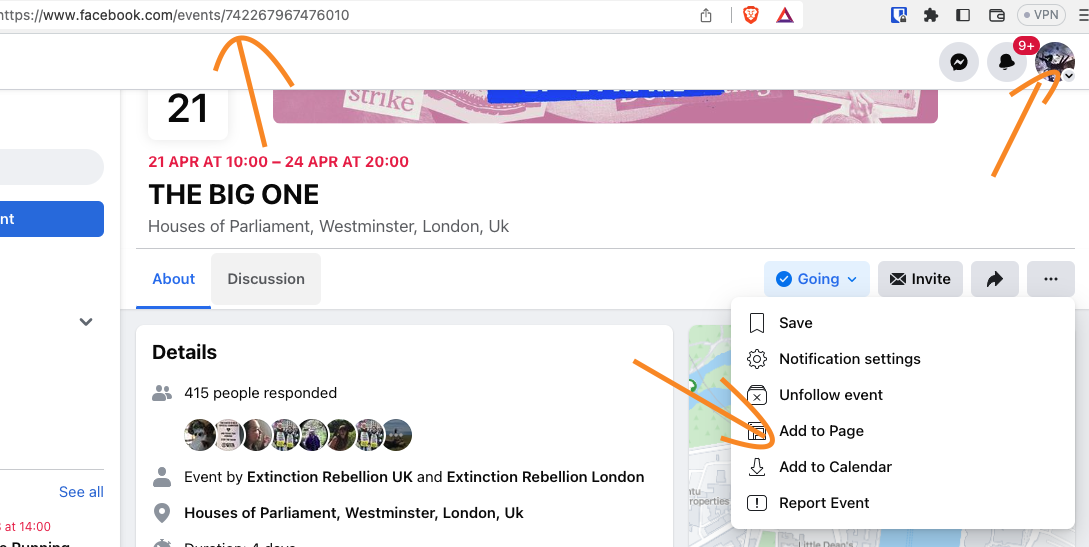
If you have the OLD version. Then make sure you are switched to your personal profile and then go to the event, click the three dots and 'add to page' - you should get the option of any page that you are an admin of
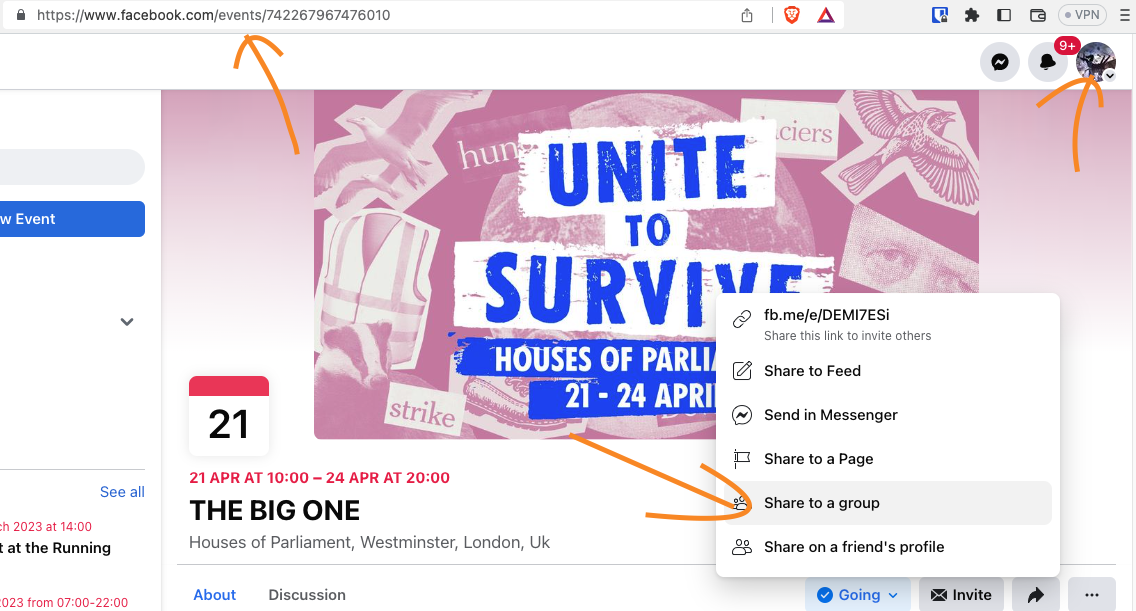
Share to Group
Go to the event url and then click the three dots and share to a group that you are a member of. Write a message with the post that suits the group - doesn't have to be an XR group -you might be talking to any kind of nature/green group you are in who you think might be interested.
That will mean everyone in that group will see it as a post but ALSO it will end up on the events listing of that group!
Twitter - The Basics
Navigation
Twitter has a fairly straightforward navigation. On the left hand side you have the links to the main sections. The main areas being:
- Home - where you see the posts of the accounts you follow.
Follow some XR accounts by searching for them in the top right! - Explore - where you can search for hashtags, trends or accounts.
Find some tweets to quote by searching for #ExtinctionRebellion - Notifications - where you get a ping if someone tags you in a tweet!
The rest is less key, feel free to click around as you can’t really break anything! And you will always have that Home button to get you back!
How Do I Tweet?
When you log into Twitter you will be on your Homepage (you should see the little house highlighted to show this!) To write a tweet you’ll see at the top of the page a box that asks “What’s Happening?” This is where you can write your tweet.
Tweets are typically very short, only a couple of sentences followed by tags. There is a limit on the length of a tweet at 280 characters, so this is not the platform for rambling!
To build a tweet you will want to write your couple of sentences or your question and then follow it with the tags you want.
Using Hashtags and Tagging Accounts
As we mentioned in the first section you will want to use tags to make sure that your post can be seen by people beyond your own following - especially if you are new to twitter!
We recommend always using #ExtinctionRebellion, to add 2-3 tags for the campaign or location you are talking about and “@” 2-3 accounts to aim your post - especially if you are asking a direct question!
Why Retweet?
Retweeting is one of the easiest ways to use twitter! As you don’t have to make up 100% of your content. You simply click the retweet button! (It looks like two arrows in a circular motion)
The best way to do this is to click on the retweet button and select Quote Tweet as this links the tweet you want and allows you to add your own text! Meaning you can refocus the tweet and use it to boost our trends.
Eg. if you see a powerful image of mother earth in handcuffs then you can “Quote Tweet” this, tag the @metpoliceuk and ask them if this indicated their view of the #ClimateEmergency. This will then alert them to your interaction as you have now publicly asked them a question!
Boosting Posts
The best way to boost posts on Twitter is to Quote Tweet them as above.
You can also “like” the post with the heart icon, reply directly (add to the tread) with the speech bubble or retweet the post without your own words. Conversations on twitter happen in the replies!
Adding to this Resource
We welcome you to add to this guide!
If you have experience of Instagram, Tik Tok, Reddit or any other Social Media platform it would really help if you would create a page to help other rebels out.
If you have more information on the existing pages of this book please don't hesiitate to add to them. You can find out how to do this on our Help pages.
What to write about.
Use the existing pages as guides. We are looking for simple information on how to navigate sites, posting and boosting existing posts, how to set up pages / groups / events etc and what we can do to play the algoritms to our advantage.
Who do I write it for?
Rebels have all different levels of skills when it comes to social media. So we recommend starting at the basics - write it for your grandmother. We can add intermediate and advanced pages for each platform if you have more to share!
Guide to Twitter, Instagram and Facebook
Short guide with images to help you learn the social media skills to amplify actions and campaigns.