Useful Tools
- XR Principles of Inclusivity
- Grounding Exercises
- De-escalation Process
- How to Hold a Listening Space
- Making Documents Accessible
- Dyslexia and Colour Blindness Friendly Style Guide
XR Principles of Inclusivity
Disablity Access Training | Disabled Rebels Network | June 2023
In order to build an inclusive approach towards involving all sections of society in the struggle to highlight the Climate Emergence, it is necessary for XR to pay particular attention to five activity areas:
- Organisation and running of meetings
- The production of documentation – including leaflets
- Accessibility of the XR websites
- Accessibility of demonstrations and other activities
- Good practices when communicating with disabled people
Please also read Diversity and Inclusivity at XR Actions when planning an action.
What is inclusivity?
An inclusive product, service or environment does not exclude any section of society. Inclusive solutions consider all users and participants, including disabled people, and is a positive step towards a holistic, universal system.
The Principles of Inclusivity
Link to the original and full XR Principles of Inclusivity document written by members of the Disabled Rebels Network
- Individuals have unique and particular needs in learning, social and campaigning environments.
- Respect each individual’s right to express and present themselves relative to their religion, culture, ethnic background, sexual orientation, gender identity, and disabilities.
- Promote inclusivity by reasonably adjusting procedures, activities and physical environments.
- Focus on the learning or support needs of the individual without assumptions or labels.
- Be inclusive in all forms of communication.
- Serve all with sensitivity, respect, and within boundaries of social justice.
Organisation and running of meetings or activities
When considering an accessible and inclusive meeting, there are three aspects you need to think about:
- Planning and preparation
- The equipment and information
- The conduct of the meeting.
1. Planning - Choosing a Venue
When considering whether a venue is accessible, the first thought may be to avoid entrances with steps. There are many other aspects to consider or options that you can provide to make the venue accessible. The information below covers a variety of suggestions however it doesn't cover every aspect. You will also need to think about different religions / faiths, backgrounds and cultures, e.g. different faiths have specific approaches to alcohol, as well as considering if attendees might be in recovery and possibly won't attend if alcohol is being served on the premises - the best practice is to consider your potential attendees / rebels and if after reading this guide you're unsure of their needs, please search the internet for information:
- Is there a barrier-free pathway to the meeting space?
- Is it easy to reach the meeting space from public transportation? Many disabled people rely on public transportation to get around.
- Have someone stand by the main entrance to direct people to the meeting room and help those needing assistance. This is a courtesy that everyone will appreciate.
- Is there adequate parking, including disabled parking?
- Is there an accessible toilet nearby?
- Consider door width, sharp corners, wheelchair ramps, access to parking for anyone with limited mobility, angle of slopes, toilets, background noise levels, lighting, clear signage.
-
Consider the size of the venue in relation to the number of wheelchair users expected to attend. Space is required for wheelchairs to be manoeuvred. As a general guide allow two spaces for every wheelchair user.
-
Arrange the seating so that wheelchair users have a choice of where they sit.
- Consider lighting levels for people with visual impairments, as low lighting is a barrier.
- Consider the availability of induction loops or arrange reserved front seating for attendees who are hard of hearing.
- If you have been unable to get an ideal venue, plan how you will overcome issues to accommodate individuals, e.g. arranging help to get people down slopes.
- Consider whether there are crèche facilities if these are required or whether childcare/carer’s expenses can be paid as an alternative.
- Brief the Venue staff regarding your needs, including numbers and access requirements.
- If you can, check the accessibility of a venue for yourself. Not only can you then be confident with what you are saying, but you can also answer enquiries more accurately.
2. Providing Information and Equipment
- The date and time for a meeting may influence who is able to come.
- The timing of a meeting may also affect people’s availability. Those with caring responsibilities may find early starts difficult and those with childcare may need to be home to collect children.
- You should consider your audience and whether you are able to provide expenses or resources for individuals requiring personal assistants, those with caring responsibilities (children and adult) or those with transport costs. Notice periods should be as far forwards as possible to enable people to make arrangements for transport, personal assistance and replacement care.
- On any notices or publicity used for the event, it is important to ensure you use the phrase: “If you require any specific requirements please inform (state a contact by phone, email and preferably address too). This allows people to explain any access/dietary needs (dietary needs may be influenced by faith, health or philosophy).
- Individuals find different formats of information easier to manage. These include large type, Braille, computer disc, audio CD. It is important if you are providing information in a particular format for an individual that you ask which is appropriate for them and not make assumptions.
- Try to use plain English without jargon in all documents including advertising. Consider your community and whether it would be useful to provide written information in different languages.
- If using a loop, check when booking, the area that the loop covers. Check before the meeting that the loop is working.
- If sign language interpreters, lip speakers and deaf blind interpreters are needed, check well in advance for cost and availability.
- It is useful to hold a briefing meeting for speakers to remind them to use microphones/talk through slide presentations etc.
3. Conduct - During the meeting
- Ensure those at reception are briefed on issues. If sighted guides are available they should be dedicated members of staff and should be on hand.
- If using PowerPoint presentations or other visual information, ask if people can read it. Don’t assume people will read the slides: talk through the information. Have printed copies available.
- At the start of the meeting, raise your hand to attract people’s attention. Check access e.g. whether people can hear; if the loop is working; if the people can see and read the PowerPoint slides; if they can see the sign language interpreters.
- When using a microphone, speakers should generally speak close to the microphone and preferably have an opportunity to practice using microphones prior to the event.
- If using a loop, then all speakers must use the microphone including those responding to questions. If the questioner is not within the looped area then the question needs to be repeated using the microphone.
- Even when a loop is not being used, it is good practice to employ a roving microphone. This might seem to slow down proceedings however often it enhances the authority of the Chair and aids the discipline of the meeting thus saving time.
- Allow time for breaks in the meeting. This is important for individuals but also for signers and lip speakers. Signers need a break every 15-20 minutes and if your meeting or event is longer than 75 minutes a break of 15 minutes is recommended.
- Time keeping is essential. Inform people of when to expect the meeting to end and when breaks are.
The Production of Documentation – Including Leaflets
Here are some tips on good practice:
- Offer a good contrast between print and background (e.g. black/blue on white/yellow)
- Avoid glossy or thin paper
- Avoid light type weights and unusual typefaces
- Keep information as concise as possible with short sentences and paragraphs
- Avoid printing text in capitals
- Provide even word spacing and justify text to the left
- Ensure text documents have been generously spaced
- Leave enough space between columns to make sure that text flows easily from column to column
When considering lay-out and design for posters and leaflets (as well as the points above):
- Avoid over-elaborate layouts, especially, placing words on top of photographs or drawings
- Highlight where the focus of the information can be found
- Ensure large and clear fonts are used such as Karla >>>Download here<<<
- Ensure the numbering and symbol protocols are kept simple and understand that some characters are difficult to tell apart for those with visual impairments, e.g., 3 and 8, 6 and 9, O and 0, S and 5, iv and vi?
Take care to avoid, where possible:
- Words split over lines
- Italics
- Underlining
- The capitalisation of whole sentences
- Narrow line spacing, narrow margins and dense text
- Faint print
General Good Practice in Communication and Information
Written Communication:
- Ensure that the letterhead and contact details are in clear, large, lowercase print
- Ensure that the subject of the poster/leaflet is clear, and that the header makes sense
- Avoid jargon or metaphorical/figurative language
- Avoid acronyms - where they are necessary, state them fully first
- Avoid adverbs and adjectives, they make sentences harder to follow
- Write short sentences with subject and object
- Use the present tense as much as possible
- Try not to use passive expressions: “We offer two services” is easier to understand than “two services are offered”
- Make the purpose of the letter/leaflet/booklet clear in the first sentence.
- At the end of the letter summarize what action you will take and what action the recipient must take
- Ensure that the contact person and their ‘phone number are clear, and in large print
- Where a mixture of graphics and text is used, make sure the layout is clean and avoids confusion
- Ensure that the graphics do not encroach upon the text, ensure that the graphics add to the understanding
- Make sure there is a large print footer saying where and in what other formats you can get the information
- Use sans serif fonts (such as Arial and Calibri - or Karla for some XR flair) and ensure the font is at least 14 point or equivalent
Audio information:
Audio information is especially important for people with a visual impairment, dyslexia, learning difficulties, non-English speakers and people who struggle to understand maps; non-disabled people may also find it reassuring and helpful.
Etiquette for producing your own audio CD: use people with clear speaking voices. Give an introduction and a summary e.g. this is an annual report of 20 pages. Have gaps between sections; state page number at appropriate points so that people can retrieve information; give contact details at the end; if pictures are important to the text describe them. Allow time for taping to be done in stages so that the reader does not sound bored.
Accessibility of the XR websites: Accessible website design
Text:
Use a sans serif typeface, like Karla as it is easier to read. A large font equivalent to Karla 14 is a good size – the alternative is to have a Large Print button at the top of the home page.
The text should be colour-contrasted with its surroundings – like black/white, yellow/blue, green/white. Many visually impaired people find it easier to read reverse coloured text – e.g. white characters (#FFFFFF), on racing green (#006600) background
The visited links colour should be a different colour and shade, so that people with colour-blindness or other visual impairments can distinguish it.
Images:
Pictures/pictograms/icons help many people with learning disabilities, but can be a hindrance to people using voice software like Hal/Supernova (text-reader software). Where pictures are included, make sure the alt tags say what they are or what they do (e.g.: click here for Toyota cars)
Frames:
Do not use them!.
Tables:
Tables are inaccessible for many with visual impairments and some screen readers. If tables are necessary, provide both a caption and a summary of its contents.
Forms:
Web-based forms can usually be read by text readers, but it’s worthwhile including a “print” button, for people who can’t use the online version.
Document downloads:
Ensure documents are available as both a Word document and as a PDF.
Structure:
Make sure website pages have a clear and logical structure.
- Avoid clutter
- Keep the homepage as simple as possible
- Pay particular attention to how you map out the site – the fewer clicks for a person to get to the information they want, the better
Accessibility of demonstrations and other activities
There have always been disabled people engaged in political activities but never to the extent that they are today. It is not possible or practical for organisers of demonstrations or certain other political activities to consider the access needs of all the disabled individuals who may want to take part. Disabled people for their part equally need to understand that with rights come responsibilities and this includes their own safety. Nevertheless in order to be able to make informed choices as to whether or not they can participate, disabled people require as much information as is possible to give.
Disabled people would find it useful to know for example:
- Details of a meeting place (nearest stations, bus routes, parking, etc)
- Agreed route of any marches and their lengths
- Details of a rallying place (nearest stations, bus routes, parking, etc)
- If disabled people are to form a separate contingent that the lead disabled people are able to liaise with identifiable stewards in case or changes in plans or possible emergencies.
Grounding Exercises
Explain fight, flight or freeze - adrenaline and its impact - e.g. can lead to panic attacks.
Explain Diaphragmatic Breathing:
Diaphragmatic breathing is a type of a breathing exercise that helps strengthen your diaphragm, an important muscle that helps you breathe. This breathing exercise is also sometimes called belly breathing or abdominal breathing.
It has a number of benefits that affect your entire body. It’s the basis for almost all meditation or relaxation techniques, which can lower your stress levels, reduce your blood pressure, and regulate other important bodily processes.
The most basic type of diaphragmatic breathing is done by inhaling through your nose and breathing out through your mouth.
Diaphragm breathing basics:
- Sit in a comfortable position or lie flat on the floor, your bed, or another comfortable, flat surface.
- Relax your shoulders.
- Put a hand on your chest and a hand on your stomach.
- Breathe in through your nose for about two seconds. You should experience the air moving through your nostrils into your abdomen, making your stomach expand. During this type of breathing, make sure your stomach is moving outward while your chest remains relatively still.
- Purse your lips (as if you’re about to drink through a straw), press gently on your stomach, and exhale slowly for about two seconds.
- Repeat these steps several times for best results.
Rib-stretch breathing (use diaphragmatic breathing into your stomach):
- Stand up straight and arch your back.
- Breathe out until you just can’t anymore.
- Inhale slowly and gradually, taking in as much air as possible until you can’t breathe in anymore.
- Hold your breath for about 10 seconds.
- Breathe out slowly through your mouth. You can do this normally or with pursed lips.
Numbered breathing (use diaphragmatic breathing into your stomach). Numbered breathing is a good exercise for gaining control over your breathing patterns. Here’s how you can do it:
- Stand up, staying still, and close your eyes.
- Inhale deeply until you can’t take in anymore air.
- Exhale until all air has been emptied from your lungs.
- Keep your eyes closed! Now, inhale again while picturing the number 1.
- Keep the air in your lungs for a few seconds, then let it all out.
- Inhale again while picturing the number 2.
- Hold your breath while counting silently to 3, then let it all out again.
- Repeat these steps until you’ve reached 8. Feel free to count higher if you feel comfortable.
Anchoring or can be used as a check-in or check-out:
This might be something like, “I’m Full Name. I’m X years old. I live in….. Today is Friday, June 3. It’s 10:04 in the morning. I’m sitting at my desk. There’s no one else in the room.” You can expand on the phrase by adding details until you feel calm, such as, “It’s raining lightly, but I can still see the sun. I need a break. I’m thirsty, so I’m going to make a cup of tea.”
Short grounding:
Lower your gaze, hands in lap or on diaphragm and take 3 breaths in and out (using diaphragmatic breathing). Feel your feet on the floor, and then starting with your toes, press them to the floor, then the balls of your feet, your arches and the heels. Make a whole foot connection! Then imagine roots growing out of your feet into the earth. Imagine those roots growing longer and combining with all the root systems underground. Feel connected to our earth. Then in your mind, take yourself to a place in nature, somewhere you love or maybe visited recently. Remember what it felt like. How warm or chilly, dry or drizzly, still or windy. Stay with those feelings for a few moments. Then bring yourself slowly back into the space with everyone. And when you’re ready, open your eyes or clear your gaze and then if you can, stretch or shake yourself in whatever way you feel comfortable.
Longer grounding:
Cognitive Behavioural Technique (CBT) - The 5 senses.
- Ask participants to lower their gaze or close their eyes whichever feels comfortable, then to focus on their breathing for the count of 3 breaths in and out.
- Gradually look around themselves and take in their environment and then look at 5 different things as if seeing them for the first time - study each one for a few seconds.
- Then touch 4 different things, again as if feeling them for the first time, taking in temperature and the material they’re made from.
- Then listen for 3 different sounds focussing on each one for a few seconds. If in a very quiet space, participants can snap their fingers, clap hands, whistle etc.
- Then smell two things - their clothing, skin, hair, whatever their drinking or an object to hand. Lastly to taste one thing - if nothing to hand then they can lick the back of their hand. This technique takes the person ‘out of their mind’ - in other words helps them to stop focussing on their thoughts which can break the cycle of panicked thinking and lower adrenaline.
Longest grounding:
Emotional Freedom Technique (EFT): I’d like to invite you to close your eyes, focus on your breath - in and out. And then to just feel into your body, scanning up and down looking for some tension. Do you have tightness, stress or pain anywhere? Is it in your neck, shoulders, lower back or somewhere else? If you can’t find anything in your body, then look outside for whatever is causing you tension at the moment. Then tap the side of your hand with the other hand and repeat after me, “Even though I have this tension (or you can name the specific tension, e.g. this headache/back pain/frustration) in my body and life, I deeply and completely accept myself.” Repeat this x 3.
Then tap gently and repeatedly:
- Inside of the eyebrow, where the nose meets the eyebrow, say - this tension (or headache/pain)
- Side of the outside of the eye on the bone, say - this tension.
- Underneath the eye on the bone - this tension.
- Under the nose, above the top lip - this tension.
- Under the bottom lip in the crease above the chin - this tension.
- Feel for your collarbone and then to the outside towards your arm move an inch - this tension.
- Under the armpit and 3 inches below - this tension.
- Lastly, top of the head - this tension. Then drop your hands to your lap and close your eyes or unfocus your gaze and take 3 deep slow breaths. And when you’re ready come back into the group.
Check outs:
List favorites - List three favorite things in several different categories, such as foods, trees, songs, movies, books, places, and so on.
Plan an activity - This might be something you do alone or with a friend or loved one. Think of what you’ll do and when. Maybe you’ll make your favourite dinner, take a walk somewhere you love, watch a film you’ve been looking forward to, call a friend. Focus on the details, describing as much as possible.
List positive things - Write or mentally list four or five things in your life that bring you joy, visualising each of them briefly.
De-escalation Process
We welcome everyone and every part of everyone but not all behaviours. For clarity around this: here is a link to XR's Principles and Values found on the Rebel Toolkit.
If there is a disruption to the meeting which can't be handled immediately and promptly we have a process which we have devised.
- For people who feel triggered or stressed we have a safe-space with a person to hand in this meeting who can go into a breakout room with you so you can come back to the meeting and participate. You can contact this person privately via the chat.
- In the case of a major disruption such as a 'zoom-bombing', the person will be immediately removed from the meeting.
- In the case of a person being unintentionally disruptive, we will invite them to a break out room. If they continue and don't accept they will be sent to the waiting room where they can accept to return but first they must go into a breakout room to ensure their wellbeing and that of the groups' is guaranteed.
Expected disruption:
Within the meeting, a rebel has been designated de-escalator / calm-enabler. If someone is feeling triggered they can privately or publicly ask to go to a break out room with them and actively calm down so as to better join the room again later, or not as the case may be. The designated calm-enabler is in the meeting to decide for the benefit of both the person struggling and for the whole group what will happen after the breakout-room session. The breakout-room is confidential but not secret and if the outcomes affect the team in charge of the meeting they will be informed accordingly while keeping any personal details shared confidential.
Unexpected disruption.
We will quickly assess the gravity and potential longevity of the disruption.
Serious disruptions which are obviously there to cause harm will be dealt with immediately and the person will be removed from the main meeting as swiftly as possible by the facilitation team.
Serious disruptions which are caused by triggered human beings participating in the meeting which can not obviously be dealt with in the main meeting will be dealt with in this manner:
The offer of a breakout room is made. If not accepted within 'x' seconds then they will be sent to the waiting room. In the waiting room, an offer to return is made so as to discuss the issue further in a breakout room. The intention is to enable the person to participate in the meeting. The person in the waiting room must accept the offer to join the breakout room before being allowed back in. If they then refuse* to join the breakout room once returned they will not be allowed back into the meeting.
The breakout-room is confidential but not secret and if the outcomes affect the team in charge of the meeting they will be informed accordingly while keeping any personal details shared confidential.
How to Hold a Listening Space
Introduction
A Circle is a wonderfully versatile held-space which allows us to communicate with others in a way that is non-hierarchical, equal, respectful and connecting. The Circle as a symbol appears in cave paintings dating back 35000 years. Jung discovered that the circle, often in the form of a sun-wheel, appeared in cultures that developed in complete isolation from one another.
When we pull the chairs away from a table and out of linear rows and into a ring where we face one another, we are turning ourselves into a sun-wheel. We assume the shape of the symbol ourselves and the synergy comes with us.
As part of Extinction Rebellion’s Regenerative Culture, a talking circle can offer a space for people involved to mutually support, share and process a multitude of thoughts & feelings that emerge through their relationship to climate emergency and associated actions.
We come in connection with our feelings/ Grief as they are arising in our daily lived experiences:
- Awareness of those sickening and dying among us.
- Separation from those we love and are concerned for; just round the corner or in distant places, we cannot meet and hug and cry together.
- The loss of touch and connection.
- The restrictions on choice and freedom.
- Awareness of a planet so horrifically mistreated, she would evolve a way to put a stop to the trauma.
- Awareness that it has taken a human-scaled immediate crisis to prevent us participating in this relentless abuse.
We are driven to online connections - a shadowy substitute for the comfort of solid physical presence - and for now, it is all many of us have access to.
How we hold the space can deeply inform and influence how people share what is alive within them and how people bear witness to that. We have put the following suggestions together to support those who are stepping forwards to hold spaces at this time for others to speak and be heard.
Host/Facilitator
Preparation - Welcoming
Give yourself 15 minutes or so to create a sense of welcome before the call begins.
If you are pairing with another to help facilitate, connect in with your partner at this point and share how you are preparing for the call.
Turn off all other distractions and devices. The quality of attention you bring to the call has an impact on those who join the room.
Ground yourself into calm with breathing practice and any other techniques which you know support you.
Have fresh water and comfy seating. Check the Zoom link is working and have all you need to hand.
- We advise working with a co-facilitator in order that you are supported in this process and in order that with larger groups are facilitated successfully. This includes working with the uncertainties around the numbers of people and the online technology involved.
- Holding this space can be a vulnerable task and we encourage authenticity from the facilitators around their own emotions through the process to model and encourage this depth as a group.
- Open the zoom room a few minutes early if you can.
- Welcome people as they arrive. Notice how many are arriving by phone and be clear how you will engage them in discussions - by raising their hands in the chat window, or voicing their desire to talk with a word, such as stack or queue.
Timings & Technicalities
- As a facilitator, timing is of optimum importance. It is the facilitator’s duty to state the time of the call at the beginning or if there is a possibility of running over. Closing the door to the zoom room is advised to maintain the safety of the container. Please familiarise yourself with this before holding the circle.
- Spreading the time equally among the participants is of great importance so that each person is heard equally. We recommend an alarm to assist with this process. If you are co-facilitating, the timekeeper role could be the job of one of the facilitators.
- We recommend dividing the groups’ time into 2 rounds (two opportunities for each person to speak) so that a deepening can occur as a result of, say, hearing the vulnerability of another. Usually the rounds are a longer one to start with, followed by a shorter one.
- Break out groups - if the group is large we suggest splitting the group into break out groups in order that there are small and more intimate groups, ideal for sharing more deeply and being more effective with time.
Process
The circle has a beginning, a middle and an end. The host can offer a simple ritual to signify these shifts:
Beginning
Group Agreements
The success of a circle rests on the ability of the participants to understand, contribute to and abide by rules of respectful engagement. Agreements provide trust and an interpersonal safety net for participating. Agreements are the circle’s self-governance and create a way for each member to hold both self and each other accountable for the quality of interaction.
Suggested initial agreements would include:
- Confidentiality- Nothing gets taken outside the circle and people don’t refer to each others’ sharings.
- Listening with curiosity and compassion, without interruption, including without hand signals.
- Speak from the ‘I’ - only speak from our own experience and within the circle we refrain from commenting about or offering advice/opinion about what another has shared.
Our agreements are what ‘carry us through stormy seas’.
Welcoming all of us and every part of all of us:
Numbness is also welcome in these spaces and we encourage facilitators to acknowledge and be with the numbness that may be appearing in participants as equally as valuable as grief or any other emotional state. This may also be recognised as “not knowing” how I feel about something.
Creating the container (energetically):
- A grounding meditation, a quote or poem could be an effective means of connecting participants to create a container for the talking circle. It offers a clear transition from whatever was happening before.
- Asking participants to follow this with a go around of their names, pronouns and very briefly stating something that they are grateful for - for example from nature, or their day so far.
- When they have finished, ask them to pass on to another person by name, and then mute themselves.
Middle
Model a little of what it might be like to reflect back some understanding of what was said - track meaning for some or most of what is shared. How might others offer reflections or curiosities - is this invited? Think about how you might feel steady in the space you are holding and offer this - there is no ‘right’ way...it is a gift to bear witness to what is and not many places to sit with things. Share if you feel uncertain or unsure and if you would welcome people to ask for a pause etc.
- The talking circle - dividing time up equally and setting out break out groups, as described above.
- Reminding participants that the more they can tune in to and express how they are feeling rather than what they are thinking, the more full may be their experience of sharing their truth and being witnessed and acknowledged in this.
- Reminding participants that there is also no requirement to use words. Simply breathing and being with what is there within us really welcomed.
Pay attention to the conversation, and also, have some attention to others either waiting to speak or who are very quiet. If you see people being moved to tears you can call a restorative pause. You might want to invite people to return to some breaths together in honour and validation. In this pause, remember to people that tears are normal and needed. They are a sign of life and emotions shifting and flowing and are a very human communion with the element of water.
As facilitators we could wonder out loud, allowing people to start bringing up feelings.
- What truths are proving too hard to talk about with those around you?
- What sort of anxieties are arising in people?
- Who have been the rocks in people’s lives - where are they now and what arises when you think of them?
These kinds of courageous conversations almost sustain themselves. As people start to engage with the dialogue, the facilitator can step back, thanking people when they have finished speaking and calling in the next person.
Closing
Around half way through the call, I begin to listen out for a moment to connect with what's next. Perhaps it is an invite for people to share the type of self care they are finding that supports them, or perhaps it is to invite people to connect to what matters to them most in these times - something they might wish to maintain when the immediate restrictions of this crisis are lifted.
If the group has split into break out groups, we suggest bringing the group back together towards the end, so that we may express all together what it is that resources us. E.g. walking in nature, having a hot bath, speaking to a loved one - an invitation to remember these things and resort to them when we are emotionally/energetically challenged.
We do this to give time for participants to integrate some of their experience of sharing and of witnessing, as well as to tune in to what we might need now. We have stepped into openness and vulnerability, and potentially pain, and rather than step out of the circle and close ourselves down for protection, we can step out and into self-care and compassion.
Ending
Make sure you have made sufficient time for the ending.
Group check out: A time to briefly share final feelings at the end of the call. It is the facilitator’s role to frame the amount of time remaining. The check-out is passed from one participant to the next - i.e. the person who goes first will choose someone to go next, etc. For the facilitators this is an opportunity to be at least a little sighted of how each participant is doing, so that additional support might be offered after and outside of the session.
If you can be available for 15 mins after the ending, then any one who is struggling or needs some other support can be heard in a boundaried way. This may be necessary for you and your co-faciliator to offer.
What next after attending this training session and reading this document?
You might find some or all of the following helpful in supporting yourself as you step into holding a listening space. Do offer that which feels right for you and do include within this what you offer to yourself in the way of support. There is not a strict wrong or right of this, only some suggestions born of experience. And no hierarchy of expertise that you have just entered onto the bottom rung of. That is a concept born of a disempowering system. But there is wisdom and support for you as you step in (“in”, not “up”).
- Taking some time to ask yourself “why am I really considering offering to hold a listening space for others? In what ways does this serve my needs?” Listening carefully to what comes up in you and sharing this with another person who can hear you non-judgmentally, to support your widening insight into what you are stepping in to and why.
- Attending other listening circles to both support yourself and experience others holding them.
- Speaking with others who are holding listening circles, to gain further insights.
- Asking others who are holding listening circles if you can support them when they hold a circle (i.e. being the second not first person holding the circle / the shallow rather than deep end first)
- Asking another who you have supported to hold a circle to then come to support you when you hold your first circles.
- Attending regular ‘Holding the holders’ group sessions. These are offered as spaces for you to decompress, debrief with each other, learn and feel held. These are held by Sandy from XR Trained Emotional Support Network.
Supporting information around Trauma:
These are initial notes around awareness of how trauma can affect people and suggested resources for self educating.
The conditions for psychological trauma are rife at the moment, so underlying traumatic events may break through much more easily. Many have lost access to their normal support networks, resources etc.
One person expressing anger/rage, triggering another person’s trauma history of being raged at. A person triggered into primal screams of pain/anguish triggering other people’s early experiences of terror by, for example, witnessing domestic abuse as a powerless child.
Here is a chart about the stages of hyper-arousal in the nervous system that happen when one is in trauma and the dangers associated with it.
Please make sure you have lists of national helplines that you can put in the chat, and any other XR Grief/ Sharing circle offerings, including:
- This gives links to Wales,Scotland and England.
- Rape crisis and sexual abuse support.
- XR Support: Trained Emotional Support Network. Please email Herve at : XR-TESN@PROTONMAIL.COM
- In The Rooms is a free online recovery tool that offers 130 weekly online meetings for those recovering from addiction and related issues. We embrace multiple pathways to recovery, including all 12 Step, Non-12 Step, Wellness and Mental Health modalities.
- Centre for Anxiety Disorders and Trauma
- CPA are offering support to people who are affected by the ecological, biodiversity and climate crises. Some CPA members will offer 3 free sessions of Therapeutic Support by phone or skype. More sessions could be negotiated with the person directly, depending on availability.
- Samaritans are a confidential emotional support service for anyone in the UK and Ireland. The service is available 24 hours a day for people experiencing feelings of distress or despair, including those which may lead to suicide. Call them on 116 123 for free or email Samaritans on jo@samaritans.org.
- National Suicide Prevention Support Grassroots – Preventing Suicide Together. The UK leader in suicide prevention, this website also includes the Stay Alive App which offers help and support, both to people with thoughts of suicide and to people concerned about someone else.
- International Association for Suicide Prevention (IASP) This resource provides a list of helplines organised by countries.
- Cruse Bereavement Care: helpline 0808 808 1677(Mon-Fri,9.30-5pm, and till 8pm Tues-Thurs) offering free advice, information and support to anyone struggling with grief. You can also email helpline@cruse.org.uk.
- We support people bereaved by sudden death. There are many causes of sudden death. COVID-19, other communicable diseases or undiagnosed medical conditions, suicide, road crashes, terrorism and conflict, natural disasters and drownings, and accidents in the workplace and home.
- Hope Again: helpline: 0808 808 1677 (Mon-Fri, 9:30-5pm).Hope Again is Cruse’s website for young people, offering information, vlogs, podcasts, and stories.
- Mind: Infoline:0300 123 3393(Mon-Fri, 9am-6pm, not bank holidays). This offers information regarding mental health problems; where to get help; treatment options; and advocacy services, or you can email: info@mind.org.uk or Text: 86463.
- Survivors of Bereavement By Suicide: helpline 0300 111 5065 (9am-9pm every day).
- Sands: helpline 0808 164 3332 (9.30am-5.30pm Mon-Fri and to 9.30pm on Tues and Thurs) for those affected by still birth or neonatal death. You can also email them at helpline@sands.org.uk.
- Good Thinking Tools and resources for anxiety, sleep, low mood and stress (NHS approved) can be found here.
It is really useful to be familiar with using Zoom so online tutorials are available including : https://embodiedfacilitator.com/resources-for-embodiment/.
Summary
A suggested circle might run like this:
- Welcome
- Group Agreements/housekeeping/timings/welcoming all and every part of us
- Opening Ritual, Poem - for example a grounding meditation
- Names and Gratitudes
- Break out groups
- Deep sharing space - timed in 2 rounds.
- Coming back together
- Resourcing ideas
- Check out - brief sharing on where we individually are now
- Closing and thanks
Making Documents Accessible
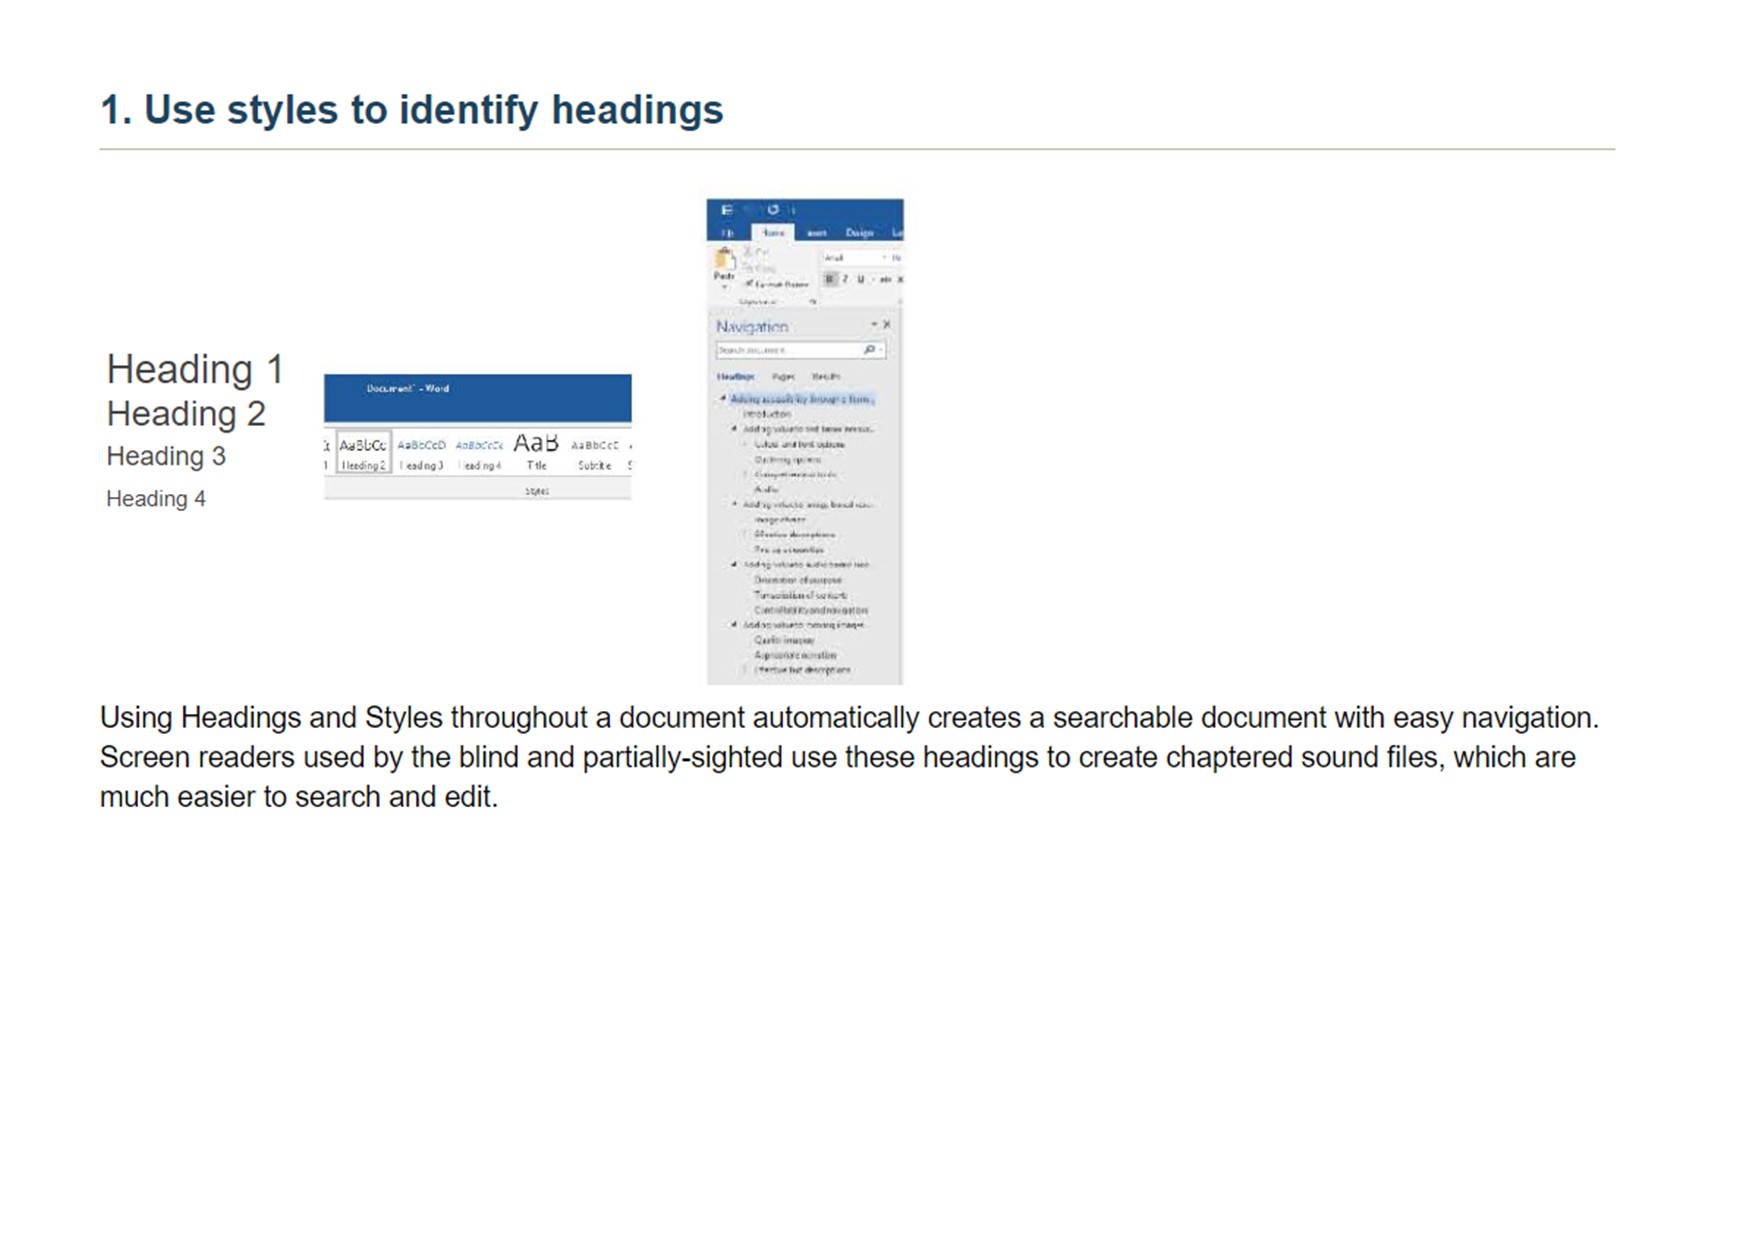 Alt text: 1. Use styles to identify headings
Using heading and styles throughout a document automatically creates a searchable document with easy navigation. Screen readers used by the Blind and partially-sighted use these headings to create chaptered sound files, which are much easier to search and edit.
 [
[
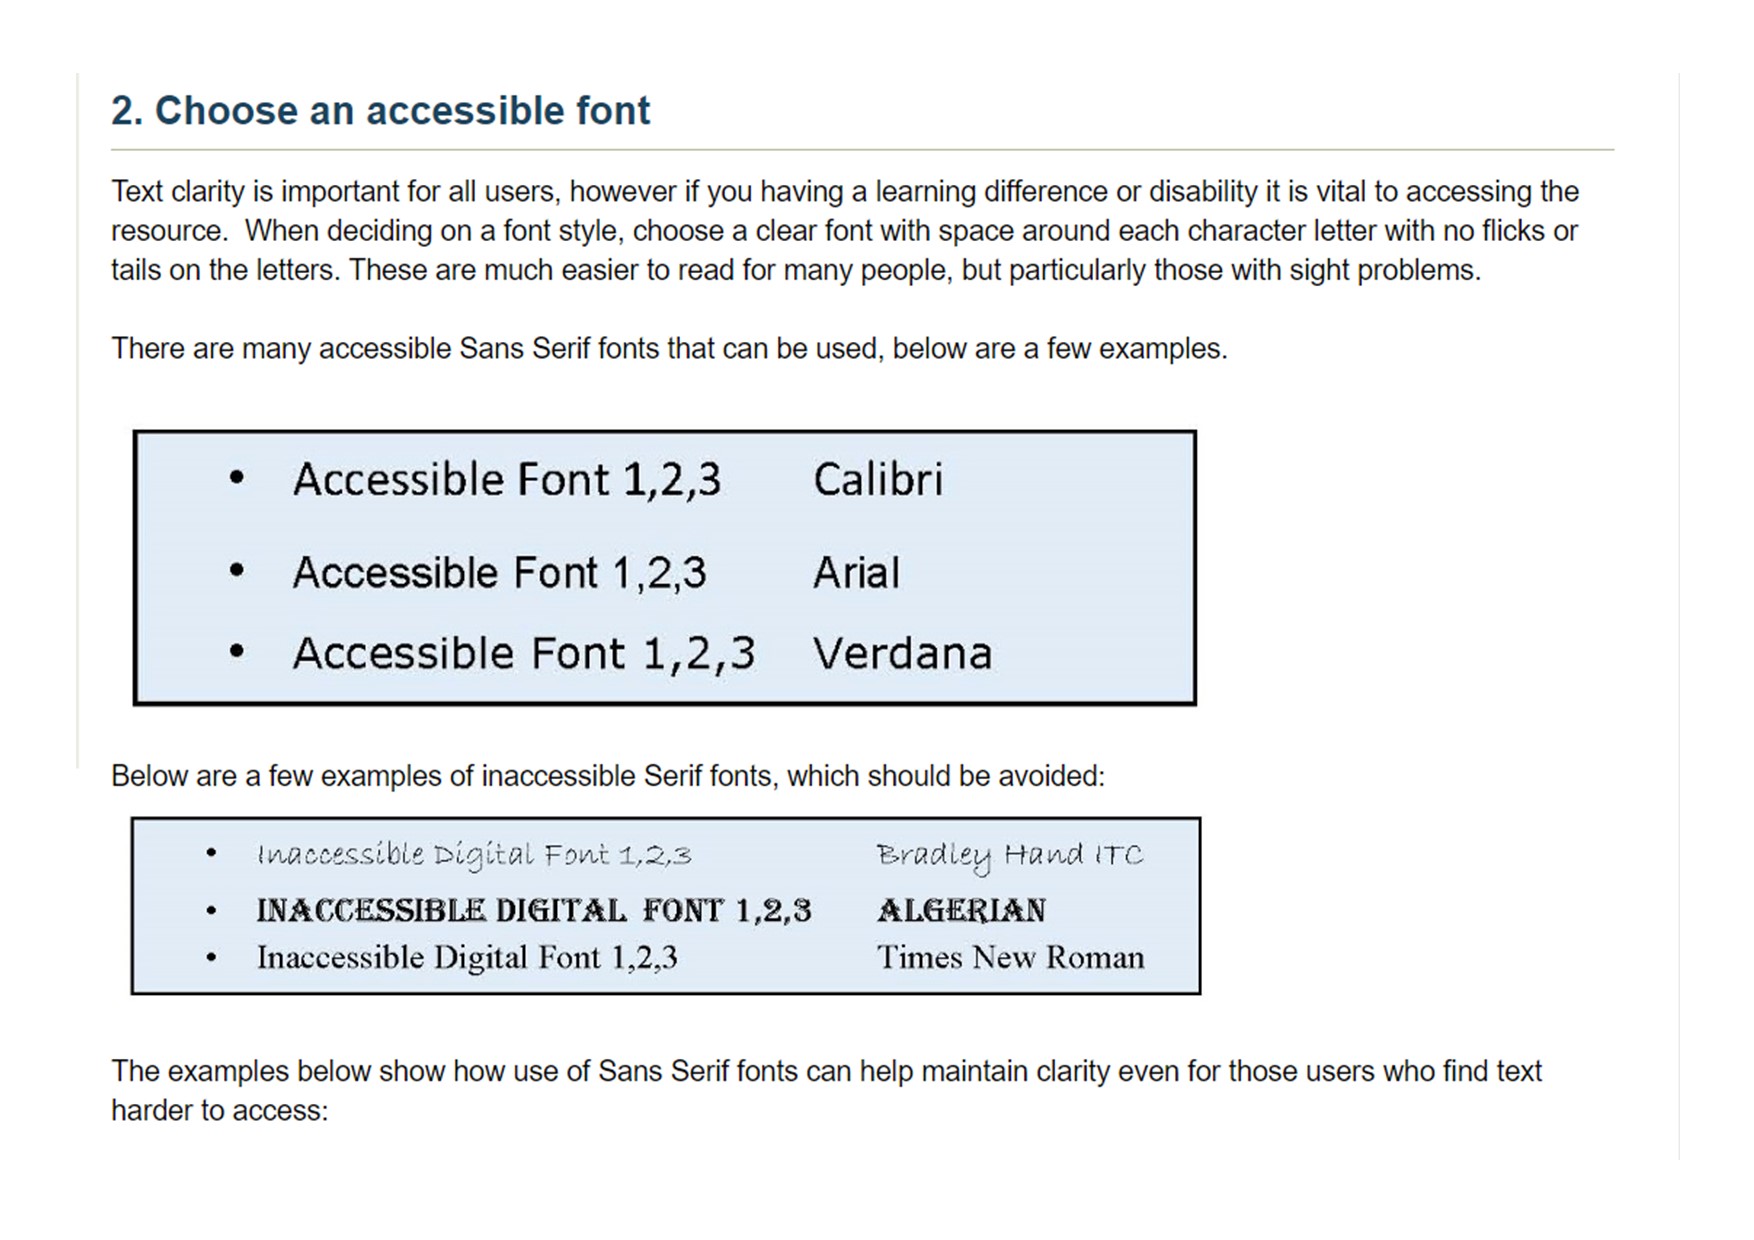
Alt text: 2. Choose an accessible font.
Text clarity is important for all users. However, if you have a learning difficulty or disability it is vital to accessing the resource. When deciding on a fint style, choose a clear font with space around each character letter with no flicks or tails on the letters. These are much easier to read for many people, but particularly those with sight problems.
There are mant accessible sans serif fonts that can be used. Below are a few examples: Calibri, Arial, Verdana.
Below are a few examples of inaccessible serif fonts which should be avoided: Bradlet Hand ITC, Algerian, Times New Roman.
 ](https://rebeltoolkit.extinctionrebellion.uk/uploads/images/gallery/2022-08/Making-documents-accessible-pg3.jpg)
[
](https://rebeltoolkit.extinctionrebellion.uk/uploads/images/gallery/2022-08/Making-documents-accessible-pg3.jpg)
[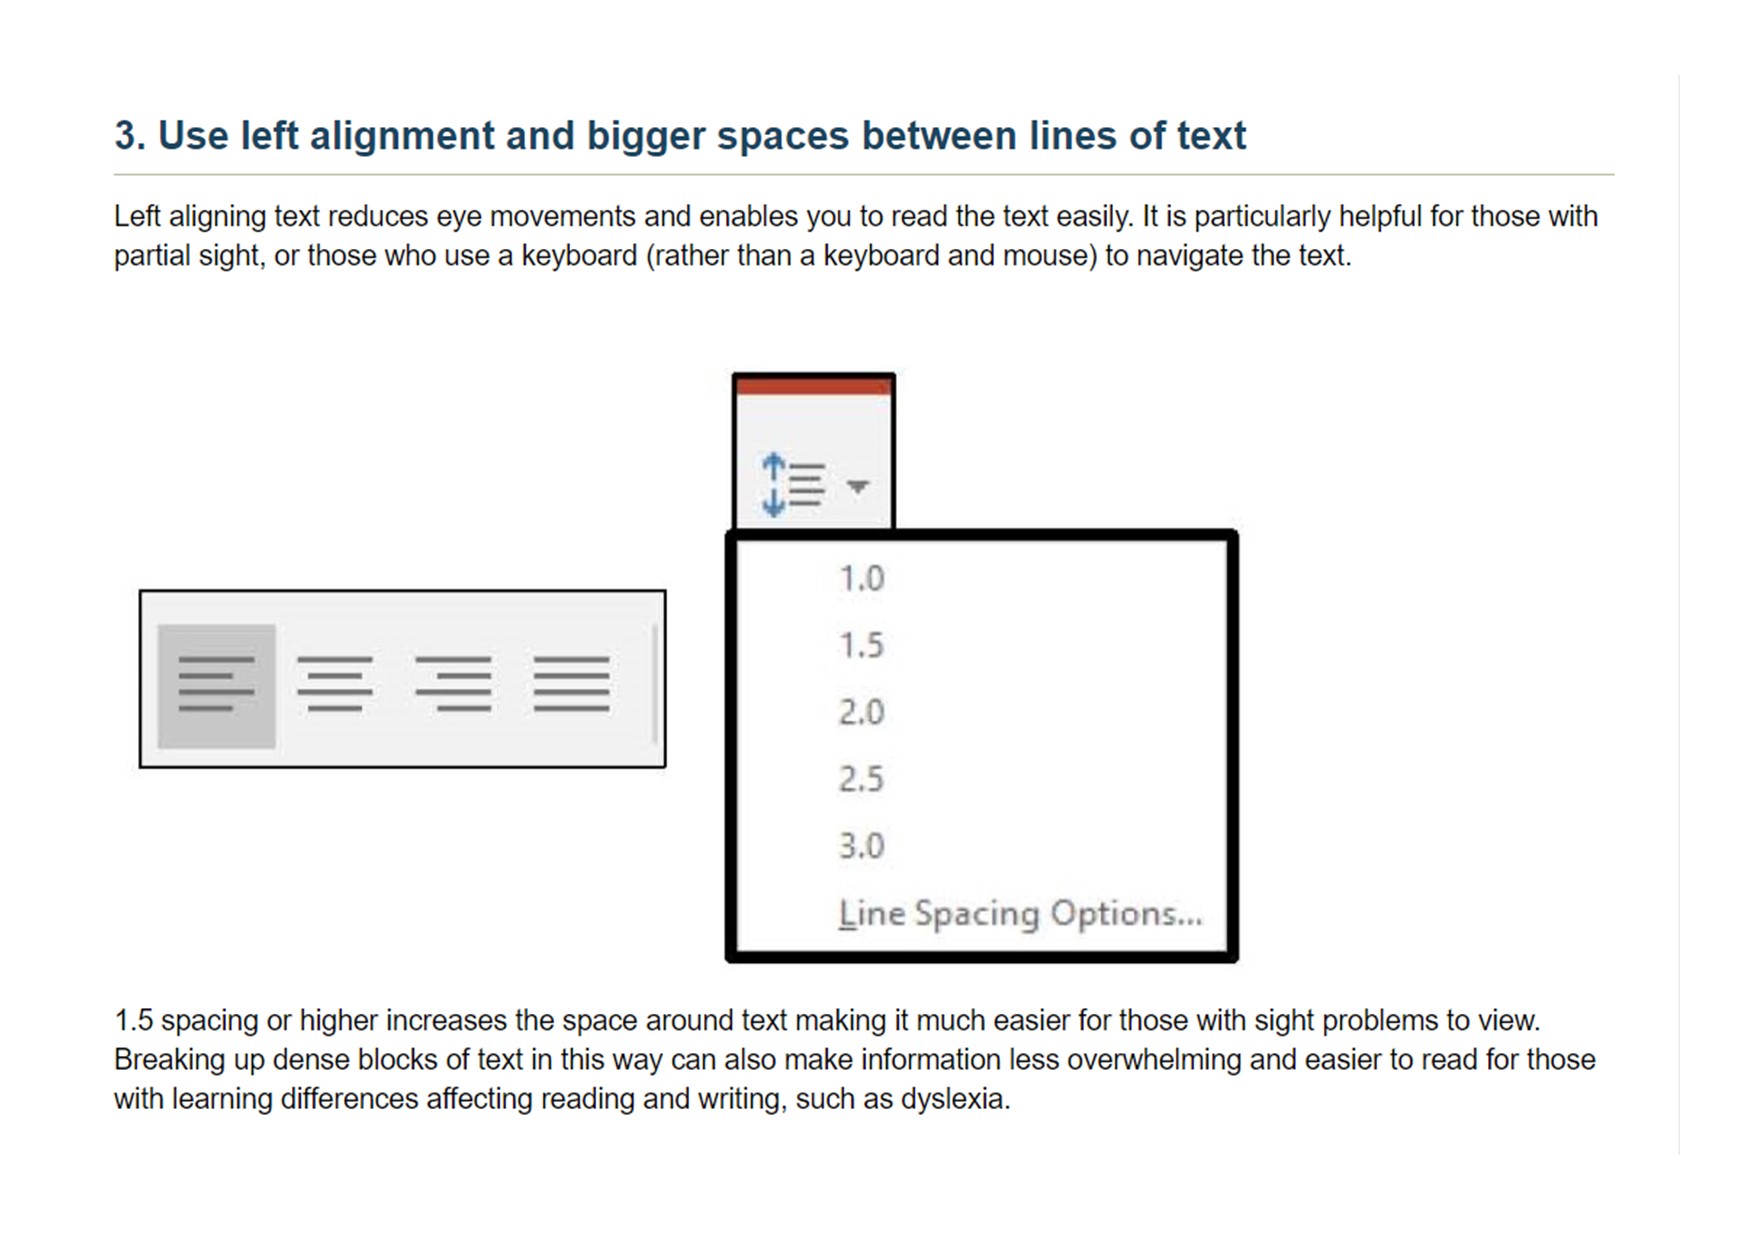 Alt text: 3. Use left alignment and bigger spaces between lines of text.
Left aligning text reduces eye movements and enables you to read the text easily. It is particularly helpful for those with partial sight or those who use a keyboard (rather than a keyboard and mouse) to navigate the text.
1.5 spacing or higher increases the space around text, making it much easier for those with sight problems to view. Breaking up dense blocks of text in this way can also make information less overwhelming and easier to read for those with learning differences affecting reading and writing, such as dyslexia.
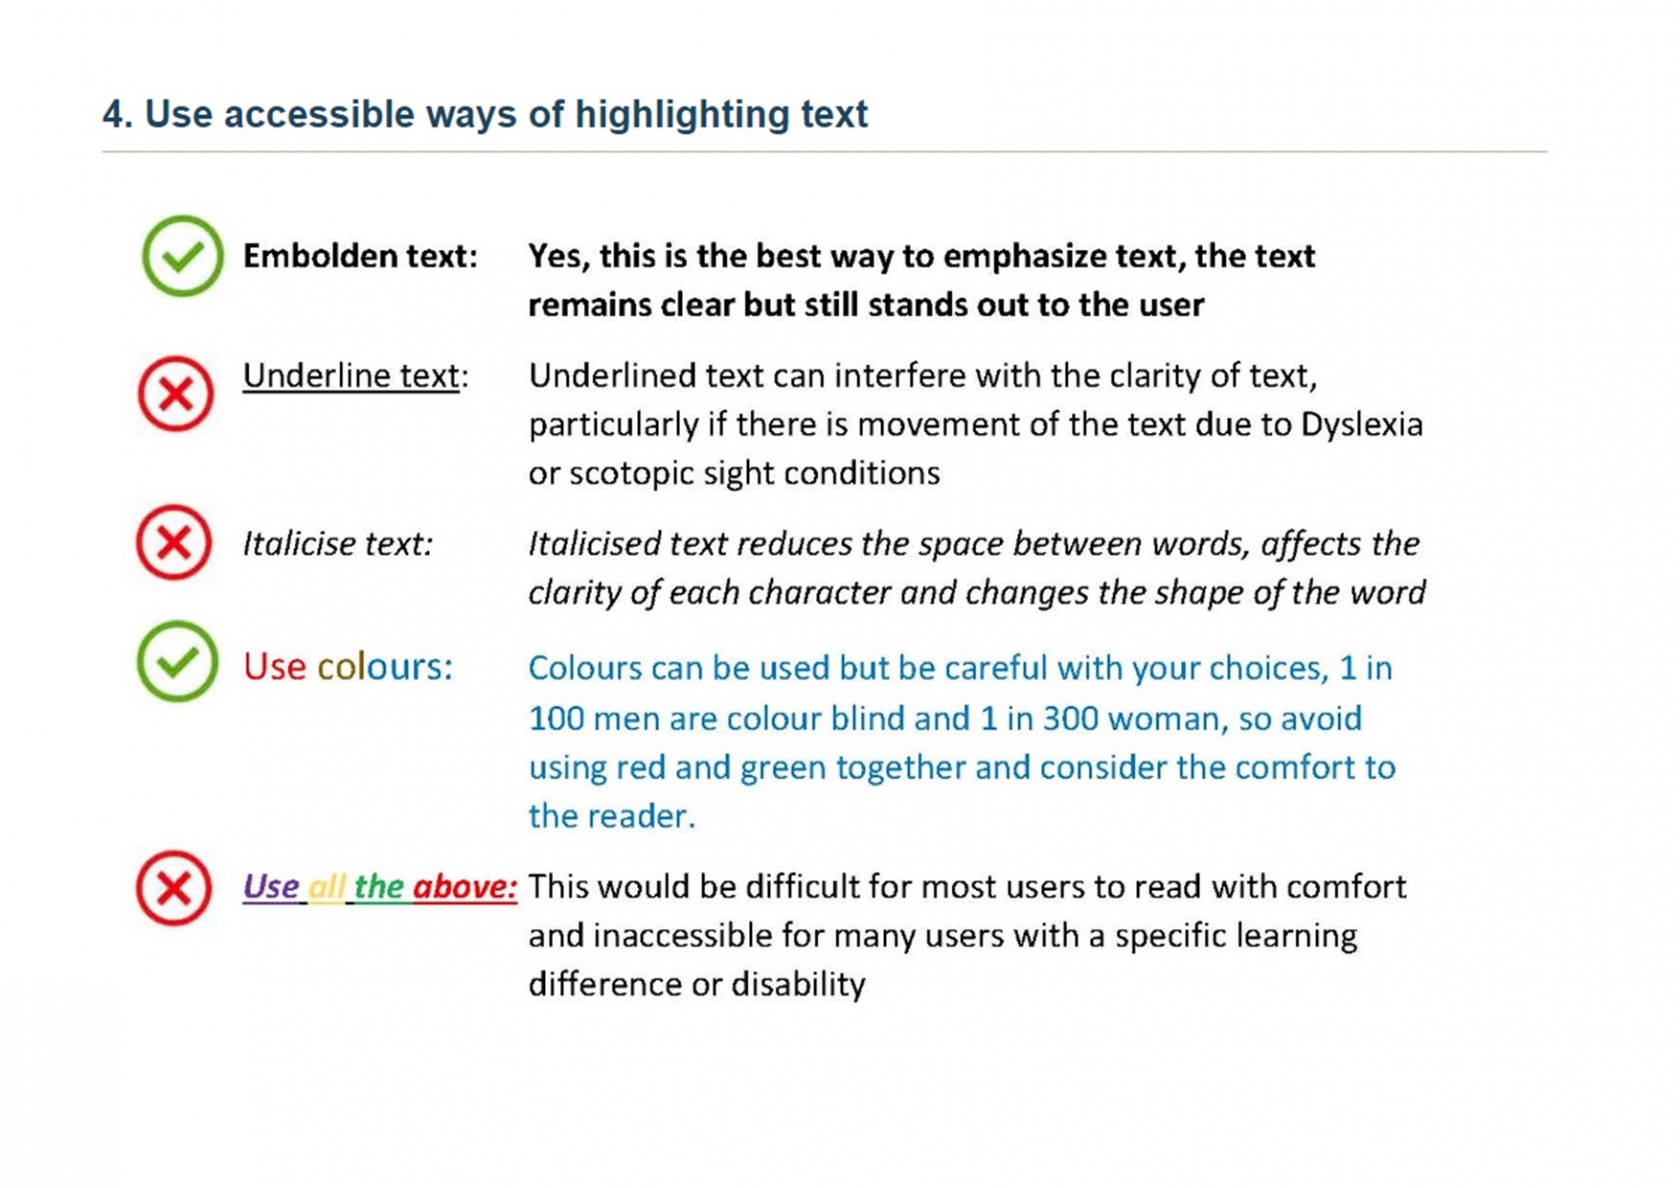
Alt text: 4. Use accessible ways of highlighting text.
Embolden text: Yes, this is the best way to empathize text. The text remains clear but still stands out to the user.
Underline text: Underlined text can interfere with the clarity of the text, particularly if there is a movement of the text due to dyslexia or scotopic sight conditions.
Italicise text: Italicised text reduces the space between words, affects the clarity of each character, and changes the shape of the words.
Use of colours: Colours can be use but be careful with your choices. Avoid using red and green together.
Use of all of the above: This would be difficult for most users to read with comfort and is inaccessible for many users with a specific learning difficulty or disability.
Dyslexia Friendly Style Guide
Written and compiled by Nicki - External Coordinator Disabled Rebels Network
If you're producing a written document with fancy backgrounds and tonnes of images, it's good practise to link a plain text version near the beginning of the document for visually impaired and dyslexic rebels.
Readable fonts
- Use sans serif fonts, such as Arial, as letters can appear less crowded.
- Alternatives include Verdana, Tahoma, Century Gothic, Trebuchet, Calibri, Open Sans.
- Font size should be 12-14 point or equivalent (e.g. 1-1.2em / 16-19 px). Some dyslexic readers may request a larger font.
- Larger inter-letter / character spacing (sometimes called tracking) improves readability, ideally around 35% of the average letter width. If letter spacing is excessive it can reduce readability.
- Inter-word spacing should be at least 3.5 times the inter-letter spacing.
- Larger line spacing improves readability and should be proportional to inter-word spacing; 1.5/150% is preferable.
- Avoid underlining and italics as this can make the text appear to run together and cause crowding. Use bold for emphasis.
- Avoid text in uppercase/capital letters and small caps, which can be less familiar to the reader and harder to read.
Headings and structure
Use headings and styles to create consistent structure to help people navigate through your content. In Word, you’ll find these tools in the ‘Home’ tab:
Headings
- Use a font size that is at least 20% larger than the normal text. If further emphasis is required, then use bold.
- Use formatting tools for text alignment, justification, indents, lists, line and paragraph spacing to support assistive technology users. In Word, you’ll find these tools in the ‘Layout’ tab:
- Add extra space around headings and between paragraphs.
- Ensure hyperlinks look different from headings and normal text
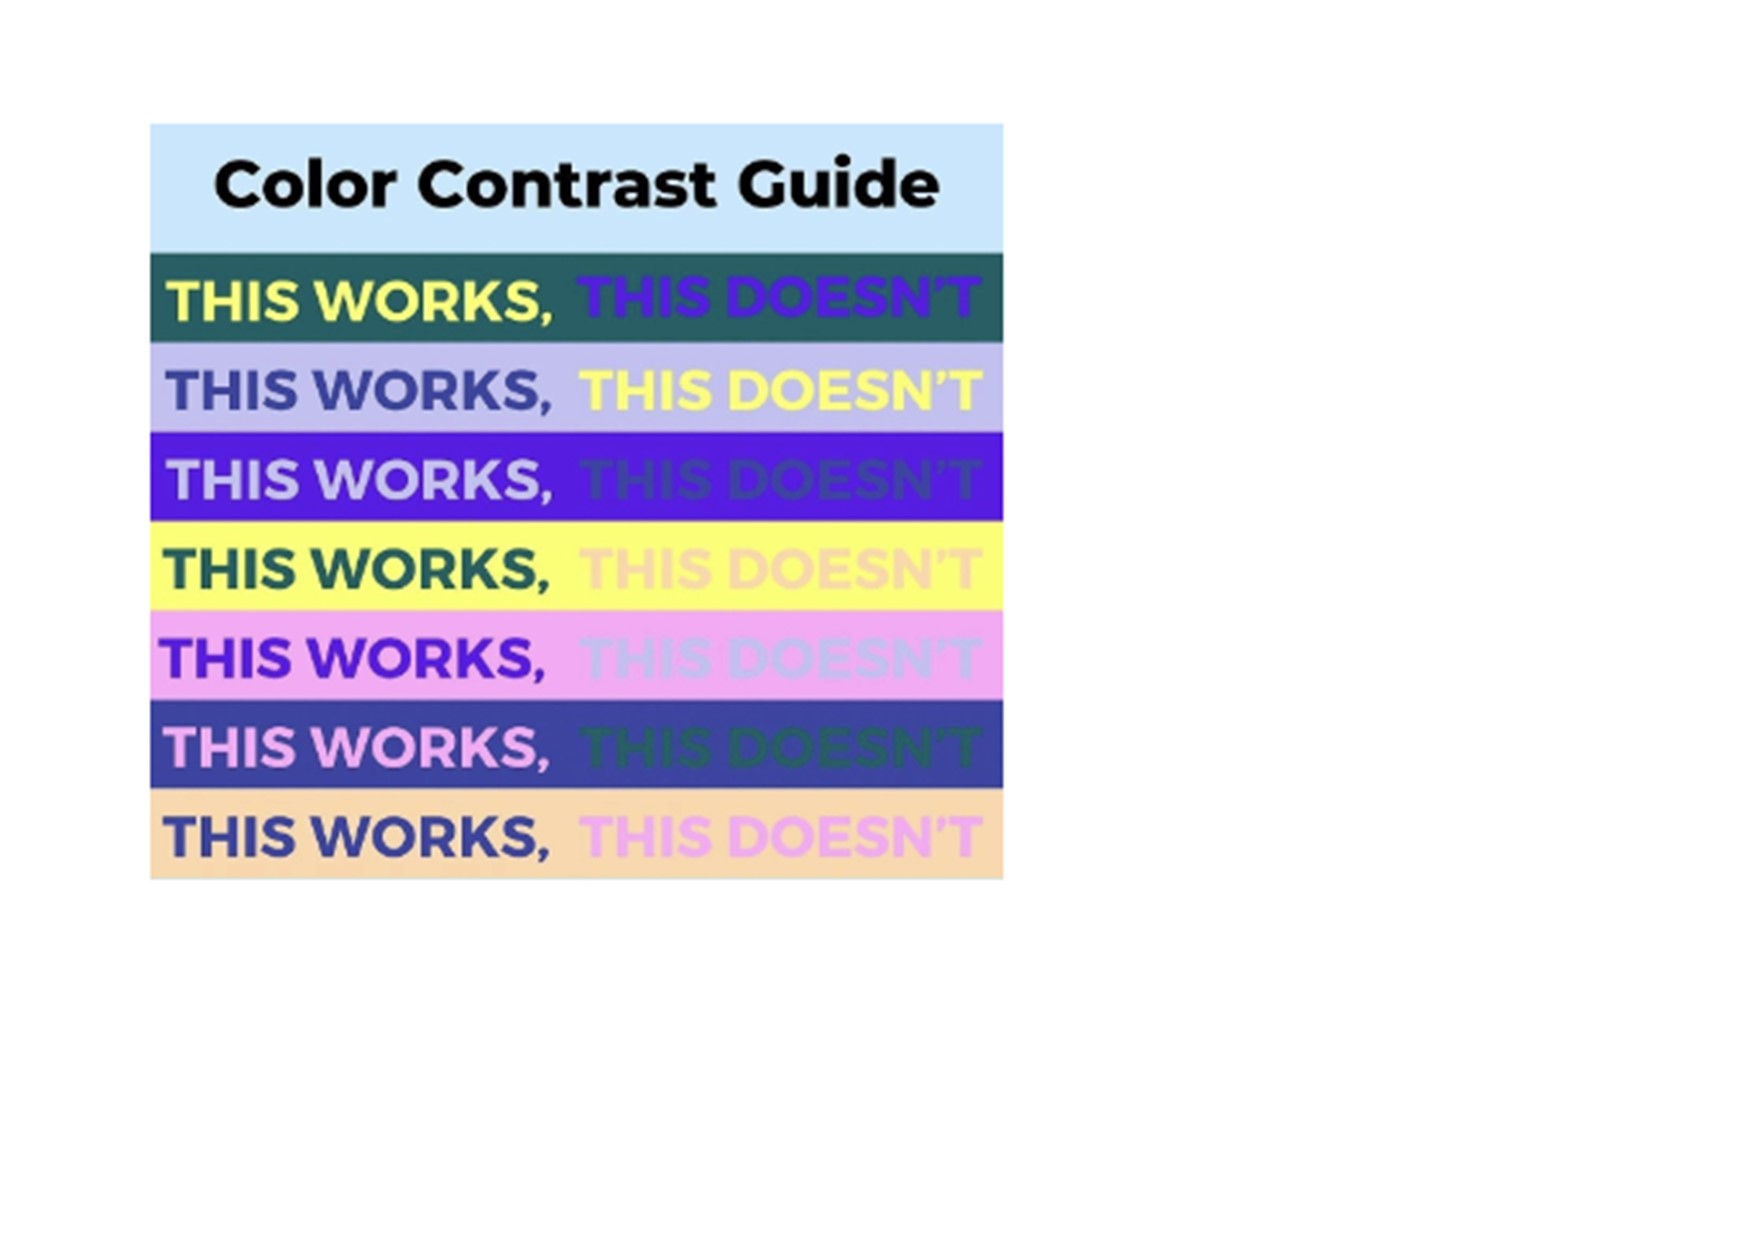
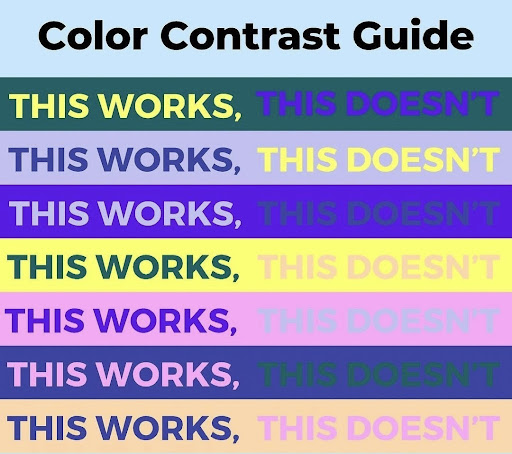
Colour
- Use single colour backgrounds. Avoid background patterns or pictures and distracting surrounds.
- Use sufficient contrast levels between background and text.
- Use dark coloured text on a light (not white) background.
- Avoid green and red/pink, as these colours are difficult for those who have colour vision deficiencies (colour blindness).
- Consider alternatives to white backgrounds for paper, computer and visual aids such as whiteboards. White can appear too dazzling. Use cream or a soft pastel colour. Some dyslexic people will have their own colour preference.
- When printing, use matt paper rather than gloss. Paper should be thick enough to prevent the other side showing through.

Layout
- Left align text, without justification.
- Avoid multiple columns (as used in newspapers).
- Lines should not be too long: 60 to 70 characters.
- Use white space to remove clutter near text and group related content.
- Break up the text with regular section headings in long documents and include a table of contents.
Writing Style
- Use active rather than passive voice.
- Be concise; avoid using long, dense paragraphs.
- Use short, simple sentences in a direct style.
- Use images to support text. Flow charts are ideal for explaining procedures. Pictograms and graphics can help to locate and support information in the text.
- Consider using bullet points and numbering rather than continuous prose.
- Give instructions clearly.
- Avoid double negatives.
- Avoid abbreviations where possible; always provide the expanded form when first used.
- Provide a glossary of abbreviations and jargon.
Dyslexia and Colour Blindness Friendly Style Guide
Readable fonts
- Use sans serif fonts, such as Arial as letters can appear less crowded. Alternatives include Verdana, Tahoma, Century Gothic, Trebuchet, Calibri, Open Sans.
- Font size should be 12-14 point or equivalent (e.g. 1-1.2em / 16-19 px). Some dyslexic readers may request a larger font.
- Larger inter-letter / character spacing (sometimes called tracking) improves readability, ideally around 35% of the average letter width. If letter spacing is excessive it can reduce readability.
- Inter-word spacing should be at least 3.5 times the inter-letter spacing.
- Larger line spacing improves readability and should be proportional to inter-word spacing; 1.5/150% is preferable.
- Avoid underlining and italics as this can make the text appear to run together and cause crowding. Use bold for emphasis.
- Avoid text in uppercase/capital letters and small caps, which can be less familiar to the reader and harder to read.
Headings and structure
Use headings and styles to create consistent structure to help people navigate through your content. In Word, you’ll find these tools in the ‘Home’ tab:
Headings
- Use a font size that is at least 20% larger than the normal text. If further emphasis is required, then use bold.
- Use formatting tools for text alignment, justification, indents, lists, line and paragraph spacing to support assistive technology users. In Word, you’ll find these tools in the ‘Layout’ tab:
- Add extra space around headings and between paragraphs.
- Ensure hyperlinks look different from headings and normal text
Colour
Colour blindness and web design info here
- Use single colour backgrounds. Avoid background patterns or pictures and distracting surrounds.
- Use sufficient contrast levels between background and text.
- Use dark coloured text on a light (not white) background.
- Avoid green and red/pink, as these colours are difficult for those who have colour vision deficiencies (colour blindness).
- Consider alternatives to white backgrounds for paper, computer and visual aids such as whiteboards. White can appear too dazzling. Use cream or a soft pastel colour. Some dyslexic people will have their own colour preference.
- When printing, use matt paper rather than gloss. Paper should be thick enough to prevent the other side showing through.
Layout
- Left align text, without justification.
- Avoid multiple columns (as used in newspapers).
- Lines should not be too long: 60 to 70 characters.
- Use white space to remove clutter near text and group related content.
- Break up the text with regular section headings in long documents and include a table of contents.
Writing Style
- Use active rather than passive voice.
- Be concise; avoid using long, dense paragraphs.
- Use short, simple sentences in a direct style.
- Use images to support text. Flow charts are ideal for explaining procedures. Pictograms and graphics can help to locate and support information in the text.
- Consider using bullet points and numbering rather than continuous prose.
- Give instructions clearly.
- Avoid double negatives.
- Avoid abbreviations where possible; always provide the expanded form when first used.
- Provide a glossary of abbreviations and jargon.