Old Hub Guides
Guides for the old Hub, for those who prefer to use it.
- Mattermost
- The Hub
- READ THIS FIRST
- Problems Getting on the Hub
- Compromised Account Procedure
- The XR Volunteer Agreement
- Inviting People to your Group
- Add and Edit Groups, Channels & Forums
- XR Groups, Roles and Mandates
- Role Tenure
- SOS Facilities on the Hub
- Setting up a new group on the Hub
- Deactivating or reactivating someone's account
- Placeholder Hub Groups
- What do DDAT do?
- Meeting Links - back up advice ...
Mattermost
Read this document to get familiar with Mattermost. It is used to communicate with XR groups as well as have 1-to-1 conversations.
If you need support with:
- How to use Mattermost
- Getting onto Mattermost
- Using the Hub (and XR's other services including the UK Cloud, UK Forums)
Please join one of the weekly sessions:
Mondays 17:30-18:00 (quick questions)
Thursdays 18:30-19:30 (longer training)
Join Zoom Meeting https://us02web.zoom.us/j/89528558324?pwd=R0JWZUovZk8zUy9RMXRjZGFGTmJaUT09
Meeting ID: 895 2855 8324 Passcode: 278766
First Steps
Watch this handy intro to Mattermost for an overview.
Getting Access
Before you can access Mattermost you first need to sign up to the XR UK Communications Hub. For instructions on how to do this, please read this guide.
Once you are on the Hub, there are a few ways to access Mattermost:
- Click on the Mattermost icon from the Comms Hub main page.
![]()
- Type https://organise.earth into your browser and hit Enter.
Once this is done, we recommend adding the page to your bookmarks/favourites so it's easier to find in future.
Note: Mattermost is also available as an app so you can install it to your smartphone or tablet. Please read this document or watch this video for instructions on how to do this.
Landing Page
When you have logged in to Mattermost, you will see a screen that looks a lot like this:
Note that we have added numbers to the screenshot and we will refer to this image throughout the document.
Basic Navigation
Watch this 5 minute video for an introduction on finding your way around Mattermost.
Teams
Teams in Mattermost are basically collections of Channels. Teams appear on the far left of your screen (1). Click to switch between them.
You will be added to the UK Team by default but your group might use other Teams — you will see these too.
Checking who else is in my Team
To see the other members of a Team, click on the Main Menu (3) and select View Members.
Joining other Teams
UK Circles with their own Team can be contacted via their Reception Channel in UK Team.
To join a public Team, click on the + sign next to your list of Teams (1) and then click "Browse Channels". This will bring up a list of all the other XR public Teams you are able to join, including for other countries. Click on one of the list of Teams to add yourself.
If you want to be added to a private Team (e.g. for your local group), you will need to speak to a Group Admin/Tech Champion who will be able to send you an invite.
Leaving a Team
To leave a Team, open the Main Menu (3), and then select the option Leave Team.
Note that once you have left a Team, if you want to re-join at any point, you will have to join (or be invited to) all the Channels you belong(ed) to previously.
Channels
Channels are just another name for group chats. Every local group/working group set up on the Hub will have several of these Channels that you will be added to if you are part of that group.
Note: For a walkthrough of Channels, you can watch the Finding and Joining Channels video (4 mins).
Type of Channels
![]() Most Channels are public, so anyone in the Team can join them. They have a picture of the globe next to them. Some Channels are private, by invitation only, and they have a padlock next to them.
Most Channels are public, so anyone in the Team can join them. They have a picture of the globe next to them. Some Channels are private, by invitation only, and they have a padlock next to them.
Joining Channels
To join a public Channel, either click in Find Channel and search, or click the + button to browse Channels on the left (4). This will bring up a list of all of the public Channels in your Team. Click on any of these in the list to add yourself.
To join a private Channel, you should ask someone already in that Channel to add you. You could also post a message in that group's reception Channel asking to be added.
Leaving a Channel
To leave a Channel, click its name at the top of the screen (not where it appears lower down on the left) and then select the option Leave Channel. Alternatively, if you hover over the Channel lower down on the left, three dots will appear next to it — from that menu, select Leave Channel.
Muting Channels
You can mute Channels if you want to stop receiving notifications from it but don't want to leave. To do this, click the Channel heading (at the top of the screen), or hover over the Channel lower down on the left and click the three dots, and then click Mute Channel. You can also set whether you want to be notified if someone uses @all or @channel in Settings (11).
Default Channels
Every Team has two default Channels that you will be added to when you are added to the team:
-
Town Square: This is the communal area in each team that should be used for announcements and general XR-related discussions.
-
Off Topic: This is a place where team members can discuss things that aren't directly related to the business of the team (e.g. social activities).
Very Important: Please do not rename these default Channels as it will cause a lot of confusion.
Note: It is not possible to leave the Town Square Channel. If you want to stop receiving notifications, you should mute the Channel instead.
Sorting Channels
If you hover over the Channels header on the lower left (5), by clicking on the three dots that then appear, you can sort your Channels in one of three ways:
- Alphabetically
- by Recent Activity - the most recent will be at the top
- Manually – you can drag the Channels up and down into the order you prefer
In addition, you can Create New Category which enables you to sort Channels into groups that suit you, e.g. relating to particular projects or areas of interest. Once you have created your categories, you can drag and drop Channels between them.
Contacting other groups
All XR UK groups on Mattermost have a public 'Reception' Channel in the UK Team, and their members will be added to them by default (you will probably be in some yourself). This lets rebels from other groups find and speak to them.
To join someone else's reception Channel, go to the UK Team, click Find Channel or + (4), to search or browse for the Channel you want to join and then click Join. The Channel will then appear in your Channels list.
Creating Channels
Important: You should not create public Channels from inside Mattermost. Instead, please get your Group Admin/Tech Champion to do this for you using the Hub.
To create a private Channel:
- Click on the + sign next to the Main Menu (3)
- Select 'Create New Channel'
- Enter a name for the new Channel (and optional Purpose and Header), ensuring that 'Private' is selected
- Click Create Channel
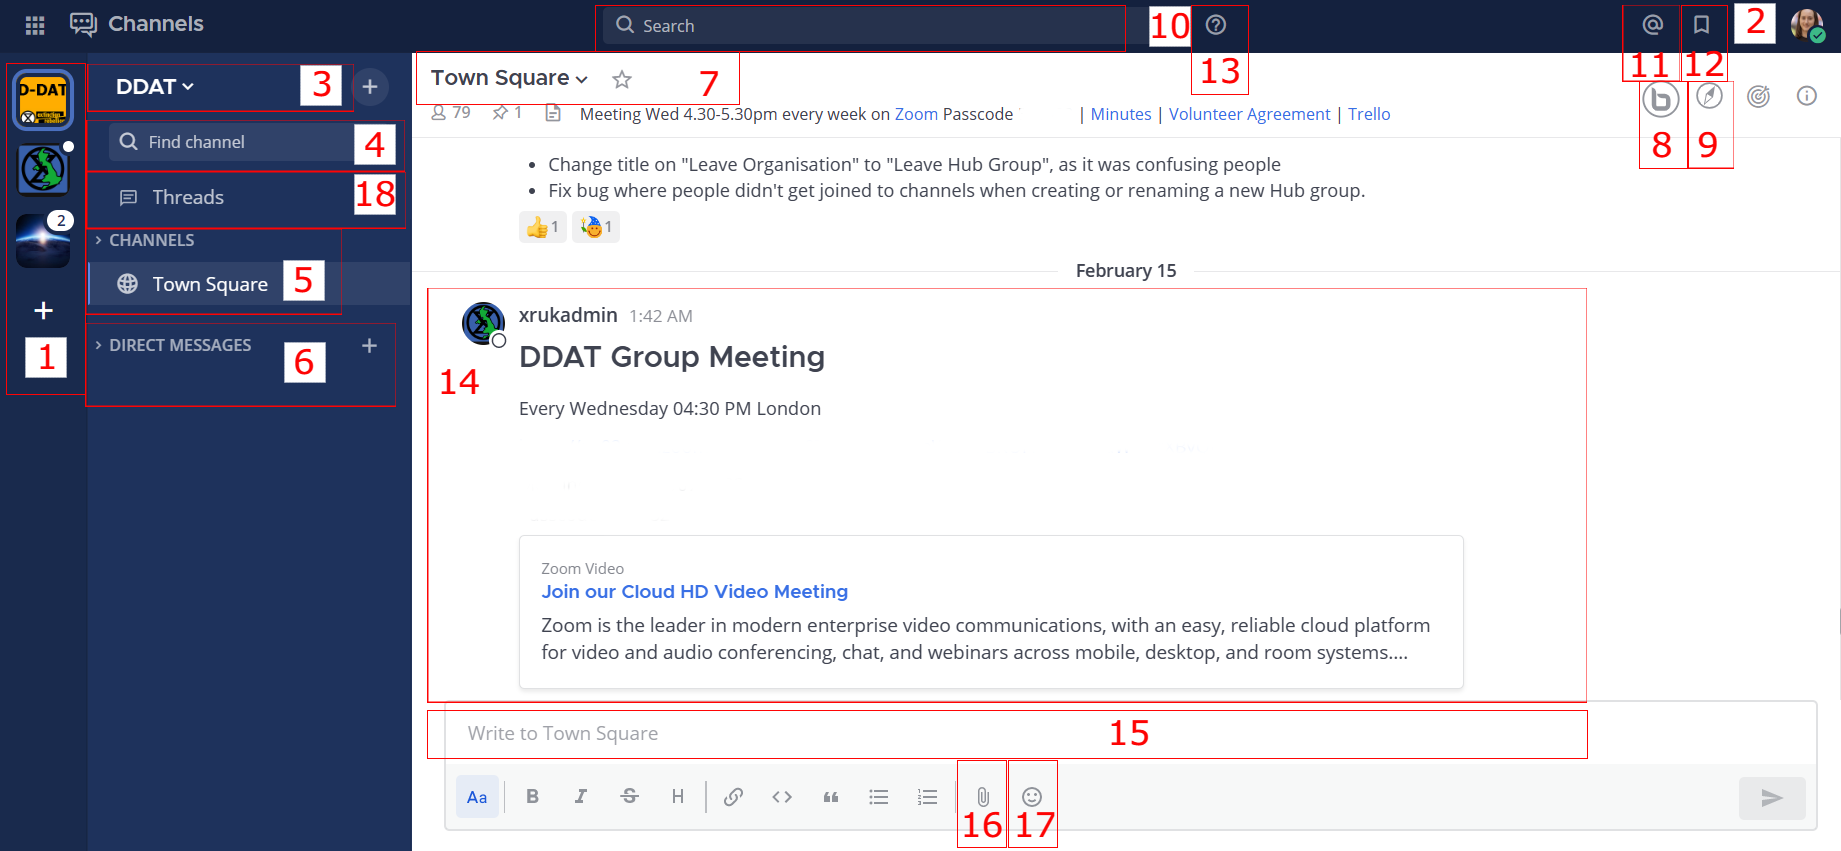
Channel headers (7)
Underneath the Channel name at the top of the page is the Channel header. It is a useful place to put information about what the Channel is for and to store some useful links (e.g. your group's Forum or your regular Zoom meetings).
To see all the info, click on the Channel name:
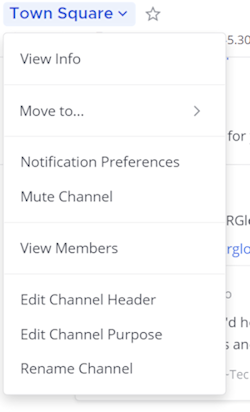
then click on View Info.
If you want to change what is written in the header, click on Edit Channel Header. If you want to add links to this section, the process is the same as here. Please confirm with your Group Admin before making any change to the Header.
Sending Messages (15)
You can write messages by typing in the box at the bottom of the screen. To send them hit Enter. The message will be sent to the Channel or Direct Message you are currently in.
Alerting people to messages
If you want a particular person to read a message you are sending, you can tag them by writing '@' followed by their username (e.g. @xrukadmin). This will send them a notification.
Important: You can also use @all or @channel to notify everyone in a Channel but please use this responsibly as for larger groups it is rarely appropriate and may annoy people.
Sending Direct Messages (6)
To send someone a Direct Message (instead of posting in a Channel):
- Click the + sign to the right of the heading DIRECT MESSAGES to the left of the screen (6)
- Select the users you want to message (up to a maximum of 6)
- Write and send your message
All of the Direct Message conversations that you have had will appear below the DIRECT MESSAGES heading to make it easier to contact them again. Next to each name, an icon shows whether they are online or not. Clicking on a username will display your Direct Message history with that user. Users you do not need to contact regularly can be removed from this list by pressing the cross to the right of their name.
Sorting your Direct Messages
Much like with Channels, Direct Messages can be sorted alphabetically or most recent first. You can also choose how many to show (all, 10, 15...). To change these settings hover over DIRECT MESSAGES then click the three dots to the right of it.
Replying to messages
It is possible to reply to messages posted in Channels or Direct Messages using 'threads'. These are helpful if you are having multiple conversations at once so people don't get confused about which messages are related to which discussion. To reply to a message in a thread click on the Reply icon:

You can access your threaded messages on the Mattermost homepage (18). Clicking 'Threads' will bring up all threads you are participating in, and you can post any replies or catch up on messages more easily.
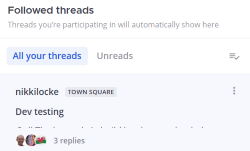
Note: For a full explanation, watch the threading messages video (5 mins).
Reacting to messages
To add a reaction (e.g. a thumbs up or heart icon) to a message click on the Add Reaction icon:

To post a reaction to a message, click on the Emoticon icon on the bottom right-hand side (17).
![]()
Searching for messages (10)
Use the search box to find messages and replies that match the search terms entered. All Channels that you are a member of in the current Team are searched.
Note: For a full explanation, watch the Searching for messages video (3 mins).
Saving messages
You can click on the 'save' icon (like a bookmark) next to a message to save it for later, then bring up all your saved messages by clicking on the 'Saved posts' icon at the top right of the screen (12).
Note: For a full explanation, watch the Saving messages video (3 mins).
Adding links
To add a picture, click on the paperclip icon on the bottom right of the screen (16). To add a nicely formatted link to your message, write the text you want to show in square brackets immediately followed by the link URL in round brackets. For example:
Check out this fantastic [guide to Mattermost](https://rebeltoolkit.extinctionrebellion.uk/link/394#bkmrk-page-title)!
will look like:
Check out this fantastic guide to Mattermost!
when sent.
Other formatting tips
Here are a few simple tips on formatting messages:
- **bold** displays as bold
- _italic_ displays as italic
- ~~strikethrough~~ displays as
strikethrough - ```typewriter style``` displays as
typewriter stye - >quote displays as
quote
Copying messages
It can be difficult to copy messages in order to share them in multiple Channels without losing the formatting and any links. Currently, the only way this is to:
- Open Settings (underneath 2)
- On the sidebar, click Advanced
- Set Enable Post Formatting to Off
- Copy and paste the messages that you want to share
- Return to Account Settings -> Advanced and set Enable Post Formatting back to On
Video Calls (8) 
If you are in a Direct Message chat, clicking the 'Big Blue Button' will start a video call between you and the person (or people) in that chat; if you are in a Channel, it will open a video chat link for anyone in that Channel to join, using Big Blue Button. This posts a link for everyone to click on to join the call.
Rebel Compass (9)
Rebel Compass is a trusted guide through XR Global Support's digital services and infrastructure. Clicking this icon will take you to a resource page including plaforms, videos, documents, trainings, events, etc.
Notification settings
Note: For a walkthrough of all the content in this section, watch the Notifications (5 mins) and Acccount Settings (4 mins) videos.
So that you don't miss any important messages, it's strongly recommended that you adjust your notification settings. This will also make sure you aren't overwhelmed by huge numbers of irrelevant notifications.
To modify the notification settings in Mattermost, open Settings (underneath 2), which brings up the following:
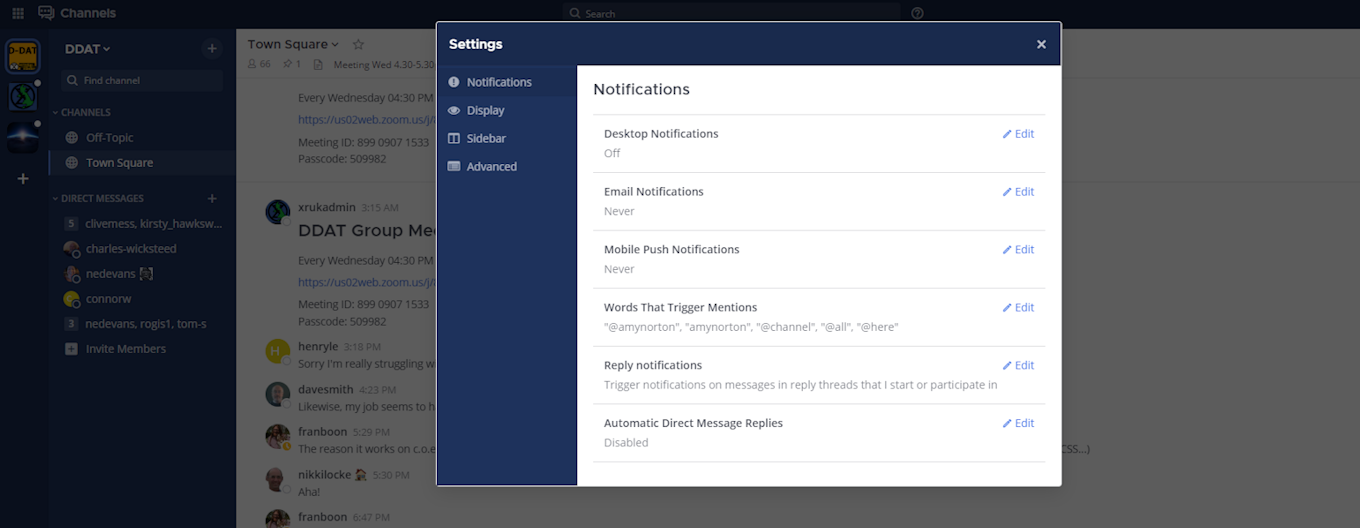
Notification settings can be changed by clicking on the Notifications tab.
Setting desktop/mobile notifications
To modify these settings, go to the notification settings tab, as shown above, and click Edit in the sections labelled Desktop Notifications or Mobile Push Notifications.
We recommend that Send desktop notifications (under Desktop Notifications) and Send mobile push notifications (under Mobile Push Notifications) are set to either For all activity or For mentions and direct messages.
Enabling email notifications
You can enable email notifications of Mattermost messages. To do this:
- Open Settings
- In Email Notifications, click Edit
- Under Send email notifications, select Immediately
- Click Save
Setting notifications for reply threads
To be notified of all messages that happen in a thread you are participating in, you should:
- Open Settings
- In Reply notifications, click Edit
- Select Trigger notifications on messages in reply threads that I start or participate in
- Click Save
Personalising your mentions
It is possible to be notified every time a certain word is mentioned in one of your Channels. By default, this word will just be your username including the @ symbol (e.g. @myusername), but you can add extra words if you like. For example, if you do a lot of work on the Rebel Toolkit you may want to add toolkit to your list of words that trigger mentions.
To set this up:
- Open Settings
- Next to Words That Trigger Mentions click Edit
- Tick any of the tickboxes that apply
- Add any additional keywords (e.g.
toolkit) in the space below the tickboxes - Click Save
Seeing recent mentions (11)
Click on the top right @ sign to see posts where you have been recently mentioned.
Grouping unread messages together
You can set Mattermost to collect unread messages at the top of the sidebar so they are easier to find. To do this:
- Open Settings
- Click on the Sidebar tab
- Click Edit in Group unread channels separately
- Select On
- Click Save
Setting up 'out-of-office' messages
If you will not be reachable on Mattermost for a while and would like to set an automatic reply to any messages received in that time, you should:
- Open Settings
- Under Automatic Direct Message Replies click Edit
- Select Enabled and write your message
- Click Save
You can follow the same process to disable the automatic messages when you return.
Getting rid of annoying messages from 'System'
In your Channels, you will probably see lots of messages from 'System' notifying that people have been added to and have left the Channel. You can turn these off by:
- Open Settings
- In the sidebar, Click Advanced
- Click Edit in Enable Join/Leave Messages
- Click Off and then Save
Further information
Setting your status
To change your status (which can be Online, Away, Do Not Disturb and Offline):
- Click on your icon at the top left of the screen (2)
- Select your preferred option
Adding a profile picture
To add a profile picture to your Mattermost account:
- Click on your icon (2)
- Click Profile
- Click Edit next to Profile Picture
- Upload an image of your choice
- Click Save
Logging out
To log out of Mattermost, click on your icon (2) and then click Log Out.
Other places to find information about Mattermost
There is a Help button (underneath 17) at the bottom right of the screen.
Here is useful list of other resources about Mattermost that you might find useful:
-
This is a 16 minute video that talks you through signing up on Mattermost and explaining the basics of how to use it.
-
This is the official guide to Mattermost. It goes into a lot more detail than this guide, but it is more complicated and not all of it is relevant to XR.
The Hub
What is the Hub?
The Hub is the tool XR UK uses to connect lots of the programs (e.g. Mattermost and UK Forums) that rebels use to organise online.
This is the guide to the old Hub which is obsolete. Try the new Hub guide.
Why Do We Need This?
The Hub does some really important things:
- It creates accounts for rebels on the other tools (e.g. Mattermost) so you can sign in with the same username and password everywhere.
- It automatically adds rebels to all the channels and forums for all of the XR groups they are a member of.
- It can temporarily suspend the accounts of rebels who are arrested so the authorities cannot get access even if they take the rebel's phone or computer.
The Hub also keeps track of the structure of all the XR groups that have joined (see below). This is extremely useful because it makes it really easy to find the right people to talk to.
How Do I Join the Hub?
To join the Hub, you need to follow the steps described here.
Using the Hub
Home page
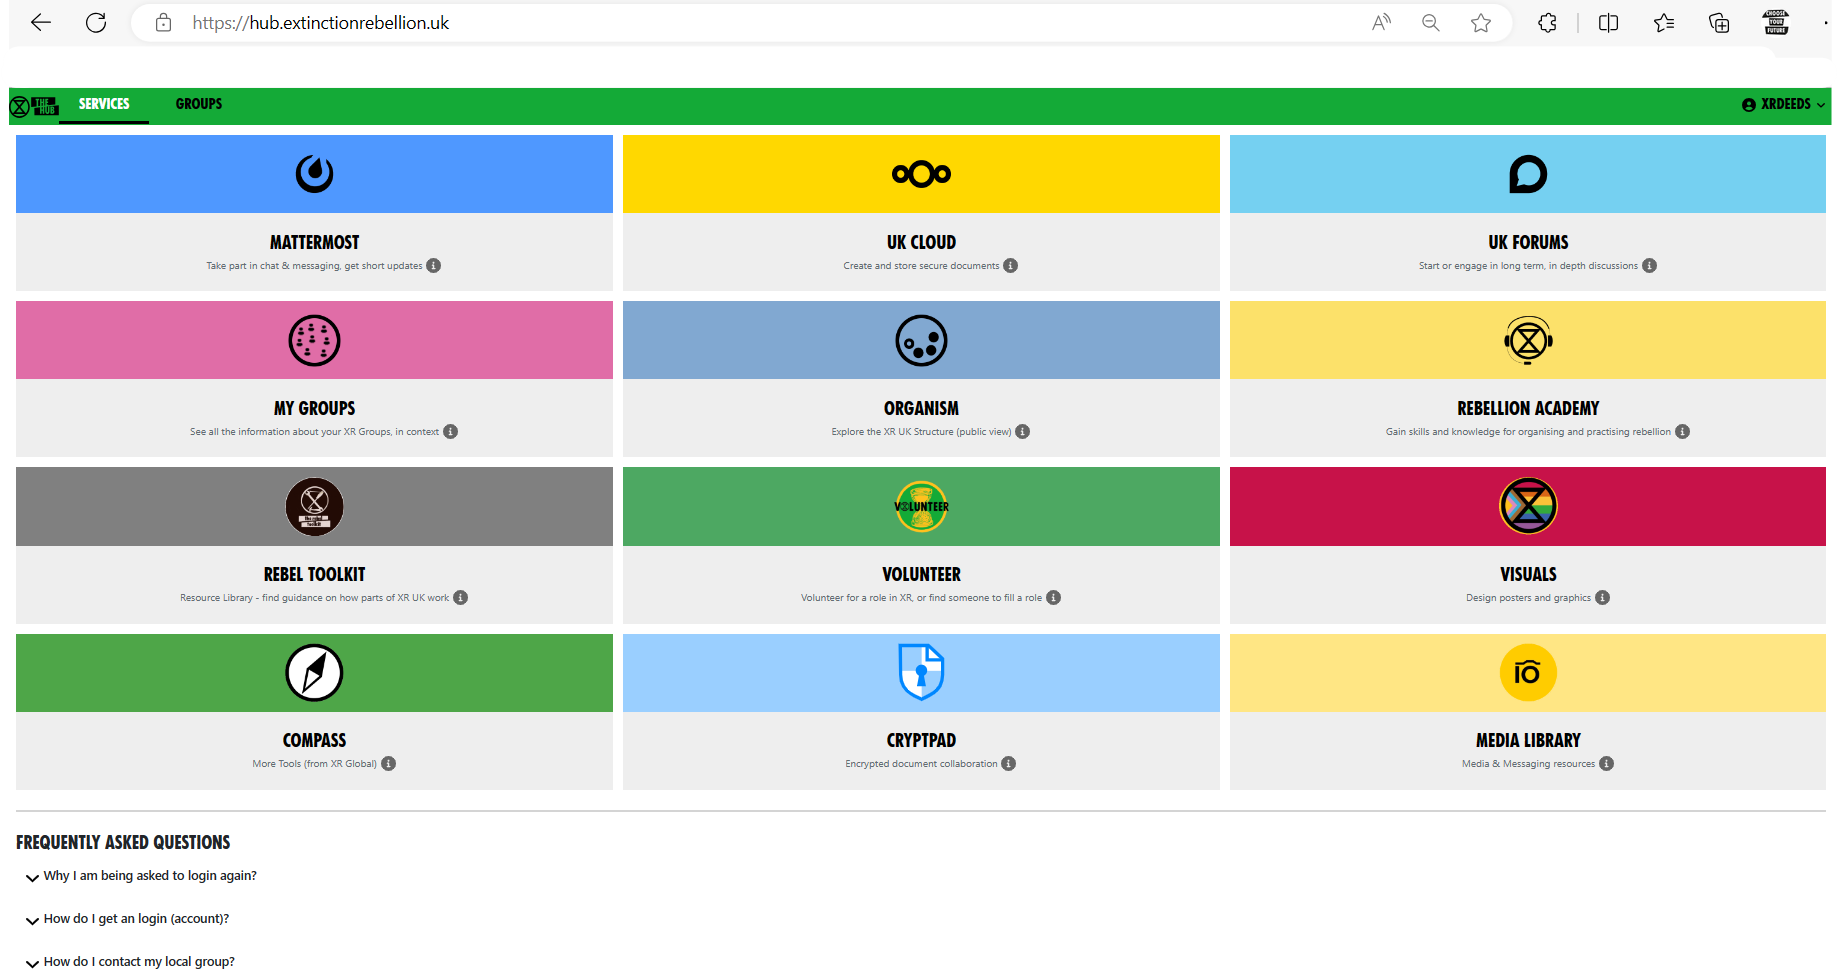
This is the Hub home page. Here you can see links to many other XR services. Click on any of the icons to go to them. If your browser hasn't got settings to prevent "pop-ups", you can check the "open the service in a new tab" box to have a separate tab for each service. Group Admins will have extra options on this page, e.g. to invite other people to the Hub and the new services.
Secret Codeword
Click this icon to set a unique secret codeword to identify you. Then, if you want to communicate with XR (e.g. Arrestee Support) without revealing who you are to anyone listening, you can use the code word. They can look it up on the Hub, and know who you are.
Only Arrestee Support, Hub Admins, and your Group Admins can see your codeword.
If you want to change your code word later, it is in Admin/My Settings.
Joining New XR Groups
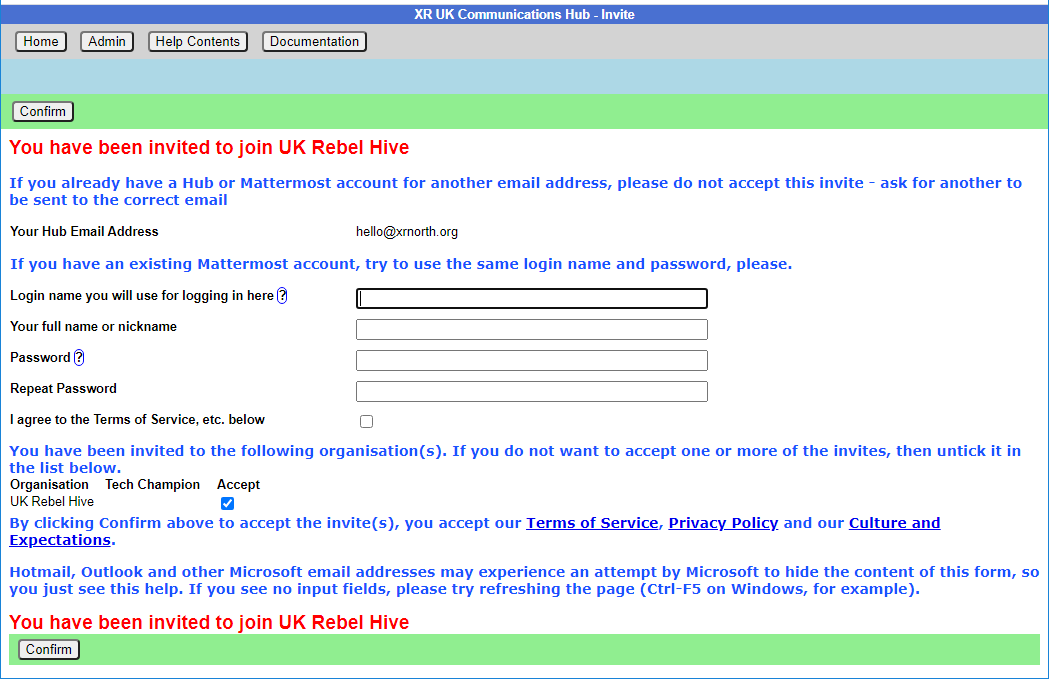
If you are already on the Hub and get invited to join a new group you should get sent an email (check your spam folder if you can't find it). If you click on the link in the email it will take you to a page that looks something like this (B this is now out of date, so wath this space for updated images):
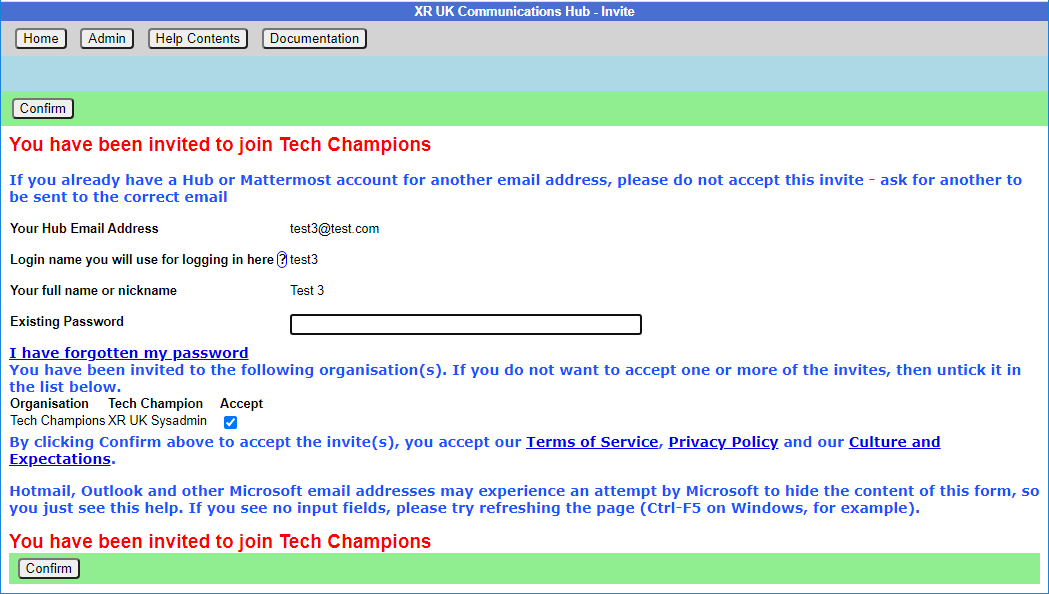
Simply enter your password and click Confirm. You will be automatically added to the group including all of its channels and forums.
It is also possible to accept your invites by clicking on Accept My Invites from the Hub home page.
My XR Groups
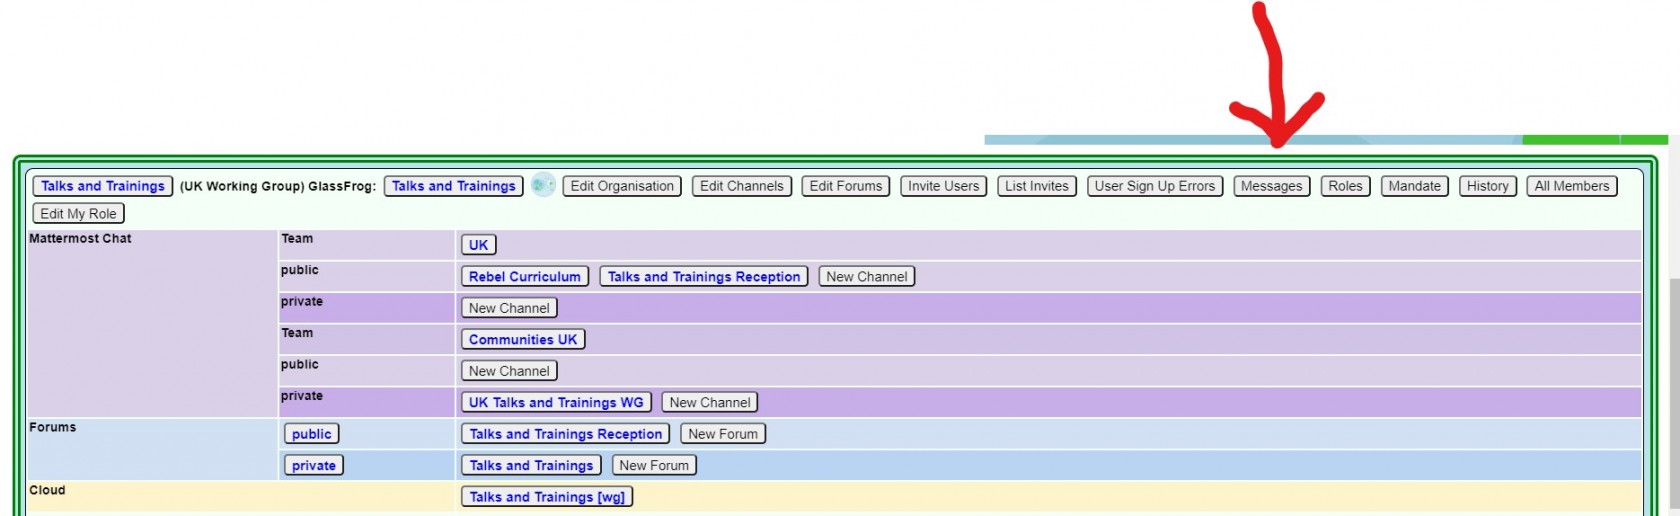
This shows a list of XR Groups you are in. There are menu options to see all other lists of groups (e.g. all UK Working Groups). Click on a group to show the group in context.
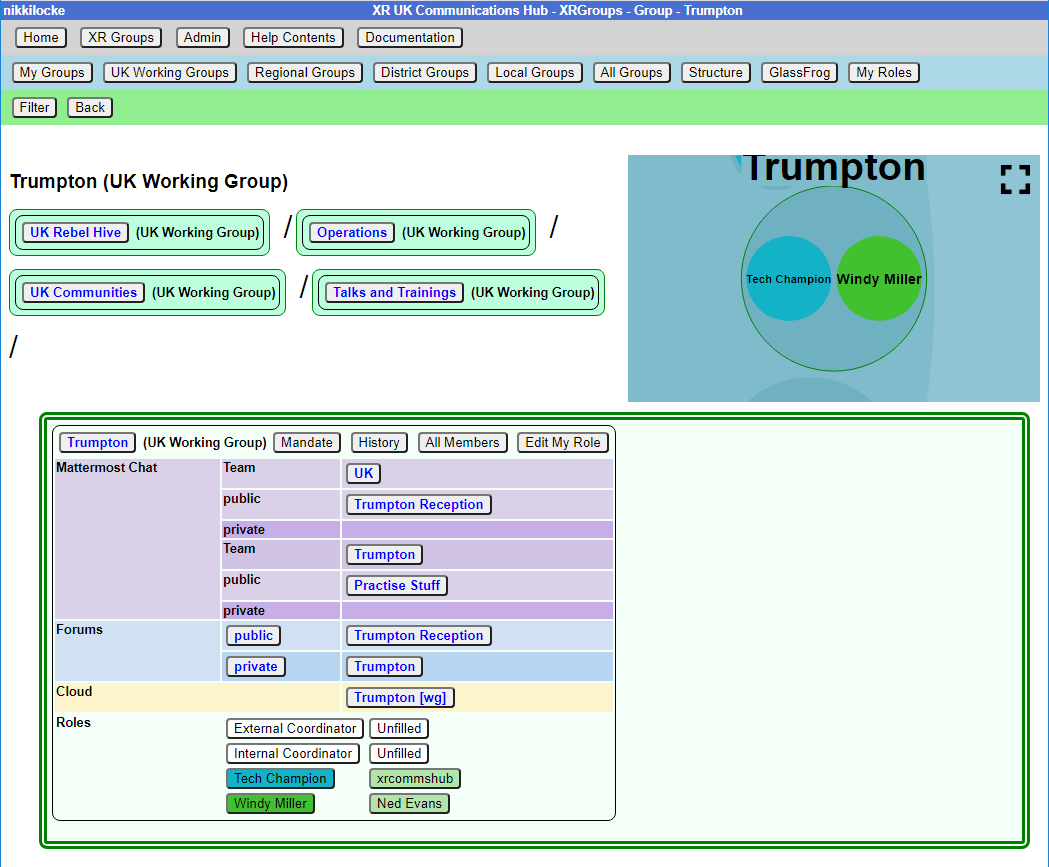
This screen is showing the Trumpton UK Working Group (a dummy group we use for training). It also shows the parent groups (Talks and Trainings and its parents), and any child groups.
To find your way about the structure, you can click on any group name on the screen to show that group, with its parent and children. Or you can click on a group in the Hub Circles graphic display at the top right. This has a full screen button to make it larger, and easier to navigate.
If you are using the Hub Circles display, you can click the Filter button to hide some of the detail, to make the diagram less busy. If you set a filter, it is remembered, and used every time you open this view.
The current group shows what chat teams and channels they use on Mattermost, what forums they have on UK Forums, what their group name is in the UK Cloud, and people filling named roles in the organisation. Those items you have permission to join are shown as clickable links. For example:
-
To chat to Trumpton Group, click on one of the public channels in the UK Team to open Mattermost in that channel (in another tab).
-
To take part in the forum discussion in Trumpton Reception, click on it. If you are not already in the Trumpton public Forum Group, a screen will give you the option to join, before taking you into the forum (in another tab).
-
To send a personal message to one of the role holders in Trumpton, click on their name in the Roles area, and Mattermost will open in another window with a private message open to them.
You can also see the Mandate of the group (Mandate button), or of each role in the group (click the role). Your Group Admins can edit them.
If you are a group member, there is a History button which shows you any changes which have been made to the group or roles within it.
Note: Group Admins will have extra options on this screen, e.g. to invite other people, and create or edit channels, forums and group information.
If you are a member of the group, you will also see a link to see a list of all the other members, and one to edit your role in the group:
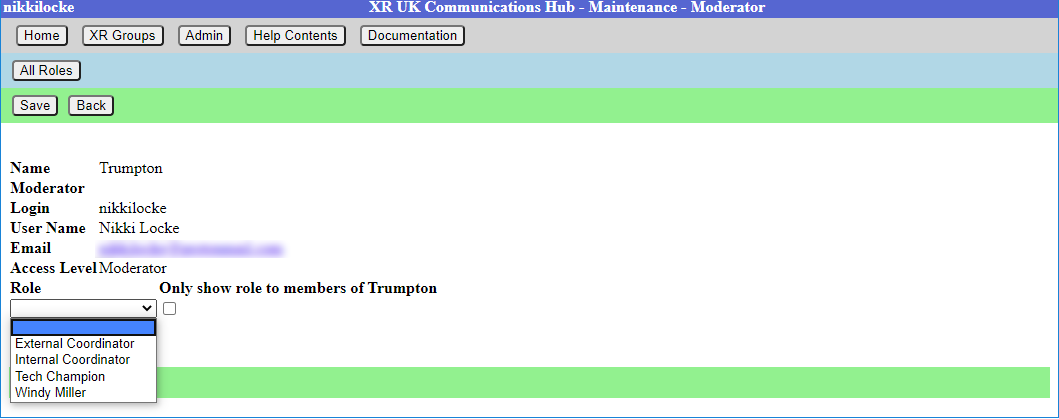 Select your role from the list your Group Admin has created, and choose whether to show it to everyone
(the default), or only to other members of the group. For example
External Coordinators may want to show their role to everyone, and
Internal Coordinators may want to remain a little more anonymous.
Select your role from the list your Group Admin has created, and choose whether to show it to everyone
(the default), or only to other members of the group. For example
External Coordinators may want to show their role to everyone, and
Internal Coordinators may want to remain a little more anonymous.
You cannot add yourself to Core Roles (shown in blue on the screen and diagram) - only your Group Admins can add people to these.
Your group can ask your Group Admin to create new roles, or edit the mandates of existing ones.
Leaving a Group
If you want to leave a group, go to the group here, click on All Members, then click the Leave Hub Group button. That will remove you from the Hub Group, and from all the private areas belonging to that Hub Group. It will not remove you from public channels and forums, but you can do this yourself in Mattermost and Forums respectively, if you wish.
Seeing all your Roles in all groups
Click on My Roles in the blue menu at the top to see a list of all the roles you hold. It has a History button to show you all the changes to your role holding.
Stepping Back From Roles
Click on My Roles in the blue menu at the top to see a list of all the roles you hold. Then click on Step Back From Roles.
 This shows all your roles, all with Step Back ticked. and gives you these options:
- Assign another user to the ticked roles
- Remove yourself from the ticked roles
- Leave the organisations (groups) the ticked roles are in.
- Make sure only those roles you are stepping back from are ticked - untick the ones you want to remain in.
- If someone else has agreed to take on these roles, select that person from the dropdown.
- If you want to remain in the role for a while (e.g. to train your replacement), leave Remove from Role unticked. But if you want to step back right away, tick it.
- If you are stepping back from the groups altogether, tick Remove From Organisation
Then click Save.
Admin Menu
 Note that Group Admins will have extra options on this menu, e.g. to
invite other people to the Hub and the new services.
Note that Group Admins will have extra options on this menu, e.g. to
invite other people to the Hub and the new services.
My Settings
Lets you change your name and secret codeword. This just changes the information we hold on the Hub, not on the other services. You can also change you email and password...
There is an edit button next to Login and Email. Clicking the button takes you to a form to change your login or email. These forms require you to enter your Mattermost password (as the Hub does not store your password, and it needs it to update your username or email address on Mattermost). A few people have different Hub and Mattermost passwords -- if that is the case, you will be asked to confirm they are different.
Once you save the form, the Hub will try to change everything on all the services (Hub, Mattermost, UK Forums and UK Cloud) to be the same.
If it is unable to do so, it will tell you which ones went wrong. The main reasons this may happen are:
-
You put in the wrong Mattermost password
-
Someone else is already using the login name or email you chose (Mattermost is global, so there are lots of users on Mattermost who aren't on the Hub).
If any errors occur, you can go back to My Settings, and try to change to something different.
Note: It is not possible to change a username on UK Cloud. So the Hub deletes your old user record, and creates a new one, joined to the same groups as the old one. This is usually fine, but if someone shared something with you by name, or you created personal calendars, decks or forms, they will be lost.
My Groups
Lists the groups you are in. Clicking on one shows you the people in the group, and whether they have Group Admin permission. Group Admins can invite other people create subgroups, etc.
Change Password
Lets you change your password on the Hub only. To change your password on the other services, you need to use the facilities on each of your other services.
Logout
Lets you log off, e.g. if you are using a shared computer, but don't want the next person to be able to access your Hub account. NB this only logs you out of the Hub, not from the individual services which you may have open in other tabs or apps.
READ THIS FIRST
This document is a quick guide to get you started with using XR's online communication tools for the first time.
In this guide, you will:
- Set up an account on the Hub.
- Log in to Mattermost and send a message to your XR group.
- Find out where to find more information.
Note: This guide assumes that you will be using a desktop computer, although if you are using a smartphone the steps should be the same. You can use either your smartphone's browser app (e.g. Chrome or Safari), or you can download the Mattermost app. For a guide on using the online tools with a smartphone, please read this page.
Note: If you have any trouble with this guide, please contact your XR group's group admin. If you don't know who this is or if your group doesn't have one, then please email tech@rebellion.earth.
1. Joining the Hub 
What is the Hub?
The Hub is the key to accessing the other online tools. It does two main things:
- When you join the Hub you will automatically have accounts created for you (with the same username and password) on all of the main tools that we use (including Mattermost).
- You are encouraged to create a username that is recognisably related to you - some rebels are happy to use their Local Group as part of their username – like
tom-bangor– while others may align with their Working Group – likerose-creatives. However, should you wish to remain anonymous, you are free to choose a username that totally conceals your identity. - The Hub acts as a phone directory – you can use the Hub to find and contact other groups.
For more information on the Hub, please read this guide.
How do I join the Hub?
To sign up to the Hub:
- Ask the group admin of your XR group to send you an email invite to the Hub.
- Open the invite and click on the link (you may need to check your spam folder). This will open a webpage containing a form that looks like this:
- Fill in the form with your name (this is visible to other users, so you can use a nickname if you like) and password and then click Confirm.
Video
This video takes you through the steps outlined above.
Already have a Mattermost account but haven't joined the Hub?
To be a member of a group on the Hub and to therefore have access to everything available to that group, including its channels on Mattermost and its Cloud folder, you need to have a Hub invite to that group.
There is a specific way to accept your Hub invite if you already have a Mattermost account. This will join your new Hub account to your Mattermost account. You will need to ask the Group Admin of the group you are looking to join to send an invite to the email address you used when setting up your Mattermost account. If this invte is sent elsewhere, you might end up creating another Mattermost account.
To check the email address used when originally setting up your Mattermost account, check your profile setttings on Mattermost (click your profile photo in the top-right corner of the screen, and click Profile to bring up your settings).
Once your Group Admin has sent the invite, access it through your email inbox and click through to the link. You'll then be asked to input your details to create your Hub account. Where you are asked for your login name, type in your Mattermost username (again, you can find this on your Mattermost settings). You'll then be able to tick/untick the group(s) you have been invited to, and choose whether you want to share your email address and/or phone number with the group.
Once you have clicked Confirm, you will see a page informing you that there is already a Mattermost account using the handle you have entered. As this is your handle, you can click This is my Mattermost account. You will then be asked to enter your Mattermost login details again. Then, the Hub will ask you to allow it to connect your new Hub account to your Mattermost account: click Allow to let it do so. Your Hub account is then set up.
Please watch this video for a live guide to setting up a Hub account when you already have a Mattermost account.
Any problems?
If you are encountering any issues, read this page for information on how to fix the most common problems, as well as where to go to ask for help.
2. First steps on Mattermost 
What is Mattermost?
Mattermost is a secure chat application that your group can use to communicate instead of using a program like WhatsApp, Signal or Telegram. It can be used both on a desktop computer and a smartphone.
The main advantage Mattermost has over other chat tools is that it is MUCH easier to get in contact with other rebels. Most groups in XR UK are already signed up to Mattermost and it is simple to find and message them. Also, Mattermost is used by XR Global so you can even get in touch with rebels across the world!
For a fuller intro to Mattermost and its benefits, watch here.
Getting access
Video
For a video guide through these steps, see here.
Mattermost basics
Once you have successfully logged in to Mattermost, you should see a screen that looks like this:
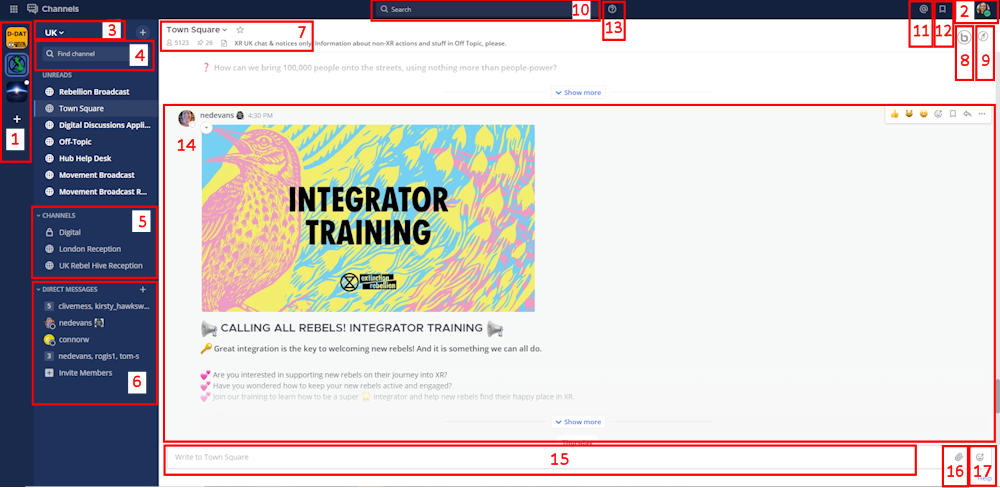
On the left-hand side (5) are the public and private Channels that you are in. When clicking on the Channels, note that the messages shown on the right (14) will change.
Below the Channels are your Direct Messages (6). These are private conversations that you can have with up to six other people.
At the far-left of the screen (1), you may see two or more blocks. These are Mattermost Teams and can be used to group Channels together. If you navigate between the different Teams, notice how the Channels shown change.
For a more detailed guide to using Mattermost, see this page on the Rebel Toolkit.
Sending your first message
To message your group for the first time:
- Find the correct Channel to post a message in. To do, this click through your Channels and Teams until you find a Channel with the same (or similar) name as your group.
- Write a hello message in the box at the bottom of the screen (15).
- Hit Enter to send the message.
3. Next steps
If you are interested in learning more, there are more advanced guides on both the Hub and Mattermost as well as XR UK's other tools. In particular, you might want to look at the guides for UK Forums and UK Cloud.
We also strongly encourage you to read our Online Behaviour Guide.
Lastly, if you have any trouble at all with these tools, please contact your group admin. They are there to help!
If you need support with:
- How to use Mattermost
- Getting onto Mattermost
- Using the Hub (and XR's other services including the UK Cloud, UK Forums),
please join one of the weekly sessions:
Mondays 17:30–18:00 (quick questions)
Thursdays 18:30–19:30 (longer training)
Join Zoom Meeting https://us02web.zoom.us/j/89528558324?pwd=R0JWZUovZk8zUy9RMXRjZGFGTmJaUT09
Meeting ID: 895 2855 8324 Passcode: 278766
Or post queries or problems in the Hub Help Desk channel on Mattermost.
Extinction Rebellion UK Privacy Policy
Extinction Rebellion UK Terms of Service
Problems Getting on the Hub
Listed below are several of the most common problems people have when they sign up to the Hub. If you are still having problems after reading this document, you should ask your group's tech champion for help.
It says that an account with my username already exists
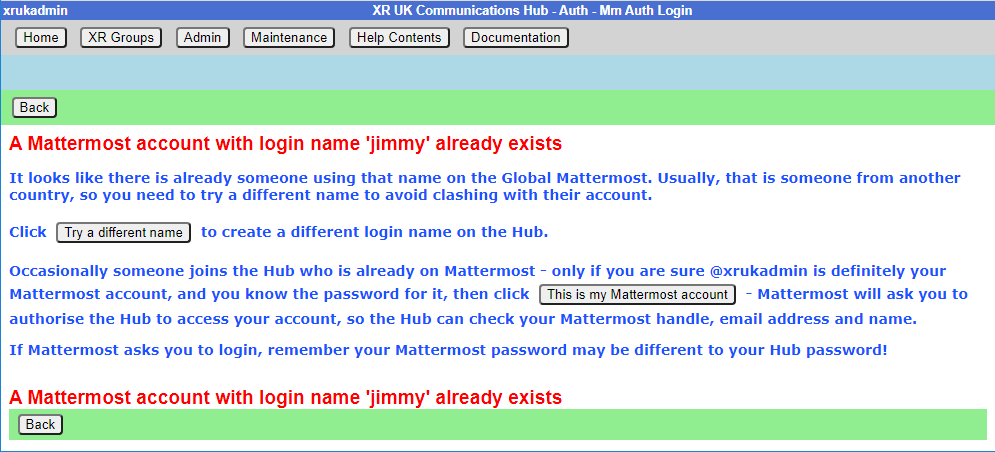
If there is already an account on Mattermost with the same username that you have chosen, you will see this screen:
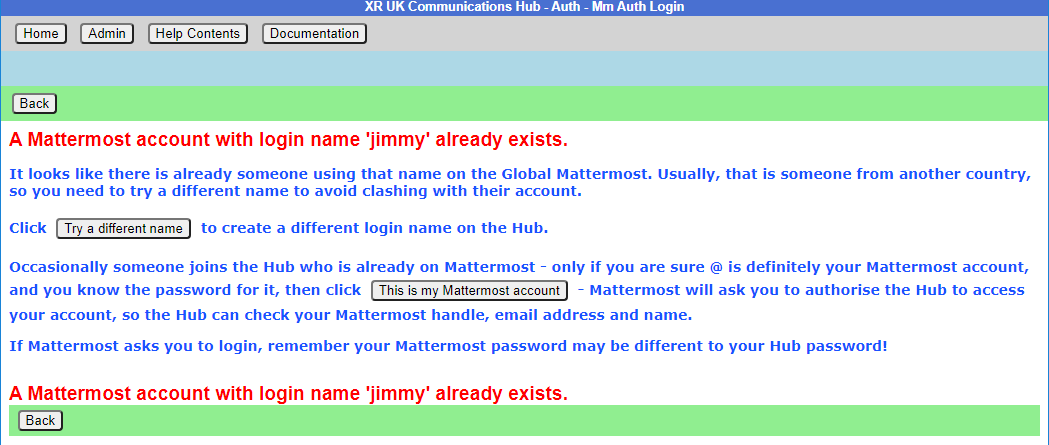
If you know you do not have an account on Mattermost, it just means you have chosen the same login name as someone else – click the Try a different name button to go back to the form, so you can try a different login name.
If you do have a Mattermost account under this name, click This is my Mattermost account to link the Hub to this account (please see this video for more help). If you are not already logged in to Mattermost in your browser, Mattermost will ask you to log in – you must use your Mattermost password here, which may be different to the one you just
entered for the Hub:
Mattermost will ask you to allow access:

It says that I already have a Mattermost account
If there is already an account on Mattermost with the same email address as your Hub one, you will see this screen:

You need to press the Continue button to link the Hub to this account.
I cannot remember my Mattermost password
If you have forgotten your Mattermost password, there is a password reset button, which will send you an email to reset your password.
It says my Mattermost account has not been validated
When your Mattermost account is first created, Mattermost will send you a verification email. You must click on the link in the email to validate your account. If you don't get the email, look in your junk email. If it is not there, there is a button to resend the verification email.
Compromised Account Procedure
All rebels with an account on the UK Hub, UK Forum, Global Mattermost and UK Cloud – which gives them access to material that should not fall into unfriendly hands, or that may compromise the legal position of themselves or others, for example, through providing evidence for conspiracy charges - need to be aware of these procedures.
Precautions to Be Taken Against Access to an Account Being Compromised
The steps below allow for the rapid temporary suspension of a compromised account on all XRUK services, to be followed either by reinstatement of the accounts with fresh passwords, or permanent deletion of the account as appropriate.
-
Set up, on the UK Hub, a secret codeword or phrase which you can easily remember and speak without having to spell it out, and that does not have ambiguous spelling.
- Log in on the UK Hub and click on the 'Set My Codeword' icon.

-
Enter your phrase or word in the box.
-
Once set, you can find and change your codeword by clicking on the Admin button and navigating to 'My Settings'.
-
Follow the advice available through the links below to secure any device that you use to access XR services and email:
This should include any desktop devices you may leave at home that could be subject to a search warrant and seizure in your absence.
There is not yet a specific general guide to securing desktop devices against seizure – much of the laptop advice applies. Don't forget any memory sticks or CD/disc backups you may have lying around.
-
DO NOT take any device, which has general access to your Hub accounts, into an arrestable situation! Please use a 'burner' phone and only install and use secure apps on it. See the Phone Security Guide above.
-
If you have operational reasons for needing access to XR online services (other than Signal and Telegram and areas like the public website that do not require a login and can be viewed by anyone), you must be especially careful to ensure that your device is secure and that you don't lose it.
Loss of Your Device – Arrest, Loss or Confiscation
-
If you are arrested, tell your secret codeword to Back Office (Arrestee Watch) or a friend, ideally before your arrest, or if you are arrested without warning, as soon as possible afterwards (e.g. use one of your custody calls to tell Back Office).
-
If you lose your device, or if it is confiscated by the authorities, immediately let your Group Admin or Interal/External Coordinator know, so that they can inform the Hub Admin team.
-
The Back Office Volunteer, your Group Admin or Hub Admin on being told your secret phrase and that you have been arrested, or had a device(s) confiscated, will cross-check the secret codeword and if it is valid, immediately lock all of your accounts – the Hub, Forum, Mattermost and Cloud – until you are cleared. For Group Admins, here is how to deactivate and reactivate someone.
Restoring Your Hub Accounts
- When (if) you are released, your accounts can be restored. You will need to contact your Group's Coordinator(s) and/or Group Admin for them to restore your account.
- If any of your devices are lost or remain with the authorities, you will need to change the email address you use for the Hub. This change must be done before your account is restored and it is recommended that you change your email even if your devices have been returned. Your new email address should be given to the Hub Admin via your Hub Group Coordinator/Group Admin. A new Hub Password will also be issued, and you should subsequently change this. Once the new email has been registered and the Hub account restored, you will be able to access all of your Hub Group information as before.
- If you are a member of Mattermost channels that the Hub does not know about, your membership of those channels will not be restored automatically. You will need to rejoin these by asking people in them to invite you again.
Non-Hub Services
-
The above ONLY applies to your Hub, UK Forum, Mattermost, UK Cloud and Vault accounts. If you have administrator or moderator access to any service that gives you visibility of others' account details or activity, then it is essential that you follow a similar procedure for those services as well.
-
For social media accounts, it is worth having a trusted close friend/partner who knows your password and can be instructed to change the password immediately should they hear you have been arrested.
The XR Volunteer Agreement
How to sign the Volunteer Agreement, and to check other people who have access to personal data have signed.
Personal data includes email addresses, phone numbers, addresses, or anything which could identify an individual. It does not matter whether the person is in XR or not, if you have access to their data, you should sign the agreement.
n.b. This agreement is jointly owned by the Rebel Pathway circle and the GDPR & Security circle.
What the agreement is for
The XR Volunteer Agreement is an agreement which must be signed by people who have access to Personal Data. That includes all Hub Group Admins, and anyone else anywhere in XR who have access to any individual's data (like mailing lists, membership lists, details of who is attending an action, etc.).
Signing the agreement
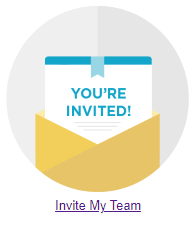
If you are on the Hub, and you haven't signed the current version of the Volunteer Agreement, the following icon will appear on your Hub Home screen:
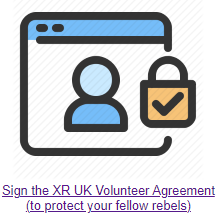
Click the icon to go to the Volunteer Agreement on Action Network.
If you are not on the Hub, you can click the link above to go there directly.
What happens if I have not signed
When you login to the Hub, if you are a Group Admin, or have other elevated permissions, you will see this screen:
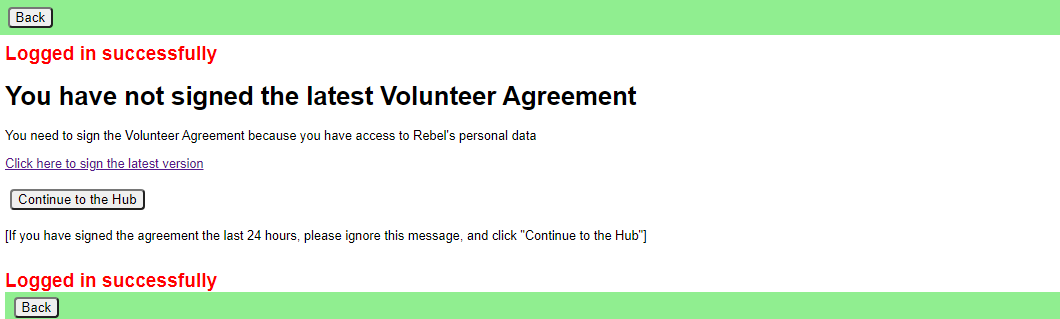
You should sign the ageement as soon as possible.
The Hub checks who has signed the agreement every night - so, if you sign, the Hub will not know about it until the next day. If you have signed today, so the Hub does not know, please click "Continue to the Hub".
What if I can't use my regular email address on Action Network
If, for any reason, you are unable or unwilling to use Action Network to sign the agreement with your regular email address, then copy the Volunteer Agreement from Action Network, paste it into an email, add some text to say you agree to abide by it, and send it to the "GDPR & Security" Team at dataprotection@rebellion.earth.
Checking if others have signed the agreement
Everyone in your group who has access to personal data (e.g. newsletter distributors, fundraisers, recruiters, Rebel Ringers, etc.) must sign the Volunteer Agreement. Please encourage them to do so.
Group Admins
If you are a Group Admin of a Group on the Hub, the "All Members" button will show you which version of the Volunteer Agreement your members have signed (if any).
You should ask anyone in your group who has access to anyone's Personal Data to sign it.
Administrators of groups not on the Hub
If you are looking after Volunteers in systems outside the Hub, please contact the "GDPR & Security" Team at the GDPR & Security Mattermost channel or by email dataprotection@rebellion.earth. They can arrange for you to have access to the Hub, with special permission to look up email addresses to see if they have signed.
When you login to the Hub, your Home page will include this icon:

Click to go to this screen:

Enter one or more email addresses, one on each line, and click Submit, to see this screen:
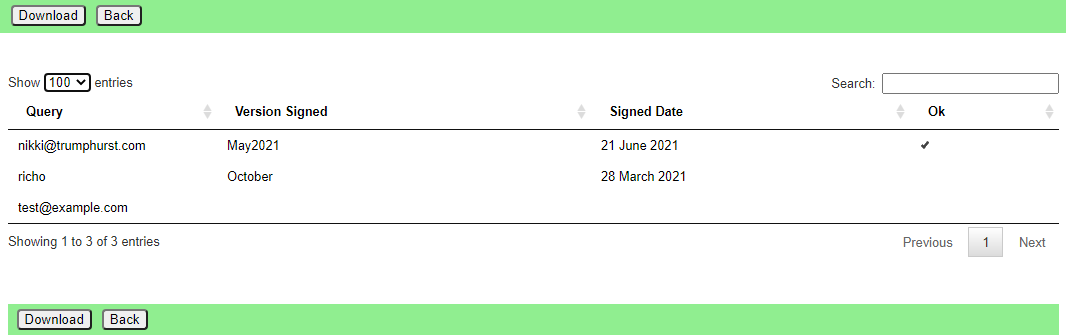
You see the email address or handle you entered, which version of the agreement they signed, when they signed it, and a tick under Ok if it is a current version. (The Volunteer Agreement may be updated from time to time, and, if the update is significant, people may need to sign the new version again.)
Updating the agreement
The Volunteer Agreement is jointly owned by the Rebel Pathway circle and the GDPR & Security circle.
GDPR & Security circle maintain the sections for Data Protection, Terms of service, and Confidentiality. Rebel Pathway circle maintain the rest.
When we change this agreement in any significant way , there will be a new version in Action Network to sign. The new version will have a different flag on your record if you sign, and it will have a different date on the top of the page. Thus we know when people signed - and a record of what the form said at that time. This is for Data Protection record keeping.
Each circle will promote people to sign this form - and in that way encourage more rebels to know more about all the aspects here.
Inviting People to your Group
How to invite people to your group
To get to the Hub, type - auth.extinctionrebellion.org.uk - into your browser address bar
You should use the Hub to invite new people to your group. This is because an invite to the Hub sets people up correctly on all the new services. You can also invite people to individual services, but you have to do all the work the Hub would have done yourself (inviting people to the right Teams, Channels and Forums, for example), so it is much easier just to invite people via the Hub.
There are three ways you can send an invite. Either click' Create invites' in the Admin menu (top left grey button), or 'Invite My Team' on the Home Page (big button in the middle of the screen), or select your group from the list of 'My Groups', then use the 'Invite Users' from the top of that group from the list of small grey buttons – then you will see this screen:
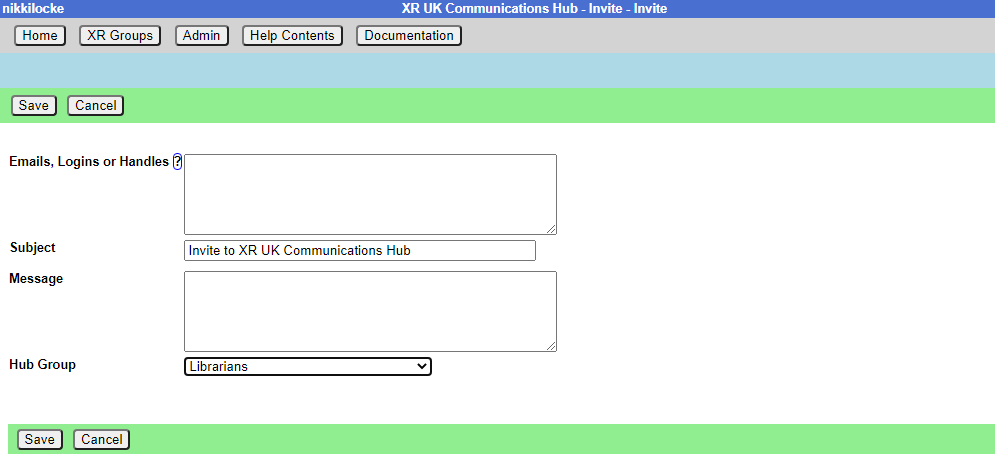
You can add as many email addresses, logins or handles of people to invite as you like (one per line), and you can add a personal message for the users you are inviting. If you put @ in front of a handle, the Hub will only search for that handle in Mattermost – otherwise it will search handles and logins on all the services (some people have different handles in different places).
Invite emails will contain your email address, so the invitee can contact you for help or advice. If you have used a personal email to register on the Hub, that is the email that will be in the invite. If you are not happy with this, then invite a generic group email address to your organisation, make it Group Admin, and log on using that email when sending out invites.
If you are Group Admin of more than one organisation, make sure the correct one is selected in this form before you send the invite! (If you came here from "Invite Users" on your Hub Group page, then the correct Hub group is already selected, and you can't change it.)
Invites expire in 14 days, so if someone doesn’t follow their invite within that time, you will have to invite them again.
Invites normally go out by email – but if you search by handle, the Hub may find someone on Mattermost who has not registered with the Hub, and does not know their email – in which case it will send them a Mattermost Direct Message instead - the Hub's handle is xrukadmin.
How to view invited people - List Invites
 This shows all the invites sent out for this organisation.
Every invite still on file for the group is shown (all invites over 60 days old are removed).
If the invite has been Accepted or Rejected, this is shown - there is nothing further you can do with these.
If the person is on the Hub with that email, their Hub login is shown.
| Status | where the person is at with the invite you sent |
|---|---|
| Sent | you've sent it and they haven't Accepted |
| Accepted | they've accepted and are now a Member of the organisation |
Expires - two weeks after the invite was sent.
Login - the invitee's Hub login name (which can be different from their MM handle).
| Join Status | |
|---|---|
| Member | they have a Hub login AND have Accepted the invite so are now a Member of the organisation to which you sent the invite |
| -blank- | they don't have a Hub login and they haven't Accepted the invite |
| On Hub | The person is on the Hub, but has not accepted your invite |
| Mattermost Problem | The person is on the Hub, but had a problem connecting to Mattermost. Please contact them to see if you can help (see Mattermost Problems below), or pass the problem to DDAT |
| Forums Problem | As above, but for Forums |
| Nextcloud Problem | As above but for Nextcloud |
All invites with Sent status (i.e. that haven’t been followed yet) have the following options:
- Edit icon - opens the invite, so you can edit it, or delete it. Note that, if you have changed anything on the screen, those changes will be lost if you click this (there is a prompt to make sure that’s what you want).
- Copy icon - copies the url for the invite to your clipboard - this is useful if you want to send it to someone by some other means, as they haven’t received the email.
- Resend checkbox - tick this to mark the invite for resending by email. It will not actually be resent until you save the form.
- Renew checkbox - tick this to mark the invite for renewing (setting the Expiry date 14 days from now). It will not actually be renewed until you save the form.
In addition, there are tickboxes for all at the bottom so you can easily renew all the invites, for example.
If you then click 'Save', any invites where you have ticked Renew will be renewed, and you will be taken to the normal Send Invites screen, with the emails of all the people where you ticked Resend already filled in.
How to fix problems with people signing up
The 'User Sign Up Errors' button on XR Groups pages lists any errors users had when the Hub tried to join them to all the right things in Mattermost, UK Forums and UK Cloud. If you see any problems here that you can’t fix by speaking to the person, please contact us on Digital Discussions Applications Team Reception.
How to fix Mattermost [MM] Problems
A Join Status of Mattermost Problem against an invite means they are on the Hub, but have not got on Mattermost for some reason. The solution begins with finding out what the problem is (usually by getting them to log into the Hub, and seeing what screens come up).
The problem is usually one of the following:
| Problem | Solution |
|---|---|
| Their login name already exists on MM, but doesn't belong to them, but they haven't changed it to one that isn't already in use | Click on the 'Try a different name to create a different login name on the Hub.' button, and try a different login name in the next screen. |
| Their login name already exists on MM, does belong to them, but they haven't authorised the Hub to access Mattermost because they have forgotten their MM password | First get MM working by trying to log in with their login name, and clicking the button to reset the password. Then they need to log in to the Hub, and authorise the Hub to access their account. |
| Their login name already exists on MM, does belong to them, but they haven't authorised the Hub to access MM because they haven't responded to (or haven't got) the MM email confirmation | First get MM working by trying to log in with their login name, and clicking the button to resend the email. Next in their emails, follow the link to activate their MM account. Then they need to log in to the Hub, and authorise the Hub to access their account. |
| Their login name already exists on MM, does belong to them, but has a different email to the one they are using for the Hub | Change their email address on Mattermost or on the Hub, so they match. |
| Their email already exists on MM, but they haven't authorised the Hub to access Mattermost because they have forgotten their MM password | First get MM working by trying to log in using their email, and clicking the button to reset the password. Then they need to log in to the Hub, and authorise the Hub to access their account. |
| Their email already exists on MM, but they haven't authorised the Hub to access MM because they haven't responded to (or haven't got) the MM email confirmation | First get MM working by trying to log in using their email, and clicking the button to resend the email. Next their emails, follow the link to activate their MM account. Then they need to log in to the Hub, and authorise the Hub to access their account. |
This screen shows if they have chosen a login name that matches an existing name on Mattermost. It lets them choose a different login name (if the Mattermost account isn't them), or link their Hub account to their Mattermost account:
This screen shows if there is an existing Mattermost account for their email address. It lets them link their Hub account to their Mattermost account:
How to invite people via a private Mattermost channel
If you click the Mattermost Invite button above, you see this screen:
This lets you select a private channel in Mattermost that belongs to your group, and post an invite link in there. Anyone who is in the private channel can follow the link to join the Hub. They will then have access to all your group’s channels, forums and cloud space.
This is useful if you have invited people to your channels on Mattermost, but haven’t invited them through the Hub.
Removing people
To just remove someone from you group, click the "All Members" button in your group screen, then click on their entry, then click "Remove User From Hub Group" at the top.
If someone is stepping back altogether from all their roles, you may find the Step Back From Roles screen useful.
Add and Edit Groups, Channels & Forums
Groups
Edit Group screen
This lets you rename your group, or any of its teams, channels, forum groups, forums or cloud group:
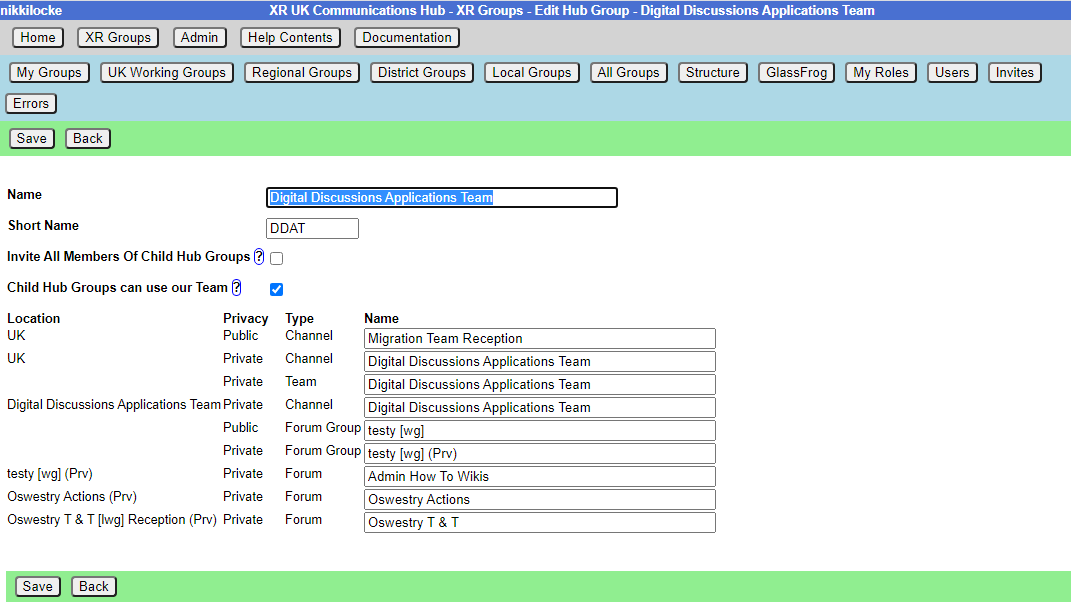
The editor helps you out – if you change your name or short name, it will update all of the other names on the screen to match (you can still edit them). If the changes it makes automatically do not suit you, you can change back the individual team, channel, forum or cloud folder names. When you click Save it will try to update everything on the Hub and on the other services. You may get an error message if one of the names you have chosen has already been used by another organisation.
It also lets you change the setting where members of child groups are automatically invited to your group. If you tick this, all members of any descendant (child, grandchild, etc.) group will be invited to join this group. If they accept the invite, they will be full members of your group, and have full access to everything – Team, public and private channels, public and private forums, and cloud storage. Note: if you change it from unticked to ticked, the invites will be sent out right away when you Save.
How to change your Group Name
'Edit Group' lets you edit your groups’s name, short name, whether you want members of child groups added to your Mattermost Team, contact details for your group, and the names of all your Channels, Forum Groups, Forums and Nextcloud Group.
Edit Contact Info screen
At the top, under Public Contact Info, is where you can place public contact details for your group. These will appear on the UK Regional Map, and possibly other public websites, so DO NOT PUT PERSONAL OR PRIVATE ADDRESSES IN HERE.
Underneath, under Members Only Info, is information you only want members of your group to see. It is intended for such things as Zoom meeting links, or other information that might also go in a Mattermost channel header, so there is another way of accessing it if Mattermost is down.
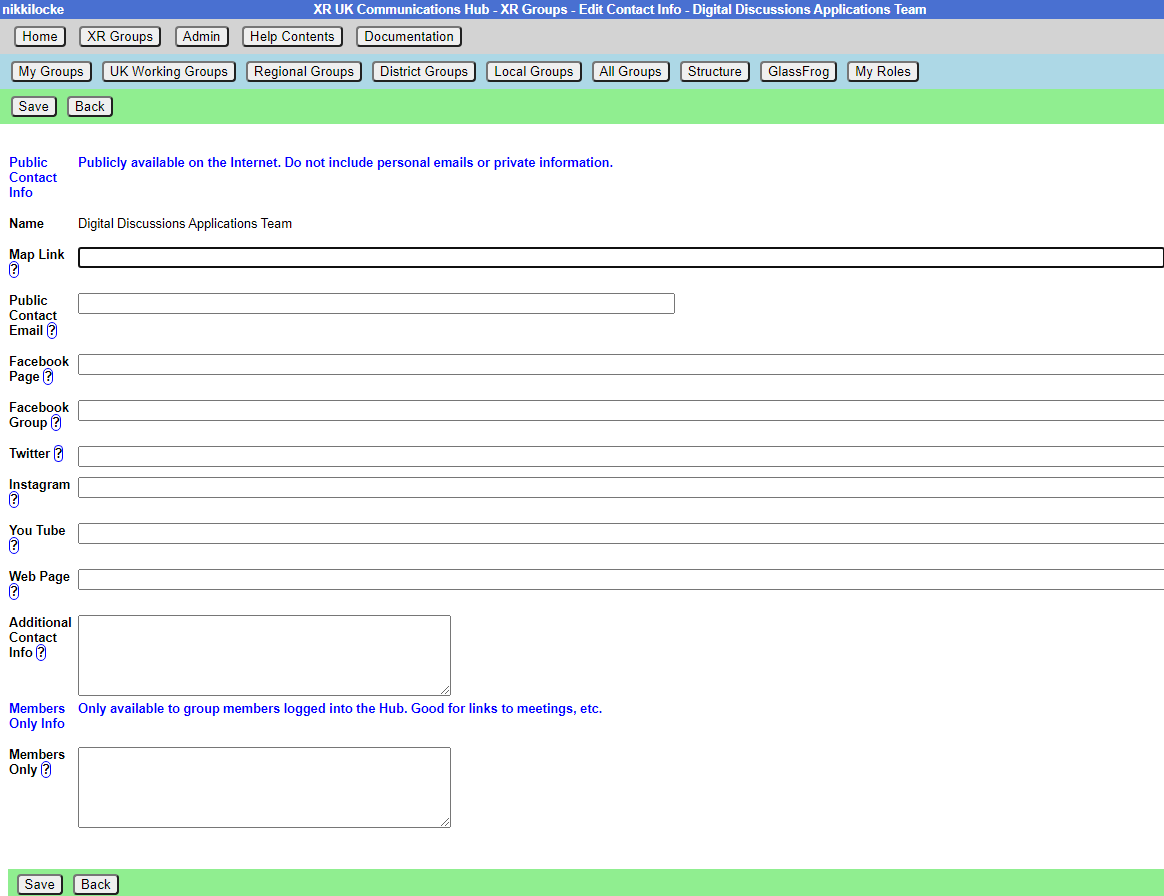
Contact details and Members Only accept Markdown (like Mattermost and Forums), so you can format your details and put links in.
How to create a New Child XR Group
If you are part of a large group which has working groups (e.g. a large working group like Communities has a number of separate working groups, like Local Group Development, Rebel Pathway, etc.), you can create separate organisations for your working groups on the Hub and the new services.
This takes you to a new group screen in the 'Setting up a new group on the Hub' document.
Channels
How to add a new Channel
'New Channel' takes you to the create channel screen to create a public or private channel in the corresponding team.
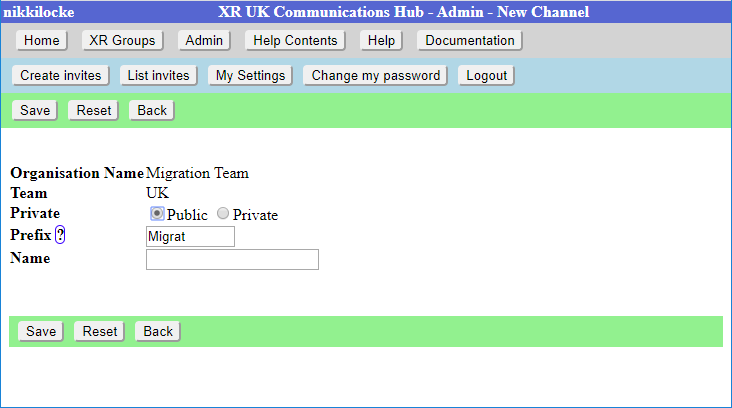
The name of the Channel will be made up of the Prefix and the Name. The Prefix defaults to your group short name, and is to help us avoid trying (and failing) to create 100 channels called “Media & Messaging” for 100 different working groups!
When you click Save, the Channel will be created right away. All your group members will be joined to it in due course (there is a background job running which does this, so it make take a while for it to catch up), or next time they log in to the Hub.
How to change your Channel names, public/private
'Edit Channels' shows the Channels for your group. Clicking on one will allow you to edit the name, and change whether the channel is public or private. When you Save your changes, the Hub will update Mattermost with your changes. The list has a 'Show unclaimed' button to also include unclaimed channels you are in, so you can pick one and claim it for your group.
How to see who is in your Channels
'Edit Channels' also list all the members of the channel on Mattermost - select a Channel then click 'List Members'. This shows which of those people are on the Hub, and whether they are a member of your group. There is also a button next to people who aren’t in your group, which you can tick to invite them.
How to delete Channels
You can also delete channels in 'Edit Channels' (except for the ones the Hub needs you to keep – your Reception and your main channel – message the Hub Admins in the Digital Discussions Applications Team Reception or Tech Champions & Group Admins channels). Deleting a channel here will also delete it on Mattermost.
How to Share channels with other organisations
You can share a channel with other groups (useful when multiple groups are working together on an action or project). All members of all the groups it is shared with are joined to the channel.
To do this, click on the  icon next to Shares, to see this screen:
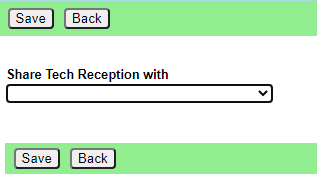
Choose the group you want to share with from the drop-down list. Another dropdown will appear, so you can share with multiple groups, and an  will appear to allow you to remove that share.
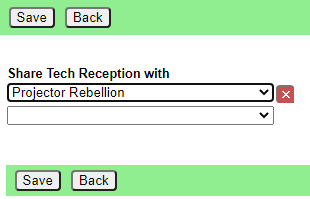
Click Save when done.
How to Unarchive channels
Mattermost lets anyone in a channel archive it. This removes it from the channel list. People sometimes do this by mistake, thinking it only archives it for them, not everyone!
If someone has archived one of your channels, you can restore it the following day - the Hub notices it has been archived on its overnight check, and adds an Unarchive button to the edit channel screen.
Claim Channels - if you already had Mattermost channels created before you came on to the Hub
Some people have set up their group on Mattermost without joining the Hub first. If you did this, you should first claim those channels for your group on the Hub (so the Hub knows they belong to you, and can join people to them when you invite them to the Hub). The procedure is as follows:
-
In Mattermost, invite @xrukadmin (the Hub’s login to Mattermost) to all the Teams and channels you want the Hub to know about. If inviting xrukadmin to a Team, make it a Team Admin (in Manage Members).
-
Wait 24 hours for the Hub to recognise your channels.
-
Claim the channels in the Hub:
- Go to your group in XR Groups
- Click Edit Channels
- Click the 'Include Unclaimed' button – this will add any other channels you are a member of but which don’t belong to a group on the Hub yet.
- Click on each channel you want to claim, check the details on the next screen, and click save to claim it for your organisation.
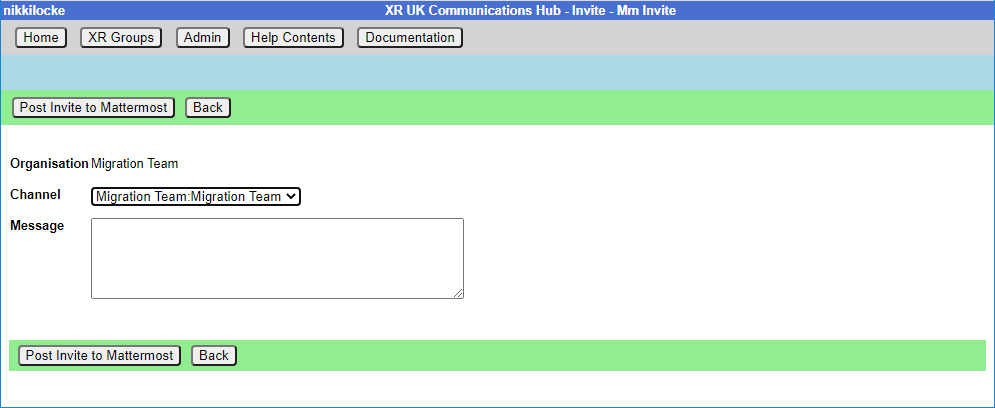
- You can then, if you wish, post a generic link to one of your private channels to allow anyone in that channel to join your group on the Hub. To do that:
- Go to your group in XR Groups
- Click Invite Users
- Click the Mattermost Invite button
- Choose the private channel to post the invite to
- Add an optional message from you
- Click Post Invite to Mattermost
Forums
How to add a new Forum
'New Forum' takes you to the create forum screen to create a public or private forum.
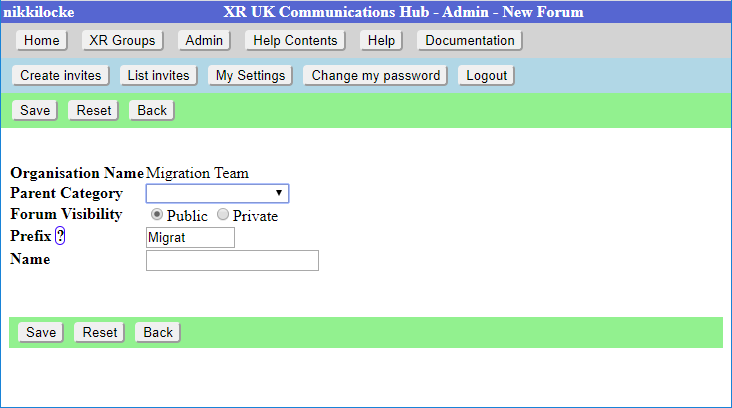
The name of the Forum will be made up of the Prefix and the Name. The Prefix defaults to your group short name, and is to help us avoid trying (and failing) to create 100 forums called “Media & Messaging” for 100 different working groups!
You must choose which top level category the forum goes in.
When you click Save, the Forum will be created right away. All your group members will be joined to it in due course (there is a background job running which does this, so it make take a while for it to catch up), or next time they log in to the Hub.
How to change Forum names and locations
'Edit Forums' Lists the Forums for your group. Clicking on one will allow you to edit the name and the parent category. When you Save your changes, the Hub will update UK Forums with your changes.
You can also delete forums here (except for the ones the Hub needs you to keep – your Reception and your main forum – message the Hub Admins in the Digital Discussions Applications Team Reception or Tech Champions & Group Admins channels). Deleting a forum here will also delete it on UK Forums.
How to share Forums with other groups
To do this, click on the icon next to Shares, to see this screen:
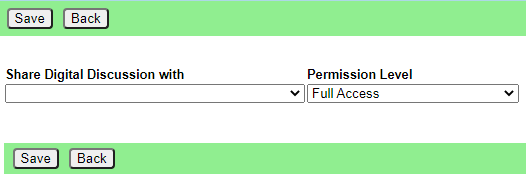
Choose the group you want to share with from the drop-down list. You can also choose to limit this group's access to the forum in the Permission Level dropdown.
Another dropdown will appear, so you can share with multiple groups, and an will appear to allow you to remove that share.
Members
Adding members
To add people to your group, you need to send them an invite - see Inviting People to your Group
Removing members
To just remove someone from you group, click the "All Members" button, then click on their entry, then click "Remove User From Hub Group" at the top.
If someone is stepping back altogether from all their roles, you may find Step Back From Roles screen useful.
Edit Messages screen
How to change default Welcome Messages
To add/edit messages click the 'Messages' button in the XR Groups screen.
Welcome messages are sent via MM Direct Message to people who have just joined your organisation on the Hub. They come from xrukadmin (the Hub's Mattermost login), which does not read replies, so you will probably want to include instructions to contact your own Mattermost handle in the message. E.g. "Do not reply to this message, contact @fred-xrtrumpton if you have any questions".
Just enter the message text (you can use Markdown formatting, like you can in Mattermost, Forums and Cloud), and click Save. Subsequently, anyone who accepts an invite to your organisation will receive that message overnight (as the Hub runs updates in the early hours of the morning.)
How to set Reminder Messages
Reminder messages are useful for regular events (like a weekly meeting). They are posted to your channel of choice on Mattermost, by xrukadmin (the Hub's Mattermost login) each night.
XR Groups, Roles and Mandates
Read this guide to learn how to use the Hub to manage your group's mandates, roles, members, etc.
XR Groups screen
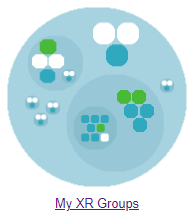
If you click 'My XR Groups' on the Home page, you will see a screen like this:

Choose a group to see all its details in context.
This is the Group Admin view – ordinary users can see this screen, but won’t have the buttons to change things.
This shows the group in context. You can click on any of the group names to see its parent and children.
Each group is displayed the same way. Public links are always clickable. If you are a member of the group, the private links are clickable too. If you are a Group Admin, the buttons also appear.
The graphic display shows the group in context – you can click the full screen icon to make it bigger, and you can click on groups within it to move the display to a different group.
Structure - to find your way about XRUK, you can click on any group name on the screen to show that group, with its parent and children. Or you can click on a group in the Hub Circles graphic display at the top right. This has a full screen button to make it larger, and easier to navigate.
If you are using the Hub Circles display, you can click the Filter button to hide some of the detail, to make the diagram less busy. If you set a filter, it is remembered, and used every time you open this view.
XR Organism: replacement for "GlassFrog"
We used to use the GlassFrog app to describe our XR UK organisational structure. We have now moved to organism.extinctionrebellion.uk, which is a public view updated from the Hub every night.
How to change people's Roles in your group
How to change my group's Mandate
To edit the Mandate:
- First ensure the parent circle has agreed the changes
- Select Mandate button (grey button at the top of the structure (see image)
- Select Edit Mandate (top blue bar)
- Make changes
- Save
The XR UK constitution says that all working groups should have a Mandate. However, not all parts of XR UK are covered by the constitution, and some Hub Groups were created without one.
The sections include: Purpose, Accountabilities and Domain, together with an optional section on Policies. As a guide to completing the Mandate, you might research those of similar Groups in your region, or UK wide (WGs and Circles). Such existing Mandates may assist with arriving at your own wording. See also Mandates and how to write them.
How to see changes made to roles, members, mandates
How to see people in my group
'All Members' shows you a list of everyone, and allows you to set their roles, and make them Group Admins or turn Group Admin status off. From there, you can click 'All Roles' to see all the roles the person has, and from there you can click 'Step Back From Roles' to pass those roles on to someone else.
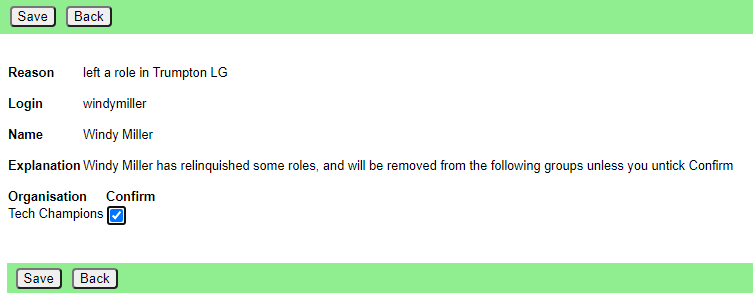
If you remove someone from one or more roles which are linked to another group, and that is the only role they hold in that group, you will see another screen where you can confirm whether or not they should also be removed from the other group.
How to change My Role
'Edit My Role' lets you edit your own role in the group. Everyone in your group can edit their own role. Note that only Group Admins can assign people to core roles (those shown in blue on the diagram). For more about core roles see the XR UK constitution.
Edit Messages screen
How to change default Welcome Messages
To add/edit messages click the 'Messages' button in the XR Groups screen.
Welcome messages are sent via MM Direct Message to people who have just joined your organisation on the Hub. They come from xrukadmin (the Hub's Mattermost login), which does not read replies, so you will probably want to include instructions to contact your own Mattermost handle in the message. E.g. "Do not reply to this message, contact @fred-xrtrumpton if you have any questions".
Just enter the message text (you can use Markdown formatting, like you can in Mattermost, Forums and Cloud), and click Save. Subsequently, anyone who accepts an invite to your organisation will receive that message overnight (as the Hub runs updates in the early hours of the morning.)
How to set Reminder Messages
Reminder messages are useful for regular events (like a weekly meeting). They are posted to your channel of choice on Mattermost, by xrukadmin (the Hub's Mattermost login) each night.
Edit Role screen
When a new group is created on the Hub, it gets a set of 3 standard roles: Internal Coordinator, External Coordinator and Group Admin.
There are an additional 8 roles, suggested by the Self Organising Systems Circle, which may be selected by the Group Admin when adding new Roles to the original set.
To add a new role for your group, select 'Add Role' and type the role name you require. As you type, you are offered any Default Roles which match the input text, and, if you then select a Default Role, the form is prefilled with the details (including mandate) of that role - which can then be edited, if necessary. This is just to save typing, and to help any Group Admin who may not know the exact wording of the Mandate for the desired Default Role. Note that any new Role will have a blank Mandate (Purpose and Accountabilities), which may be completed at a later time.
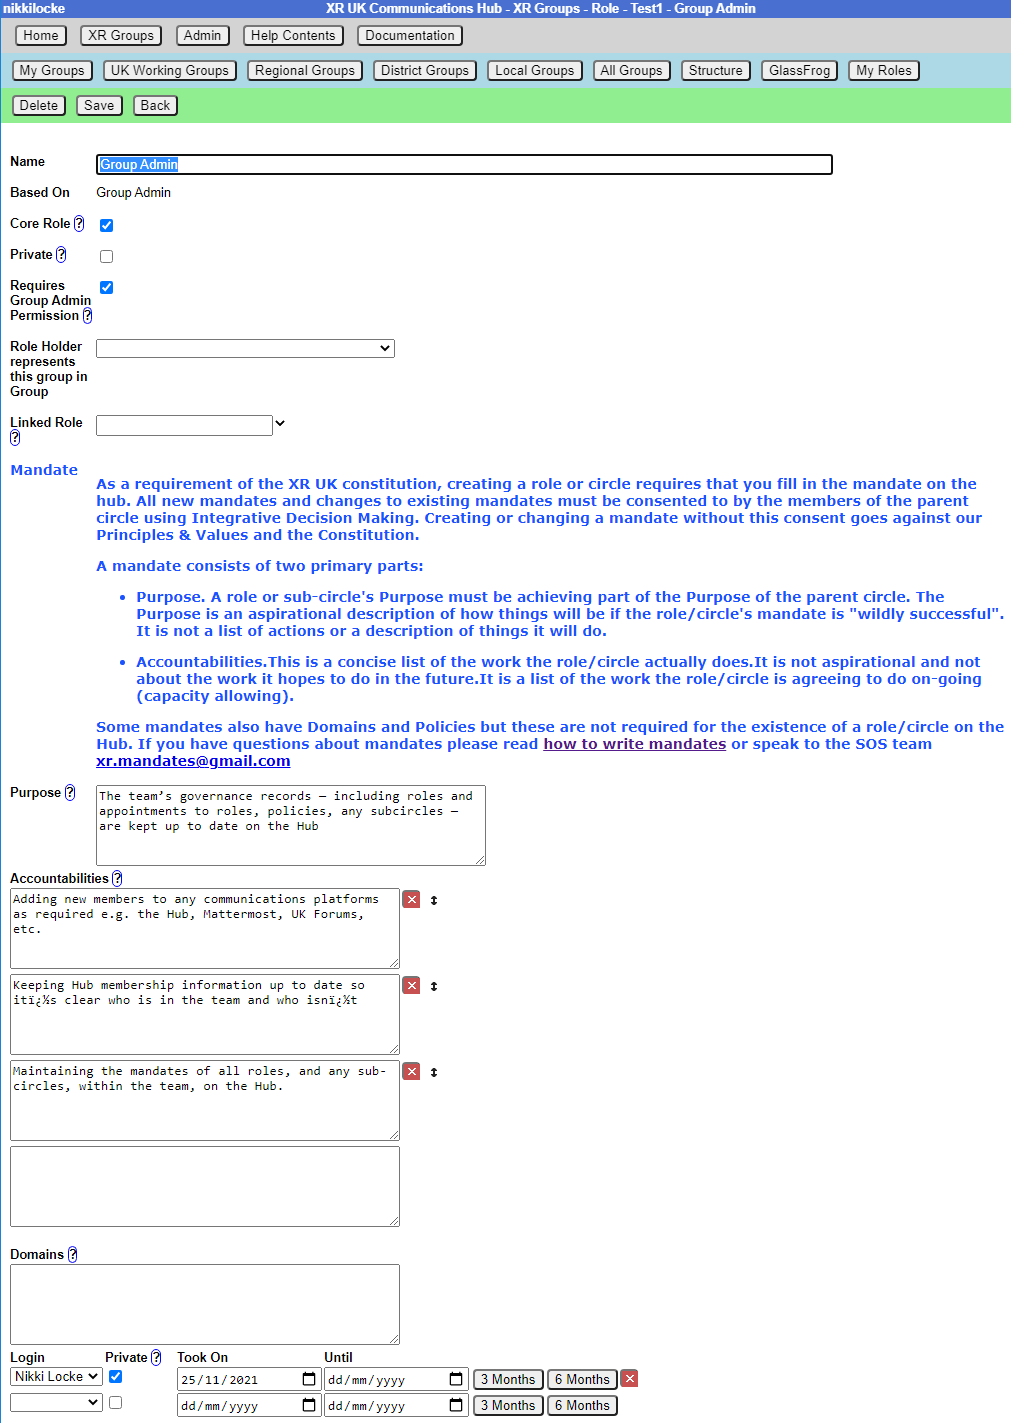
Ticking Core Role shows the role in blue instead of green in the diagram, and prevents users from assigning themselves to that role (only Group Admins can assign people to Core Roles).
The Private setting is the default for the role – if this is ticked, then users will have Private ticked by default (but they, or you, can change that).
Ticking Requires Group Admin Permission means that people assigned to this role automatically get Group Admin permission for this group, so they can invite people, edit roles, channels, forums, etc., just as you can.
You can add Accountabilities, or drag them using the handle to reorder them, or delete them with the red x button.
You can add Domains or delete them with the red x button.
You can place users in their role by selecting their names from the drop-down list. You may also remove them by clicking the red ‘X’ next to their name. The Private setting by each user should be ticked if the user does not want anyone outside the group to see that they hold this role.
You can set an 'Until' date for each person assigned to a role, which is the date their holding of that role will be reviewed. This allows people assigned to a role for a limited time to be confident that they won’t be left holding that role for ever. Roles where the Until date has passed will show in red on the group diagram.
Linking a role to another group
You can link a role to another group. Then, when people join that role, they are automatically joined to a linked role in the other group. Usually, you will do this for the External Coordinator role – the external coordinator of a working group automatically joins the parent group as the sub group’s representative. But it doesn’t have to be the parent group – for example, Cymru Wales have a "Local Group Coordinator’s" group that all their local group coordinators join. The only limitation is that you have to be a Group Admin of both groups.
To link a role, choose the group you want to link to in the Role Holder represents this group in Group dropdown.
Then either select an existing role in that group from the Linked Role dropdown, or type in a new role name (the new role will be created in the other group).
Normally a Group Admin of one group will create a child group (which automatically makes them Group Admin of the child group). They will then link the External Coordinator role in the child group to the parent group. They may well also appoint other Group Admins of the child group, and may remove themselves from the child group when this has been done. If nobody is Group Admin of both groups, Coordinators or Group Admins of both groups will have to ask a Hub Admin to do it for you. If you don't know a Hub Admin, ask in Hub Help Desk on Mattermost.
If you remove people from a role which is linked to another group, and that is the only role they hold in that group, you will see another screen where you can confirm whether or not they should also be removed from the other group.
Converting a role to a Working Group
Clicking on any role shows the details for the role. There will be an Edit Role button in the blue menu at the top to edit it. If the role is not already linked to a working group, there will also be a 'Create Working Group For Role' button – click that to set up a new working group to perform the original role. The new group will inherit its mandate from the original role, and the External Coordinator will be linked to it.
What happens when a role gives people access to more than one Hub Group?
When someone does one of the following things:
- Edits the Auto Join Roles screen (Hub Admins only)
- Edits the people in a role
- Edits the roles a person is in (+)
- Deletes a role
- Steps a person back from a role (+)
- Creates a group
- Deletes a group
- Admin edits a group (Hub Admins only)
- Removes someone from a group (+)
The change could entitle some people to be in different Hub Groups - e.g. if they join or leave a linked role, or a role with a support group.
The joining or inviting happen automatically, but any groups they should probably be removed from are first listed in a screen with tickboxes against each one, so the person making the change has a chance to untick people they do not want to be removed.
(+) The removal screen is simpler in these cases, because only a single person is affected, so it just shows a list of groups the person could be removed from. In the other cases, it has to show both person and group, as there is no reason why the same person might not be joined to two or more groups - e.g. all the Cymru Group Admins will be joined to the UK level Group Admins group, as well as the Cymru one.
Here is the simple screen:
And the more complicated one:
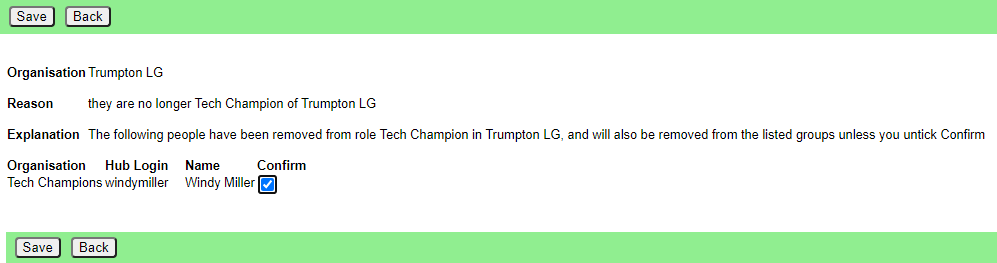
Please click Save in this screen to carry out the removals. If you think a person should not be removed, first untick the corresponding Confirm box.
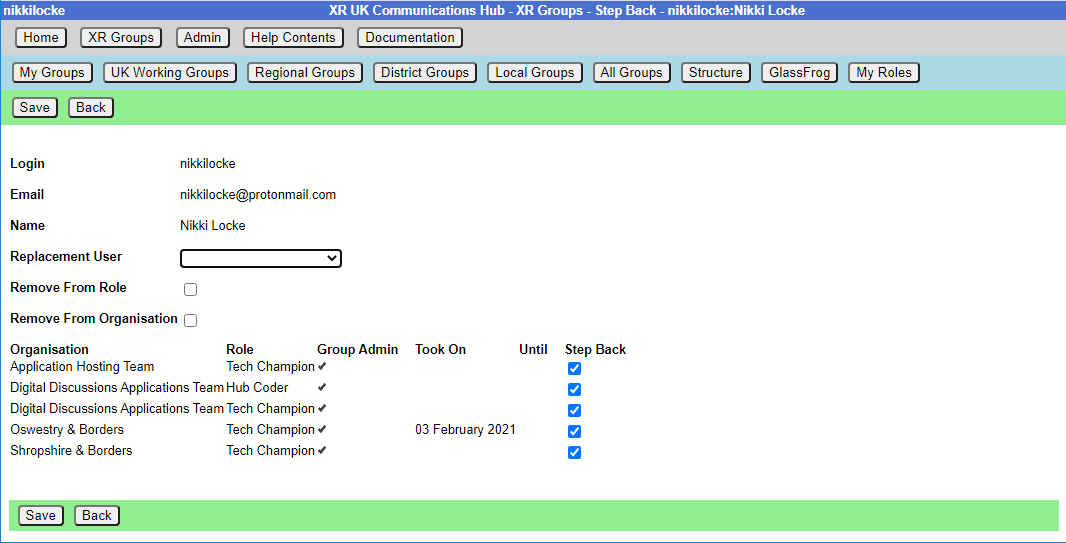
Step Back From Roles screen
You reach this screen by finding a person with a role in All Members, clicking on 'All Roles', then clicking on 'Step Back From Roles'.
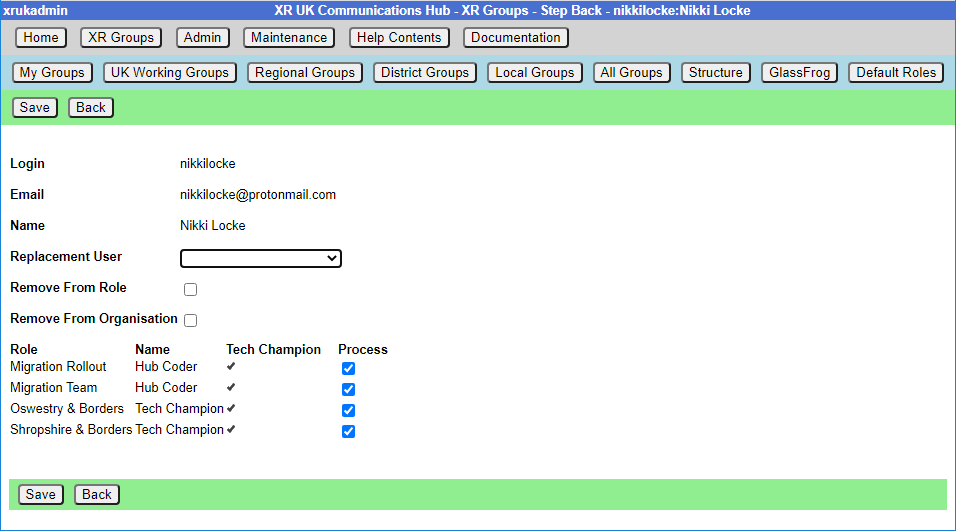 If you choose a replacement user from the dropdown, that person will be assigned to all the roles with Process ticked (being joined to the organisation if they are not already in it).
If you check Remove From Role, the original person will be removed from the roles with process ticked.
If you check Remove From Group, the original person will be removed from all groups with Process ticked.
If you remove someone from one or more roles which are linked to another group, and that is the only role they hold in that group, you will see another screen where you can confirm whether or not they should also be removed from the other group.
So, for example:
| Change Required | Action |
|---|---|
| Join a new person to the roles, to be trained by the original person | Select the new person in Replacement User. Leave Remove From boxes unticked. Tick all the roles you want them to be added to, and untick the others. |
| Pass the roles on to someone else because the original user has already stepped back. | Select new person in Replacement User. Tick Remove From Role. Tick all the roles they are stepping back from, and untick the others. If the person has left the group(s) altogether (rather than just stepped back from the role to become an ordinary member), also tick Remove From Group. |
| Step someone back from their roles, without appointing anyone else | Leave Replacement User blank. Tick Remove From Role. Tick all the roles they are stepping back from, and untick the others. If the person has left the group(s) altogether (rather than just stepped back from the role to become an ordinary member), also tick Remove From Group. |
Role Tenure
How to update role tenure, so you no longer get tenure expired messages.
Your Group Admin can set an 'Until' date for each person assigned to a role, which is the date their holding of that role will be reviewed (the role tenure). This allows people assigned to a role for a limited time to be confident that they won’t be left holding that role for ever. Roles where the Until date has passed will show in red on the group diagram.
When the Until date passes, both the person and the group will receive a reminder message on Mattermost, and the role/person will be shown in red in the Hub organism diagram.
Formal, elected roles have a procedure laid down in the constitution (Choosing Role-Holders) the group goes through to decide who holds the role, and for how long.
Once any such formalities have been followed, the procedure for any of your Group Admins to update the Hub is simple:
- Log in to the Hub
- Click on XR Groups
- Click on the relevant group
- Click on the relevant role
- Click Edit Role
- Alter the Until date of the relevant person (there are 3 month and 6 month shortcut buttons to automatically set it to that period of time, if that's what you need).
- Click Save
If you do not have a Group Admin, please get one of your Coordinators tp contact Hub Group Support on Mattermost, or email tech@rebellion.earth.
SOS Facilities on the Hub
This section describes how the Hub helps to implement the principles of Self Organising Systems within XR UK. We'll show how the External Coordinator Role in a group, or circle, can be linked to a Representative Role in the parent group, or supercircle. We'll also show how Mandates for Working Groups, need agreement with their supercircle.
Hub Groups and SOS
Our Organism diagram shows all the groups/circles on the Hub, and how they fit together within our self organising structure.
The Hub is used by lots of different kinds of groups/circles, and some have decision making power, so our Constitution says these should each have a Mandate. The Mandate details the group's Purpose (the result the group is trying to bring about), Accountabilities (what the group's jobs are) and Domains (resources that the group controls).
The decision whether to follow the Constitution rests with the groups at the outermost level of the Organism - the UK Rebel Hive (for UK Working Groups), the Regions and Nations, XR Youth, etc. Together with the Hive, many of the Regions and Nations have decided to adopt the Constitution. XR SOS will inform the Hub which groups have made this decision - if you are uncertain whether your group has adopted the Constitution, please contact your Hub Admin or DDAT (Digital Discussions Applications Team)).
Once a group has adopted the constitution, then new Working Groups and Roles under that group must decide on and publish, via the Organism, a Mandate which contains a Purpose, as a minimum, but ideally Accountabilities too. This applies at all levels - thus every UK Working Group must have a Mandate, no matter how deeply nested it is within the structure. For Regions/Nations, this applies only to Regional Working Groups and District Working Groups. It isn't enforced to Local Groups (or their working groups) because most Local Groups are not large ebough to need SOS - but they can still have a Mandate if they want to.
Linked Roles
Within XR, it is often necessary for a group/circle to be represented in another circle. The classic example of this is the External Coordinator in a circle who will normally be linked to a Representative Role in the parent/supercircle. In this case, the Linked Role represents the subcircle in the supercircle and, in addition, the supercircle holds the subcircle's Mandate.
Linked Roles can also be used between any 2 circles in the Hub, such as:
- Some regions have an Anchor Circle or Local Group Coordinator's circle. They can link the External Coordinator role in each of their Local Groups to a role in the Anchor Circle.
- There is often a need for cross-group collaboration - Arrestee & Legal Support, for example, has a rep who attends Actions meetings, to appraise A&LS of forthcoming actions, and to advise Actions circle on arrest issues.
The Hub organises these roles such that someone joining the Linked Role in one circle is automatically elected to the Linked Role in the second circle - and joined to that circle, if they are not already a member. Linked Roles appear with a yellow border in the XR Organism diagram.
Note that when someone leaves a Linked Role in one circle, they are automatically removed from the Linked Role in the other circle. The Hub also offers to remove them from membership of the other circle (this is optional).
Which Hub Groups implement SOS?
There are many different kinds of Hub Group: the Rebel Hive contains the UK Working Groups, and their sub-circles (Child Groups). Regions and Nations have their own Working Groups, together with District and Local Groups, which again can contain working groups. While all the groups/circles within the Rebel Hive are subject to SOS, only the Regions/Nations that have adopted the new Constitution are obliged to implement SOS, and that only above the Local Group level.
There are also groups where SOS doesn't apply, because they do not make decisions on behalf of the movement, including:
- Affinity Group - small groups of people supporting each other and working to achieve the XR goals. Most often used for organisaing actions. By organising as many small groups pursuing a shared vision, we avoid getting too bogged-down in slow decision-making processes.
- Community Group - a way for rebels to connect and work together through communities of shared self identity rather than of shared location. (For example, faith, profession, ethnicity and sexual identity.)
- Role Support Group - providing help and mutual support to people in a certain role in other groups
- Connected Group - a permanent ongoing group that does not have a mandate. Connected groups are autonomous and operate independently outside of Hive circles. They may have a link role to a UK circle but are not allowed decision making power in that circle. Decision making power requires accountability. In order to be accountable you need a mandate which the parent circle has consented to.
- Project Group - a group with no decision making capability, which therefore is not required to have a mandate. Any decisions have to be made by another group, which has the mandate to make them.
- Local Groups and below in Nations and Regions.
Hub Groups where SOS is enforced
Before editing any Hub Group, make sure to check the status of the relevant Enforce SOS tick-box. If this is ticked, then SOS rules must be followed. Thus, creating a new New Child Group for an SOS enforced group will require a Mandate to be entered before the Child Group can be created, unless it is of the type in the previous list.
Adding Linked Roles
To link a Role in one Hub Group with a connected Role in another group, you must be a Group Admin of both groups, or you need to be a Hub Admin. With that in mind, from the Hub Group page, select Roles to display all the group's roles. Select the Role you wish to Link to get the following page:
Click on the dropdown "Role Holder represents this group in", and select the group you want to link the role to. The top entry is the current group's parent, as that is the one most often chosen. The remainder are in alphabetical order. To unlink a role, just select the blank entry.
When you have selected the entry, the Linked Role field below will be filled in with a pre-set value - usually a role name which includes the same name as your group. However, you may change that, either by selecting one of the existing role names in the other group from the dropdown, or by typing a new role name that describes the nature of the link.
Default Roles are created by SOS
A set of important Default Roles has been created by SOS. These include External Coordinator, Internal Coordinator, Group Admin, etc. Hub Admins can edit these Default Roles, but they should only be changed with the permission of SOS. Click the XRGroups>Hub Group Name>Roles>Default Roles buttons to see the following listing:
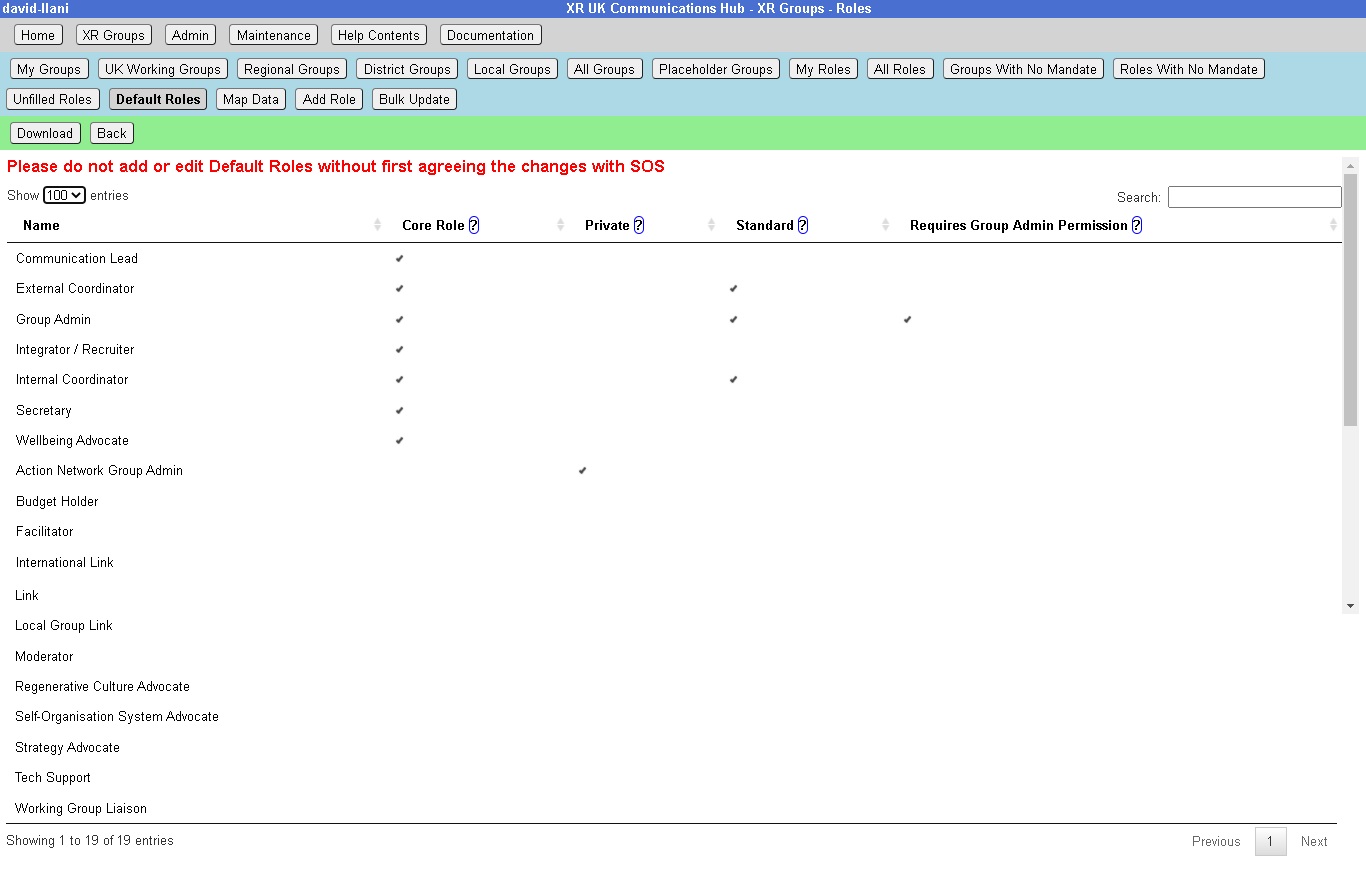
Group Admins selecting a new role can choose from these Default Roles, to get a role prefilled with standard purpose and accountabilities.
Note that for Hub Admins, the Default Roles page has an additional tickbox under Standard. If this is ticked, then any new Child Group being created will get each one of these Standard Roles automatically.
Bulk Update (Hub Admins)
If you have made a change to a Default Role, you can bulk update selected Hub Group roles to make the same change to them. You should only do this if you have a mandate to do so (usually from SOS).
Click the Bulk Update button (either when editing a default role, or on the list of default roles), and you will see a list of all the changes that have been made.
Pick one, and you will see a summary of the changes made. Now choose which groups to apply the change to - you can choose a specific Hub Group Type (default: Uk Working Group) and/or a Root Hub Group (default: UK Rebel Hive). Only groups which are descendants (subcircles, sub-subcircles, etc.) of the chose group will be changed.
If it is a change to a role (rather than an accountability), you can also choose whether to only change roles where the previous values match.
When you click Save, all the corresponding roles in the selected Hub Groups will be updated to match your change.
Setting up a new group on the Hub
This document takes you through the process of creating a new group on the Hub.
See also
- How to organise on the new services
- Setting up a new working group on the new services
- Good Practice Guide
Creating a new Child XR Group
If you are part of a large organisation which has working groups (e.g. a large working group like Communities has a number of large and separate working groups, like Mass Mobilisation, Regional Development, etc.), you can create separate Hub Groups for your working groups on the Hub and the new services.
To create a new group, go to your group in My XR Groups, and click the New Child XR Group button.
This shows the new group screen:

SOS principles suggest that a new working group is created when a role becomes too much for one person to handle, and needs a group of people. The existing role holder becomes external coordinator of the new group, and the group inherits the mandate of the role.
There are two choices here - if you are creating a new group to fulfil an existing role, then select the role in the drop down.
If there isn't an existing role, just leave the dropdown unchanged.
Then click "Create Subgroup" - this takes you to a new Hub Group screen with the parent Hub Group fixed (and the Hub Group type selection limited appropriately). Note you can only have one new Hub Group pending at a time. If you try to start a new one when you already have one which hasn’t been created, you will just be editing the existing form!
Once you have filled in the form, and it has been accepted by a Hub Admin, your new XR Group will have exactly the same kind of facilities as any other Hub Group – channels on Mattermost, security groups and forums on UK Forums, and optionally a separate file storage area on UK Cloud. People in the new group are not automatically also in the parent group (though you can invite them to be in both, if you like). If the parent (or any ancestor) group has Invite All Members Of Child Hub Groups ticked, they will be invited automatically to those groups (although they do not have to accept).
This allows your group to have private discussions (and files, if required) which are not automatically seen by the parent group, or other working groups.
If you want to set up a group which is not a child of one you are already Group Admin for, you need to ask the Group Admin of the parent group, or email tech@rebellion.earth for an invite in the usual way.
Normally a Group Admin of one group will create a child group (which automatically makes them Group Admin of the child group). They may well also appoint other Group Admins of the child group, and may remove themselves from the child group when this has been done.
New Hub Group Screen
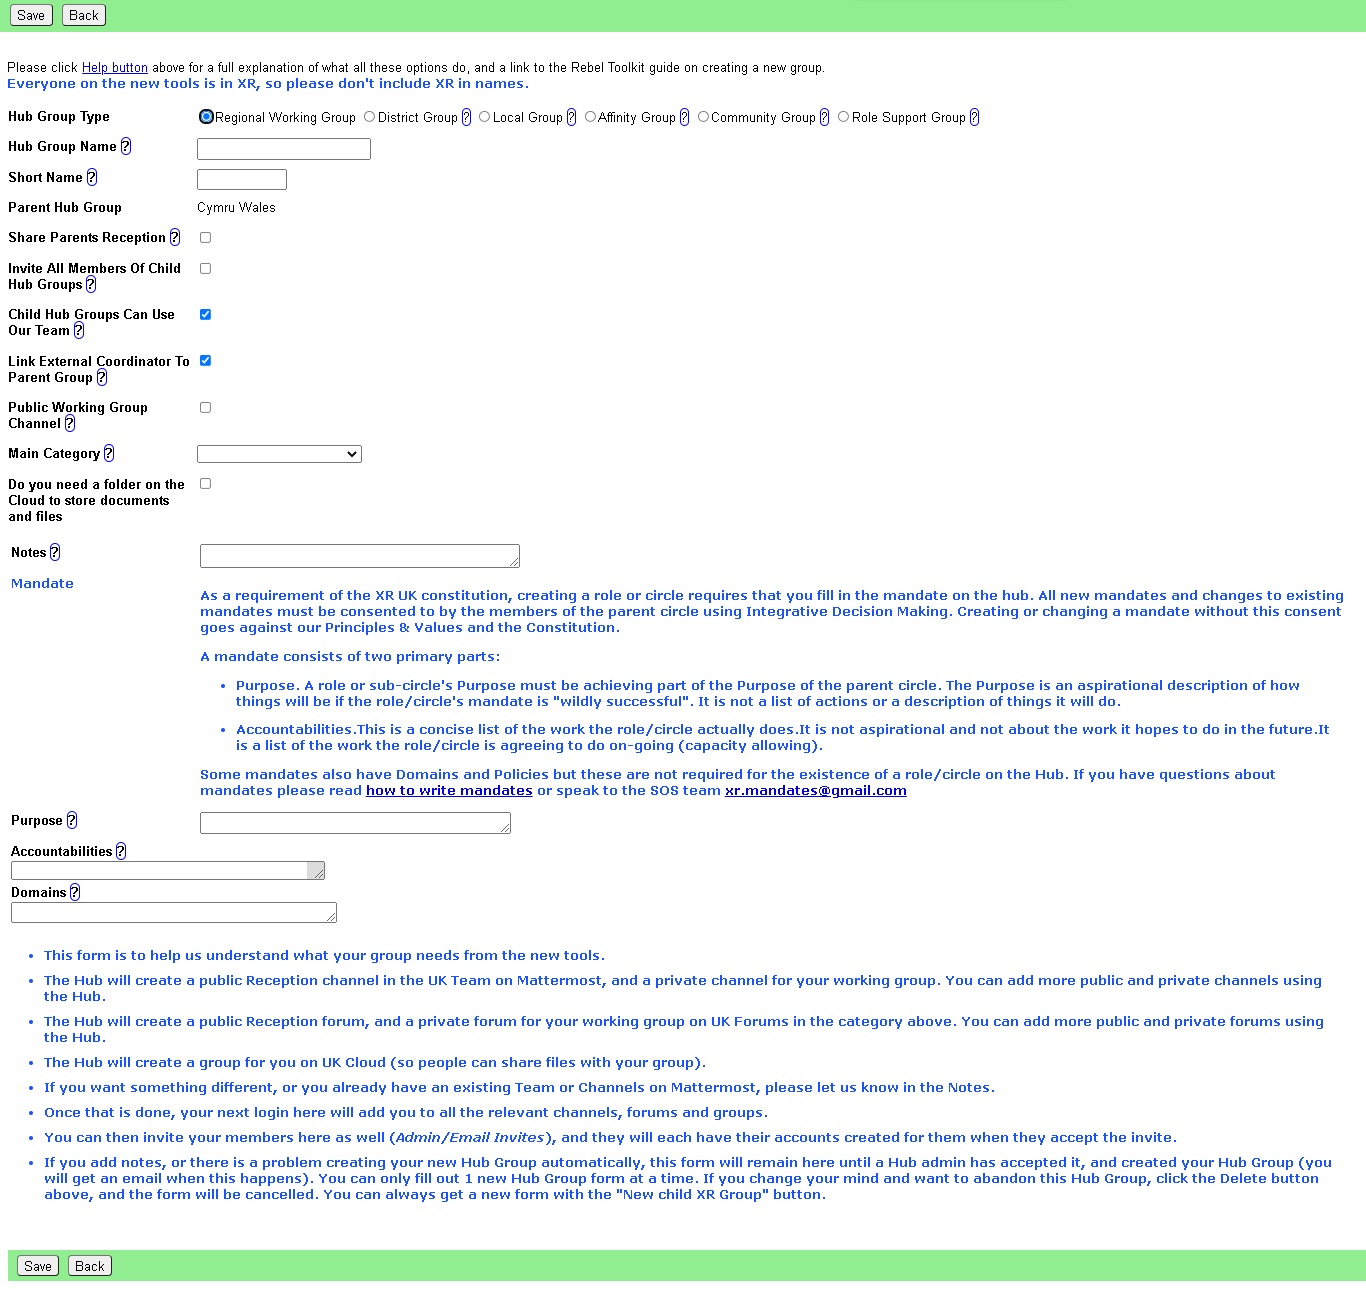
This is the screen you fill in to create your Hub Group. Some of the fields will disappear, depending on what options you choose. Click the Help button for a more detailed explanation of what all the fields are for, and how you should fill them in. Don’t forget to tick “Tick Here When Complete” when you have finished filling in the form, so it will be passed to the admins for implementation.
If you are creating a regional, district, local or affiity working group, or if the admins have given you Creator access, and have haven’t filled in any Notes, then your new Hub Group will be created right away, without admin intervention.
The idea of Creator status is that you are given this access level when you have got familiar with the form, and created a few Hub Groups without problems. If you think you should have it, ask in the Tech Champions & Group Admins or Digital Discussions Applications Team channel.
Hub Group Type - All the possible Hub Group types are shown in this screenshot. You will have fewer to choose from, because (for instance) it doesn't make sense for a UK Working Group to be a subgroup of a Region. Some group types have an explanation of what they are for (click the ? next to the name).
Hub Group Name – please be aware that the name you choose here must be unique within the whole of XR UK. So, when creating the Media & Messaging working group for Trumpton Local Group, you need to include Trumpton in the name. Otherwise you may block a main UK working group from using their name, and you may get lots of questions in your reception channel for them, instead of for you!
Parent Hub Group - if you are creating a child group, this will be fixed to the parent group. Otherwise you must get permission from the parent group before creating the child group.
Join All Members Of Child Hub Groups is important. If you tick this, all members of any descendant (child, grandchild, etc.) groups will be invited to join this group. If they accept the invite, they will be full members of your group, and have full access to everything – Team, public and private channels, public and private forums, and cloud storage. Ticking this is recommended for Local Groups – then, if they create separate Hub Groups for their working groups, people invited to the working groups will also be invited to the local group. Districts and Regions may also want to tick this – then all their local group members will be invited to the Region.
Child Hub Groups Can Use Our Team This is ticked by default. If you leave it ticked, any child Hub Groups you create, that don’t ask for their own team, will use your Mattermost Team. If you don’t like this, and want to keep your Mattermost Team just for you, then untick this box, and child Hub Groups will use your parent’s team (or, if they have it unticked, their parent – right up to the UK team if everyone has it unticked).
Link External Coordinator To Parent Group This is ticked by default for working groups. It follows SOS principles, so the External Coordinator of your new Hub Group is automatically joined to the parent Hub Group, in a role representing your Hub Group.
Mandate SOS principles require that working groups have a Mandate - see Mandates and how to write them. All groups which make decisions on behalf of the movement (or part of it) are expected to have a Mandate (see below). Project Groups are groups which are set up to achieve a specific task, and have no decision making capability, so they don't need a mandate. Role Support groups likewise have no decision making capability, so don't need a mandate either.
If you already have a Mattermost team
If your group is already on Mattermost, it is very important that you let us know, so that we link the Hub to your existing team. Use the Notes section of the form to tell us what your team is called, and which channels you want people to be joined to automatically.
You also have to give xrukadmin (the Hub’s login) admin access to your team, so the Hub can add people to it. You can only do this using a web browser or the PC app to connect to Mattermost – the phone apps do not have all the menu options.
The procedure is:
- Go to your team.
- Click the bar menu, Manage Members.
- Click Invite People.
- Type xrukadmin in the Add or Invite people box.
- Go back to Manage Members.
- Find it in the list, and use the drop down to make it Team Admin.
- Then go to each channel, and join xrukadmin to it.
You also need to join xrukadmin to any channels you want your members to be joined to automatically by the Hub. If you do not do this, the Hub cannot join people to your team and channels.
When the admins actually create your Hub Group on the new services, you will receive an email telling you this has happened. The next time you log in to the hub, your accounts on the new services will be set up for you automatically, and you can start using them.
If you want a new Mattermost team
It is recommended that you use the same team as your parent (for local groups this will normally be the regional team). This is so your group can easily interact with other groups in the region.
Only the Mattermost admins can create Teams on Mattermost now – you need to DM them @xradmin and @xradmin2 to ask for a new team. The team name must not clash with an existing team, and must be between 2 and 15 characters long. Once they have created it for you, please follow the instructions in If you already have a Mattermost team above.
What next
Read the The Hub for Group Admins for how to invite people, add new forums and channels, etc.
Deactivating or reactivating someone's account
Explains how to deactivate an account if someone is arrested or loses their phone or other device.
See Compromised Account Procedure
If a person loses their phone or other device they use to access our services (e.g. if they get arrested), a group admin can deactivate their account.
Deactivating an account
Find the person in your group, by going to the group, clicking All Members. Click on the person.

Enter the reason you want to deactivate them, and click Yes.
The user will immediately be removed from all UK private teams on Mattermost, and their accounts in Hub, Forums and Cloud will be deactivated. A message will also be sent to the global Mattermost admins asking then to deactivate the Mattermost account.
If the user has a vault account for the same email address as they currently have on the Hub, it will also be deactivated.
Reactivating an account
Do not reactivate the account of someone you do not know personally.
And, of course, make sure :
- They really have been released, and have all their devices back
- Their email address has not been compromised
If in any doubt, do not reactivate until their email address on the Hub and all other services has been changed to a new, uncompromised address. To do that, obtain their current Mattermost password, and ask your regional Hub Admin, or request in the Hub Help Desk on Mattermost.
Follow the same steps - the button should now say Reactivate User. Clicking it shows this confirmation screen:

Click Yes to reactivate them. The user will immediately be rejoined to all their UK private teams on Mattermost, and their accounts in Hub, Forums and Cloud will be reactivated. A message will also be sent to the global Mattermost admins asking then to reactivate the Mattermost account.
If they are a member of Mattermost channels which the Hub does not know about, their membership of those channels will not be restored automatically. They need to rejoin them "by hand", by asking people in the channel to join them again.
If the user has a vault account for the same email address as they currently have on the Hub, it will also be reactivated.
Placeholder Hub Groups
Placeholder Groups represent groups who do not use the Hub, so they appear in the Hub Circles diagram, and can store their public facing contact information.
Creating a Placeholder Group
Only people with "Group Admin of All Groups" permission (or above) can create Placeholder Groups. This includes regional Hub Admins.
Go to the parent of the group (usually a Region, or maybe a District), and click New Child Placeholder Group.

Put in the name and short name, and select the group type (usually Local Group)
Editing a Placeholder Group

Click the Edit Contact Info button to add contact information.
What to do if the group wants to come on the Hub
If the group has a trained Group Admin, then invite them to be Group Admin of the group. Then, when they look at the group on the Hub, they will then see the "Add to Hub services" button in the screen above.
If not, you will have to find out what they need on the Hub, and do it yourself - but they will need a trained Group Admin at some point, so the first option is preferred.
This is like the New Group Screen, but with fewer options.
Once it is filled in correctly, clicking Save should create the group on the services right away.
What do DDAT do?
Digital Discussions Applications Team
Click on any images to access the service, mouseover to see contact details.
The Rebel view


Arrest Watch
Behind the scenes
Other services not supported by DDAT
Meeting Links - back up advice ...
Find Meeting Links when Mattermost is down
Usually, you will find useful information, like zoom meeting URLs and meeting agenda links, in the Header of your Hub Group's Mattermost channel. But, what to do if the Mattermost Server goes down - just before your meeting starts? Your channel, and it's Header, containing the meeting link, etc, won't be available, so, here are some useful tips:
-
Save the relevant links as Bookmarks in your Browser - you will then be able to retrieve them from the Bookmarks Tab;
-
You could also create a Bookmarks Folder called, say, Meeting and Agenda links using the Bookmarks Manager. In this, you can save the zoom and meeting agenda URLs that are associated with your Hub Group. The image below shows the 4 steps:
a. Click on the zoom meeting link you use to connect with your meeting and open the associated Zoom Dialogue Page;
b) Now drag this page's URL padlock to the Folder Icon called "Other Bookmarks" - Note that the Padlock changes to the Page Title, in this case "Post Attendee - Zoom";
c) When you reach the Other Bookmarks Icon, a Drop-Down menu of Bookmark Folders will appear - drag the "Post Attendee - Zoom" down to the appropriate Folder, in this case "Zoom Meetings", and un-click your Mouse/Pointer - the Meeting Link is now saved;
d) When you wish to open a zoom meeting, click on the Other Bookmarks Icon, open the Zoom Meetings Folder and click on your Meeting Link to open the Zoom Dialogue Page.
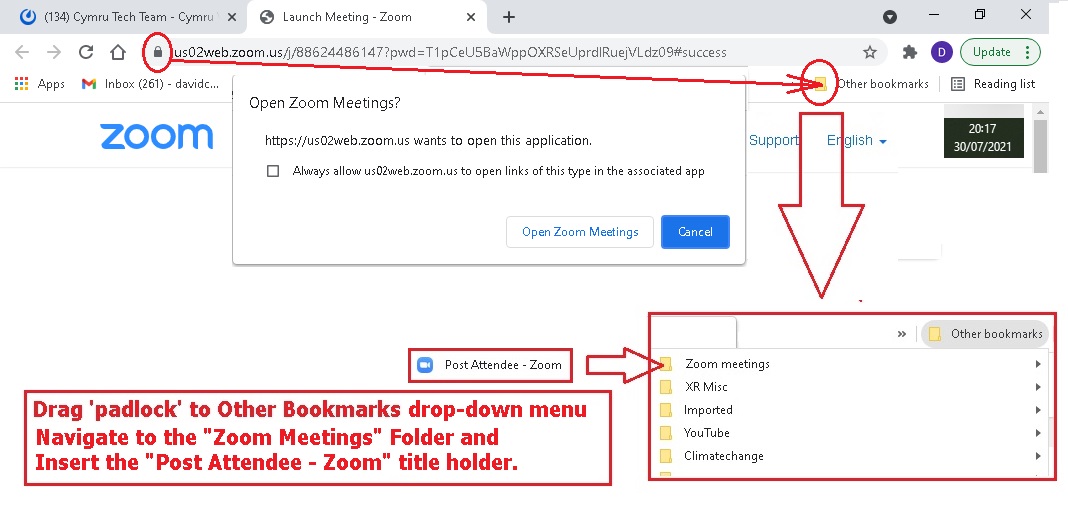
-
Another option would be to add a New Topic to the Hub Group's UK Forum, which would list any meeting and agenda links. If this topic is Pinned, then it will appear at/near the top of the topic list, so will be readily visible.
-
You should also add the Meeting URL to the Default text of your Agenda-Minutes document, in your Hub Group's UK Cloud Folder. Each time you generate a new Agenda-Minutes document, the Meeting URL will be available.
-
Save your Hub Group's meeting info - time/day/URL - in a short Text Document in your Hub Group's UK CLoud Folder. Give the document an appropriate name, and invite other members to add further meeting links.
-
The Calendar function, on UK Cloud, which reminds you f when meetings are to be held, can also include details like zoom link, etc. When setting up your Hub Group's Calendar, be sure to share it with the Hub Group.
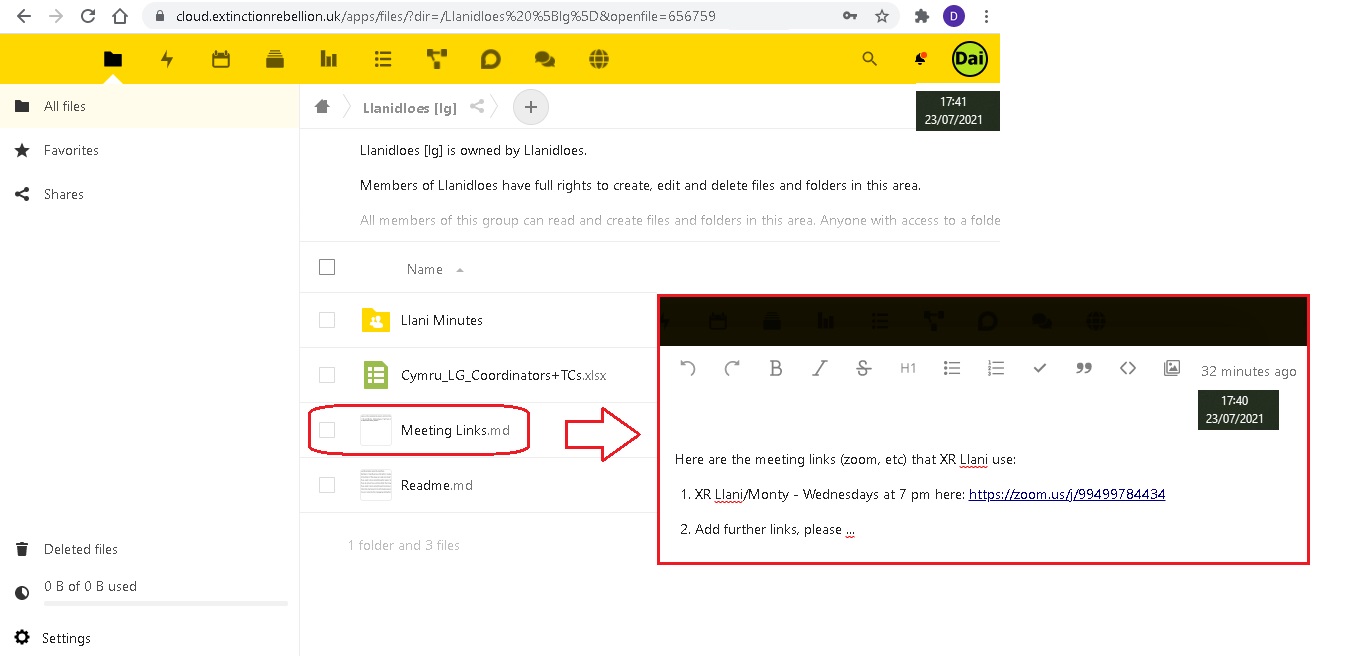
- For Group Admins, it's possible to add your group's Zoom Meeting Link URL to your Hub Group's Contact Info, which is displayed on the Hub Group Page. Additionally, you can add a link for your group's Meeting Agenda/Minutes for Members Only when members select the Hub Group from the My XR Groups option from the Hub Landing Page. Note that you may want to use the Markdown Format for these hyperlinks, as shown below:
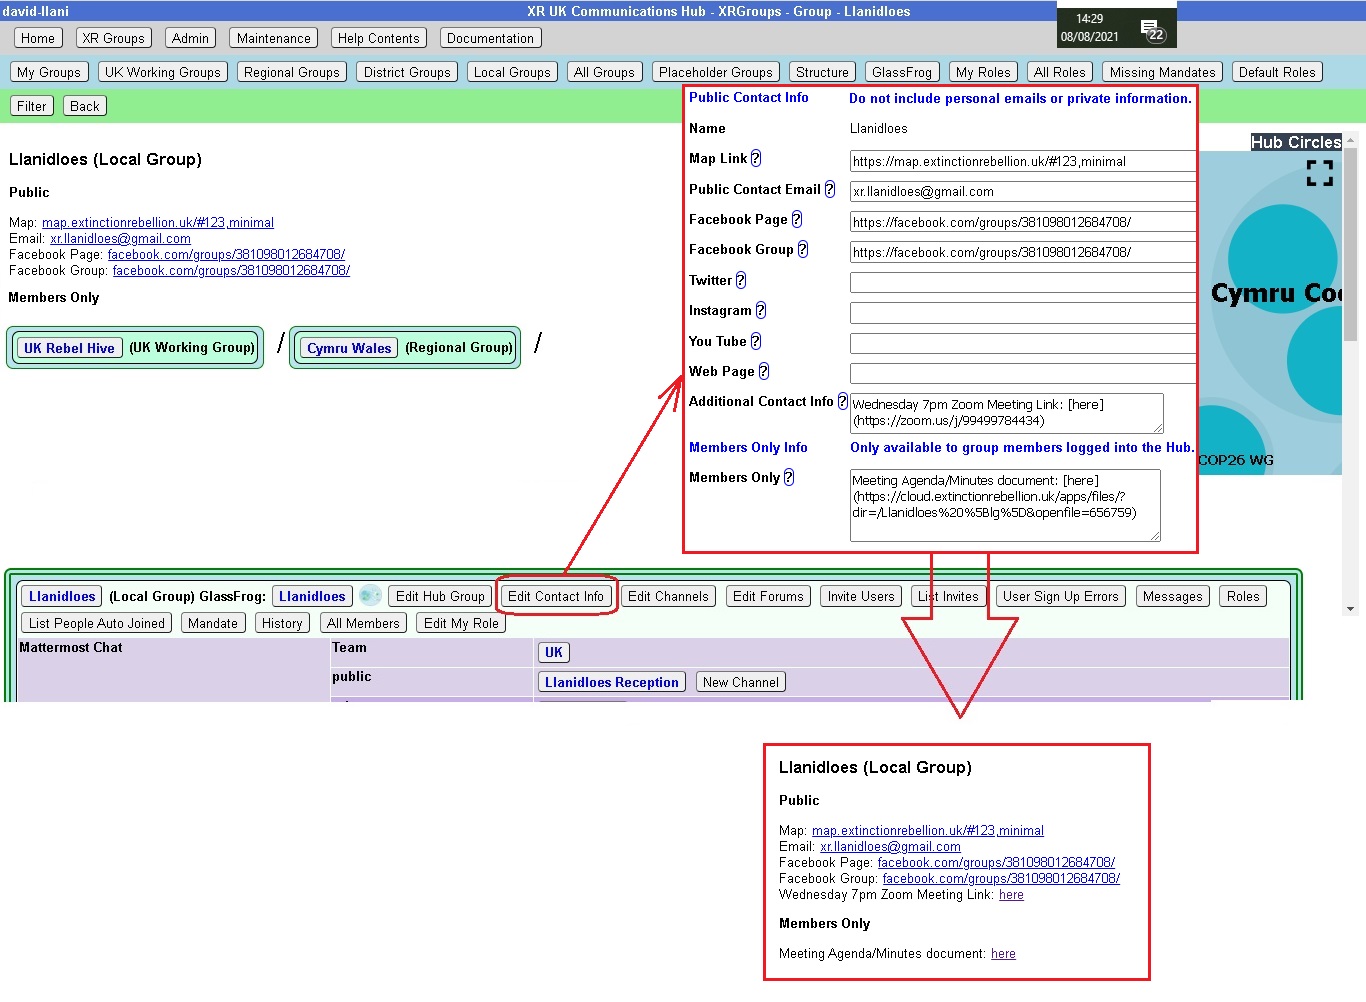 Note also that for a zoom meeting, you may need to organise a Waiting Room function, which will enable the Zoom Meeting Host to review participants on entry.
Getting the message across
Don't forget that with any meeting link back up(s) that may be implemented, for your Hub Group, the advice on where to find these links must be known to your members, either documented or part of your group's on-boarding and training.