User Guides
- Mattermost
- The Hub
- UK Forums
- UK Cloud
- The Vault
- Making Forms with Cryptpad
- Accessing the Tools Using a Smartphone or Tablet
- Online Behaviour Guide
- How do I join the Hub
- Problems Getting on the Hub
- Compromised Account Procedure
- Videos to help with getting your local group onto the Hub
- How to use the Big Blue Button (video conferencing)
- How to Change Your Login Name [Handle]
- How to get Tech Help!
Mattermost
Read this document to get familiar with Mattermost. It is used to communicate with XR groups as well as have 1-to-1 conversations. You can also watch this video for a general introduction to Mattermost and its benefits.
If you need support with:
- How to use Mattermost
- Getting onto Mattermost
- Using the Hub (and XR's other services including the UK Cloud, UK Forums)
Please join one of the weekly sessions:
Mondays 17:30-18:00 (quick questions)
Thursdays 18:30-19:30 (longer training)
Join Zoom Meeting https://us02web.zoom.us/j/89528558324?pwd=R0JWZUovZk8zUy9RMXRjZGFGTmJaUT09
Meeting ID: 895 2855 8324 Passcode: 278766
First Steps
Getting Access
Before you can access Mattermost you first need to sign up to the XR UK Communications Hub. For instructions on how to do that please read this guide.
Once you are on the Hub you can access Mattermost in a few ways:
- Click on the Mattermost icon from the Comms Hub main page.
![]()
- Type https://organise.earth into your browser and hit Enter.
Once this is done we recommend adding the page to your bookmarks/favourites so it's easier to find in future.
Note: Mattermost is also available as an app so you can install it to your smartphone or tablet. Please read this document or watch this video for instructions on how to do this.
Landing Page
When you have logged in to Mattermost you will see a screen that looks a lot like this:
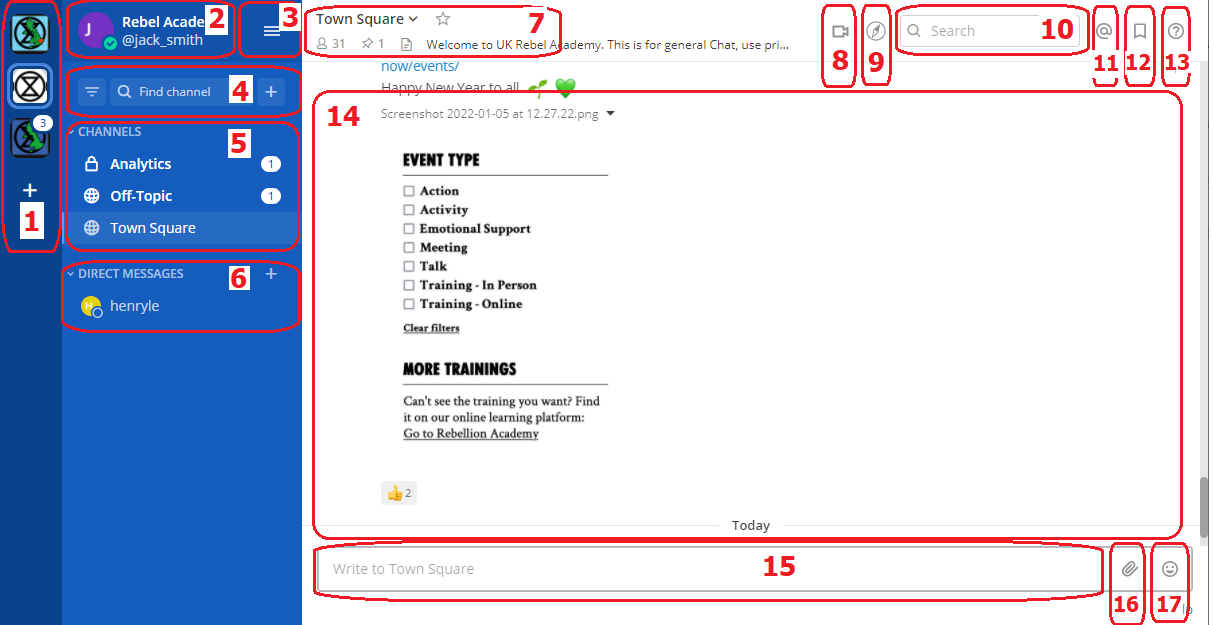
Note that we have added numbers to the screenshot and we will refer to this image throughout the document.
Navigation
Please watch this very helpful video for a guide to navigating Mattermost: from using Teams and Channels to saving and threading messages.
Teams
Teams in Mattermost are basically collections of Channels. They appear on the far left of your screen (1) and you can click on the icons to switch between them.
You will be added to the UK Team by default but your group might use other Teams and you will see these too.
Checking who else is in my Team
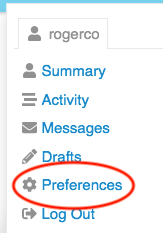
To see the other members of a Team, click on the Main Menu (3) and select View Members.
Joining other Teams
For UK Circles with their own Team, you can contact them via their Reception Channel in UK Team.
To join a public Team, click on the + sign below your list of Teams (1). This will bring up a list of all the other XR public Teams you are able to join, including for other countries. Click on one of the list of Teams to add yourself.
If you want to be added to a private Team (e.g. for your local group) you will need to speak to a Group Admin/Tech Champion who will be able to send you an invite.
Leaving a Team
To leave a Team, open the Main Menu (3), and then select the option Leave Team.
Note that once you have left a Team, if you want to re-join at any point, you will have to join (or be invited to) all the Channels you belong(ed) to previously.
Channels
Channels are just another name for group chats. Every local group/working group set up on the Hub will have several of these Channels that you will be added to if you are part of that group.
Note: For a walkthrough of Channels you can watch the Finding and Joining Channels video (4 mins).
Type of Channels
 Most Channels are public, so anyone in the Team can join them. They have a picture of the world next to them. Some Channels are private, by invitation only, and they have a padlock next to them.
Joining Channels
To join a public Channel either click in Find Channel and search, or click the + button to browse Channels on the left (4). This will bring up a list of all of the public Channels in your Team. Click on any of these in the list to add yourself.
If you want to join a private Channel you should ask someone already in that Channel to add you. You could also post a message in that group's reception Channel asking to be added.
Leaving a Channel
To leave a Channel, click on the its name at the top of the screen (not where it appears on the left) and then select the option Leave Channel. Alternatively if you hover over the Channel on the left three dots will appear next to it and from that menu you can select Leave Channel.
Muting Channels
You can mute Channels if you want to stop receiving notifications from it but don't want to leave. To do this click the Channel heading (at the top of the screen), or hover over the Channel on the left and click the three dots, then click Mute Channel. You can also set whether you want to be notified if someone uses @all or @channel by clicking on Notification Preferences.
Default Channels
Every Team has two default Channels that you will be added to when you are added to the team:
-
Town Square: This is the communal area in each team that should be used for announcements and general XR-related discussions.
-
Off Topic: This is a place where team members can discuss things that aren't directly related to the business of the team (e.g. social activities).
Very Important: Please do not rename these default Channels as it will cause a lot of confusion.
Note: It is not possible to leave the Town Square Channel. If you want to stop receiving notifications you should mute the Channel instead.
Sorting Channels
If you hover over the CHANNELS header on the left (5) then click on the three dots you can sort your Channels one of three ways:
- Alphetically
- by Recent Activity - the most recent will be at the top
- Manually - you can drag the Channels up and down into the order you prefer
If this isn't enough you can Create New Category which enables you to sort Channels into groups that suit you, for instance relating to particular projects or areas of interest. Once you have created your categories you can drag and drop Channels between them.
Contacting other groups
All XR UK groups on Mattermost have a public 'Reception' Vhannel in the UK Team, and their members will be added to them by default (you will probably be in some yourself). This lets rebels from other groups find and speak to them.
To join someone else's reception Channel, go to the UK Team, click Find Channel or + (4), to search or browse for the Channel you want to join and then click Join. The Channel will then appear in your Channels list.
Creating Channels
Important: You should not create public Channels from inside Mattermost. Instead please get your Group Admin/Tech Champion to do this for you using the Hub.
To create a private Channel:
- Click on the + sign next to Find Channel (4)
- Select 'Create new Channel'
- Enter a name for the new Channel (and optional purpose and header), ensure Private is selected.
- Click Create Channel
Channel headers (7)
Underneath the Channel name at the top of the page is the Channel header. It is a useful place to put information about what the Channel is for and to store some useful links (e.g. your group's Forum or your regular Zoom meetings).
To see all the info click on the Channel name:
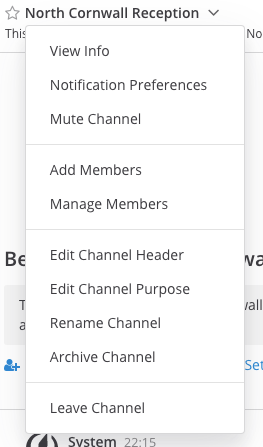
then click on View Info.
If you want to change what is written in the header click on Edit Channel Header. If you want to add links to this section the process is the same as here. Please confirm with your Group Admin before making any change to the Header.
Sending Messages (15)
You can write messages by typing in the box at the bottom of the screen. To send them hit Enter. The message will be sent to the Channel or Direct Message you are currently in.
Alerting people to messages
If you want a particular person to read a message you are sending, you can tag them by writing '@' followed by their username (e.g. @xrukadmin). This will send them a notification.
Important: You can also use @all or @channel to notify everyone in a Channel but please use this responsibly as for larger groups it is rarely appropriate and may annoy people.
Sending Direct Messages (6)
To send someone a Direct Message (instead of posting in a Channel):
- Click the + sign to the right of the heading DIRECT MESSAGES to the left of the screen (6)
- Select the users you want to message (up to a maximum of 6)
- Write and send your message
All of the Direct Message conversations that you have had will appear below the DIRECT MESSAGES heading to make it easier to contact them again. Next to each name, an icon shows whether they are online or not. Clicking on a username will display your Direct Message history with that user. Users you do not need to contact regularly can be removed from this list by pressing the cross to the right of their name.
Sorting your Direct Messages
Much like with Channels, Direct Messages can be sorted alphabetically or most recent first. You can also choose how many to show (all, 10, 15...). To change these settings hover over DIRECT MESSAGES then click the three dots to the right of it.
Replying to messages
It is possible to reply to messages posted in Channels or Direct Messages using 'threads'. These are helpful if you are having multiple conversations at once so people don't get confused about which messages are related to which discussion. To reply to a message in a thread click on the Reply icon:
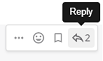
Note: For a full explanation you can watch the threading messages video (5 mins).
Reacting to messages
To add a reaction (e.g. a thumbs up or heart icon) to a message click on the Add Reaction icon:
 .
.
To post a reaction to a message you can click on the Emoticon icon on the bottom RHS (17).
Searching for messages (10)
Use the search box to find messages and replies that match the search terms that you enter. All Channels that you are a member of in the current Team are searched.
Note: For a full explanation you can watch the Searching for messages video (3 mins).
Saving messages
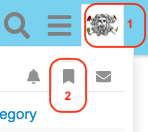
You can click on the 'save' icon (like a bookmark) next to a message to save it for later, then bring up all your saved messages by clicking on the 'Saved posts' icon at the top right of the screen (12).
Note: For a full explanation you can watch the Saving messages video (3 mins).
Adding links
To add a picture click on the paperclip icon on the bottom LHS of the screen (16). To add a nicely formatted link to your message, write the text you want to show in square brackets immediately followed by the link URL in round brackets. For example:
Check out this fantastic [guide to Mattermost](https://rebeltoolkit.extinctionrebellion.uk/link/394#bkmrk-page-title)!
will look like:
Check out this fantastic guide to Mattermost!
when sent.
Other formatting tips
Here are a few simple tips to make your messages look better:
- **bold** displays as bold
- _italic_ displays as italic
- ~~strikethrough~~ displays as
strikethrough - ```typewriter style``` displays as
typewriter stye - >quote displays as
quote
Copying messages
It can be difficult to copy messages in order to share them in multiple Channels without losing the nice formatting and any links. Currently the only way this is to:
Video Calls (8)
If you are in a Direct Message chat clicking the camera link will start a video call between you and the person (or people) in that chat; if you are in a Channel it will open a video chat link for anyone in that Channel to join, using Big Blue Button. It posts a link for everyone to click on to join the call.
Rebel Compass (9)
This takes you to a bunch of links and resources from XR Global including plaforms, videos, documents, trainings, events etc.
Notification settings
Note: For a walkthrough of all the content in this section you can watch Notifications (5 mins) and Acccount Settings (4 mins) videos.
To get the most out of Mattermost we strongly encourage you take the time to get your notification settings set up just right. This will make sure that you don't get overwhelmed by huge numbers of irrelevant notifications, and also that you won't miss any important messages that you need to see.
To modify the notification settings in Mattermost, open the main menu (3) and click on Account Settings. This will present you with a screen that looks something like this:
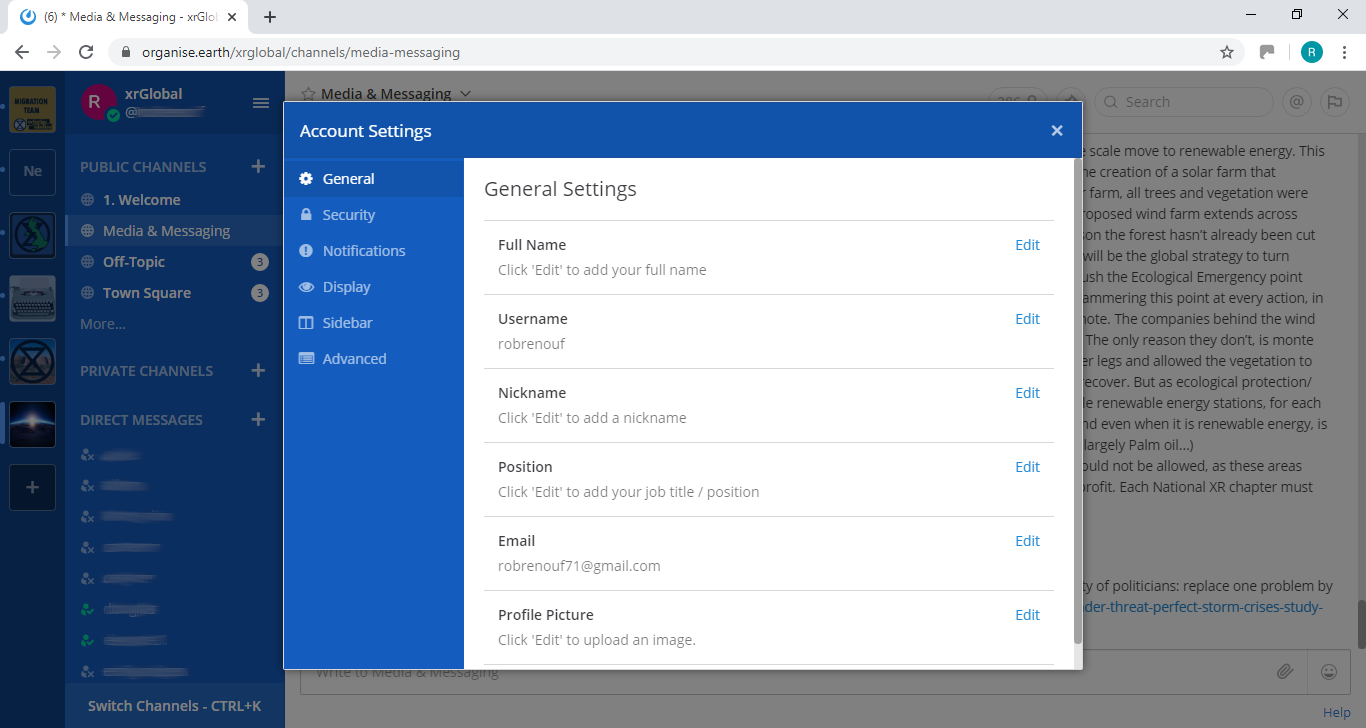
To access your notification settings click on the Notifications tab.
Setting desktop/mobile notifications
To modify these settings go to the notification settings page (link) and click Edit under the sections labelled Desktop Notifications or Mobile Push Notifications.
We recommend that Send desktop notifications (under Desktop Notifications) and Send mobile push notifications (under Mobile Push Notifications) are set to either For all activity or For mentions and direct messages.
Enabling email notifications
You can enable email notifications of Mattermost messages. To do this:
- Open your notification settings (link)
- Under Email Notifications click Edit
- Under Send email notifications tick Immediately
- Click Save
Setting notifications for reply threads
To be notified of all messages that happen in a thread you participated in you should:
- Open your notification settings (link)
- Under Reply notifications click Edit
- Tick Trigger notifications on messages in reply threads that I start or participate in
- Click Save
Personalising your mentions
It is possible to get notified everytime a certain word gets mentioned in one of your channels. By default this will just be your username including the @ symbol (e.g. @myusername) but you can add extra words if you like. For example, if you do a lot of work on the Rebel Toolkit you may want to add toolkit to your list of words that trigger mentions.
To set this up:
- Open your notification settings (link)
- Under Words That Trigger Mentions click Edit
- Tick any of the tickboxes that apply
- Add any additional keywords (e.g.
toolkit) in the space below the tickboxes - Click Save
Seeing recent mentions (11)
Click on the top right @ sign to see posts where you have been mentioned recently.
Grouping unread messages together
You can get Mattermost to collect unread messages at the top of the sidebar so they are easier to find. To do this:
- Open the Mattermost settings (link)
- Click on the Sidebar tab
- Under Channel Grouping and Sorting click Edit
- Tick Unreads grouped separately
- Click Save
Setting up 'out-of-office' messages
If you will not be reachable on Mattermost for a while and would like to set an automatic reply that anyone who messages you will see then you should:
- Open your notification settings (link)
- Under Automatic Direct Message Replies click Edit
- Tick Enabled and write your message
- Click Save
You can follow the same process to disable the automatic messages when you return.
Getting rid of annoying messages from 'System'
In your Channels you will probably see lots of messages from 'System' notifying you that people have been added to, and left the Channel. You can turn these off by:
- Open the Mattermost settings (link)
- Click Advanced
- Set Enable Join/Leave Messages to Off
Further information
Setting your status
To change your status (which can be Online, Away, Do Not Disturb and Offline):
- Click on your image/icon at the top left of the screen (2)
- Click on the option that you want
Adding a profile picture
To add a profile picture to your Mattermost account:
- Click on the main menu button (3)
- Click on Account Settings
- Under General Settings > Profile Picture click Edit
- Upload an image of your choice
- Click save!
Logging out
To log out of Mattermost, open the main menu (3) and then click on Logout.
Other places to find information about Mattermost
There is a help button (13) at the top RHS of the screen.
Here is useful list of other resources about Mattermost that you might find useful after reading this guide:
-
This is the official guide to Mattermost. It goes into a lot more detail than this guide but is more complicated and not all of it is relevant to XR.
Here is an example of how to embed an animated image from the Mattermost docs

The Hub
What is the Hub?
The Hub is the tool XR UK uses to connect lots of the programs (e.g. Mattermost and UK Forums) that rebels use to organise online.
Why do we need it?
The Hub does some really important things:
- It creates accounts for rebels on the other tools (e.g. Mattermost) so you can sign in with the same username and password everywhere.
- It automatically adds rebels to all the channels and forums for all of the XR groups they are a member of.
- It can temporarily suspend the accounts of rebels who are arrested so the authorities cannot get access even if they take the rebel's phone or computer.
The Hub also keeps track of the structure of all the XR groups that have joined (see below). This is extremely useful because it makes it really easy to find the right people to talk to.
How do I join the Hub?
To join the Hub, you need to follow the steps described here.
Using the Hub
Home page

This is the Hub home page. Here you can see links to many other XR services. Click on any of the icons to go to them. Most browsers allow you to click while holding the Ctrl key to open the link in a new tab.
The grey area at the top contains links to training on the XR communication tools. If you already know all about the the subject, click "I'VE DONE THIS" and it will show you the next set of training. Once you have done them all, it will disappear (but you can get it back – there is a link at the very bottom of the page, if you scroll down).
Some of these icons only show if you are logged in to the Hub – click LOG IN in the top-right corner:

Admins will have extra options on this page, e.g. to invite other people to the Hub and the new services.
Secret Codeword
Click this icon to set a unique secret codeword to identify you. Then, if you want to communicate with XR (e.g. Arrestee Support) without revealing who you are to anyone listening, you can use the codeword. They can look it up on the Hub, and know who you are.
Only Arrestee Support, Hub Admins, and your Group Admins can see your codeword.
If you want to change your code word later, it is in Settings – click your name in the top-right corner to see the menu.
Joining new XR groups
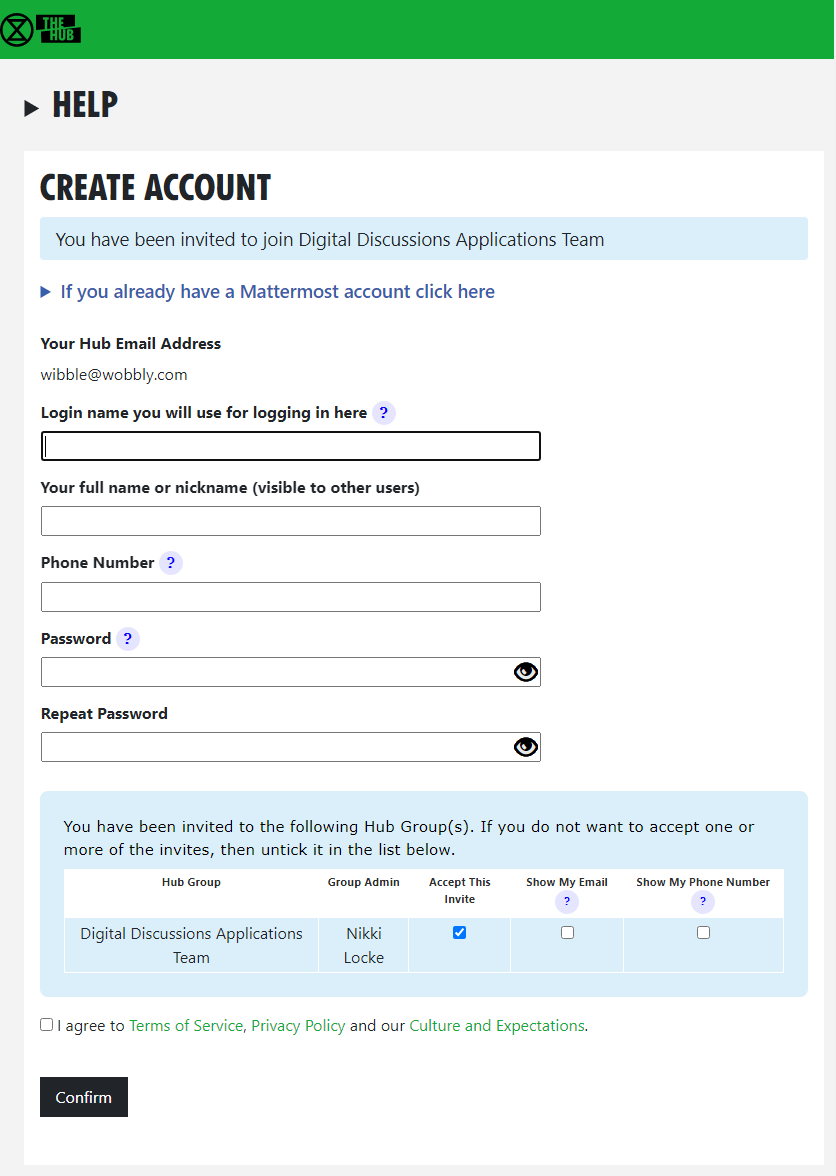
If you are already on the Hub and are invited to join a new group, you should get sent an email (check your spam folder if you can't find it). If you click on the link in the email, it will take you to a page that looks something like this:

Click the Create Hub Account button. You will see the following screen:
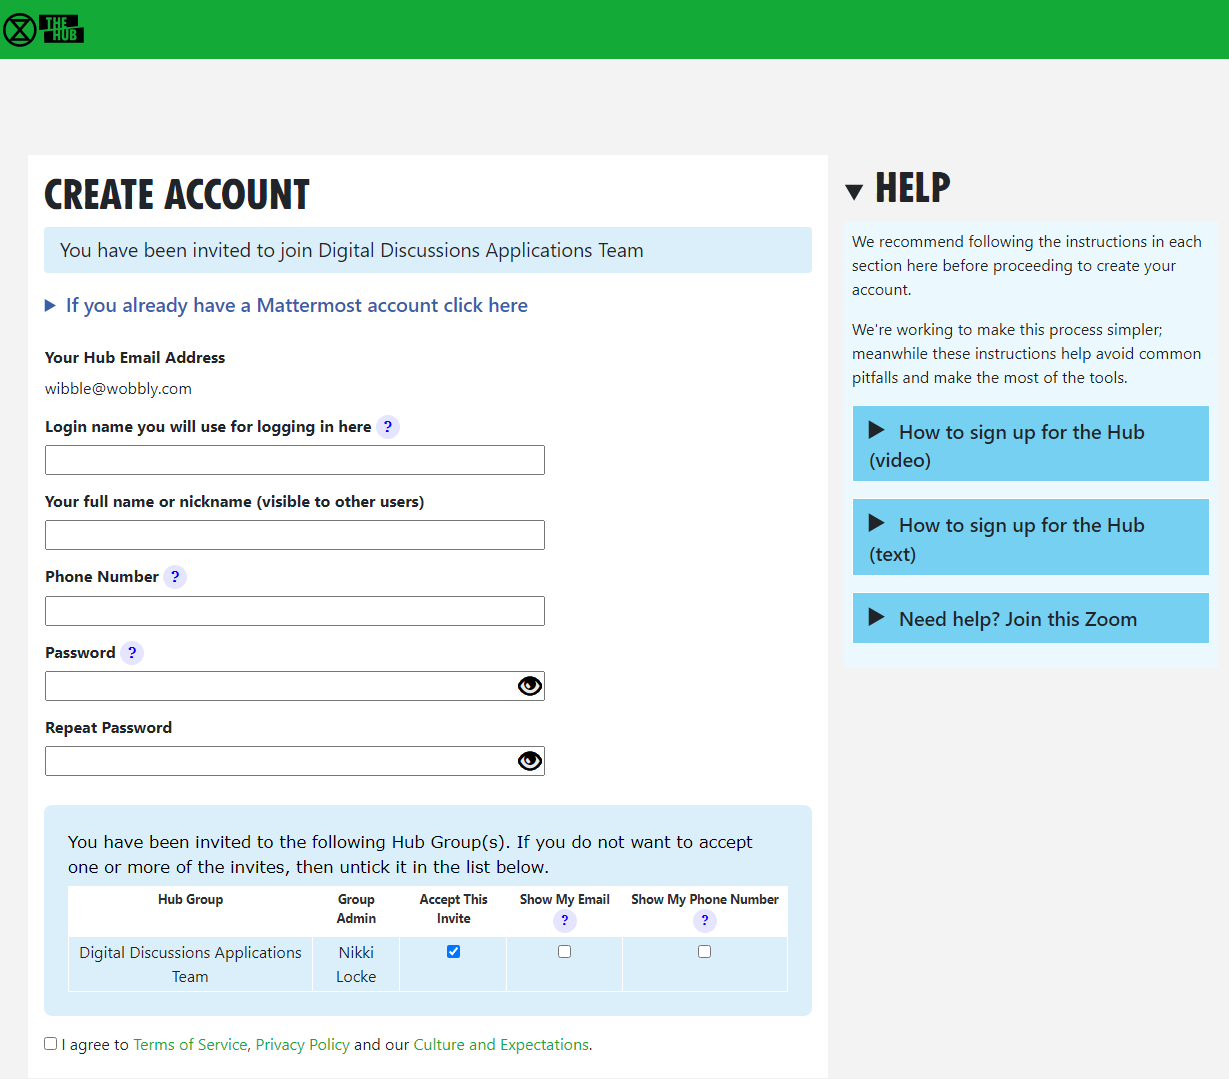
(If you are already on the Hub, some of this information will already be filled in.)
Notice the list of groups you have been invited to at the bottom of the screen. For each one, you can choose whether members of that group can see your email address and/or phone number. If you don't want to join one or more of the groups, you can choose not to accept the invite (by unticking the Accept box) – you will not be asked again (unless you are sent a new invite).
Simply fill in the form and click Confirm. You will be automatically added to the group(s) including all of its channels and forums.
It is also possible to accept your invites by clicking on Accept My Invites from the Hub home page.
Parts of the screen

- Hub logo – clicking here takes you back to the Hub Home Page
- Services – click here to go to the Services page
- Groups – click here to go to your Hub Groups
- Your menu – click here to drop down your menu (including your settings, help and logging out)
- Menu bar – all the options relevant to the current screen
- Menu bar overflow – if there isn't enough room on the screen for all the menu bar options, the extra ones will drop down if you click here
- Actions bar – all the options relevant to the current screen, e.g. Save or Delete
My Groups
You can see the groups you are in by clicking the My Groups tile:
Or select the GROUPS menu option:
 .
.
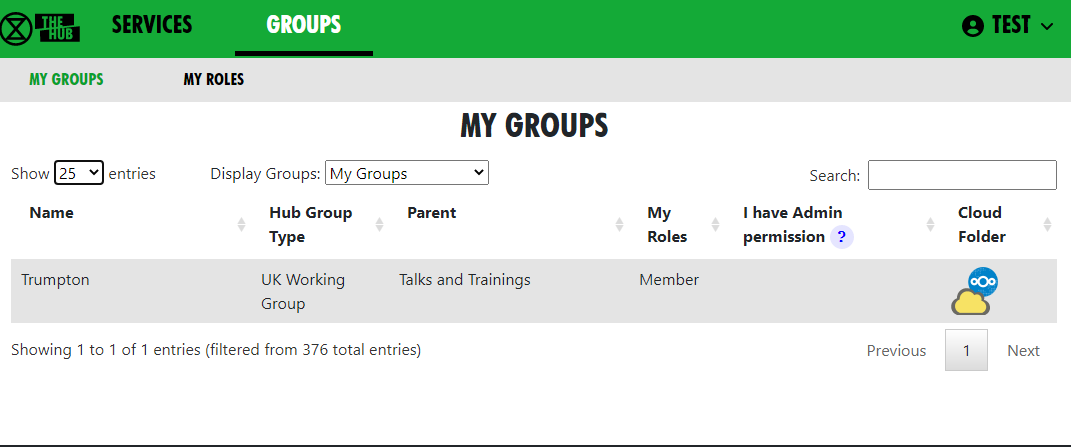
This brings up a list of Groups you are in. There is a drop-down menu to see all other lists of groups (e.g. all UK Working Groups). Click on a group to show the group in context.
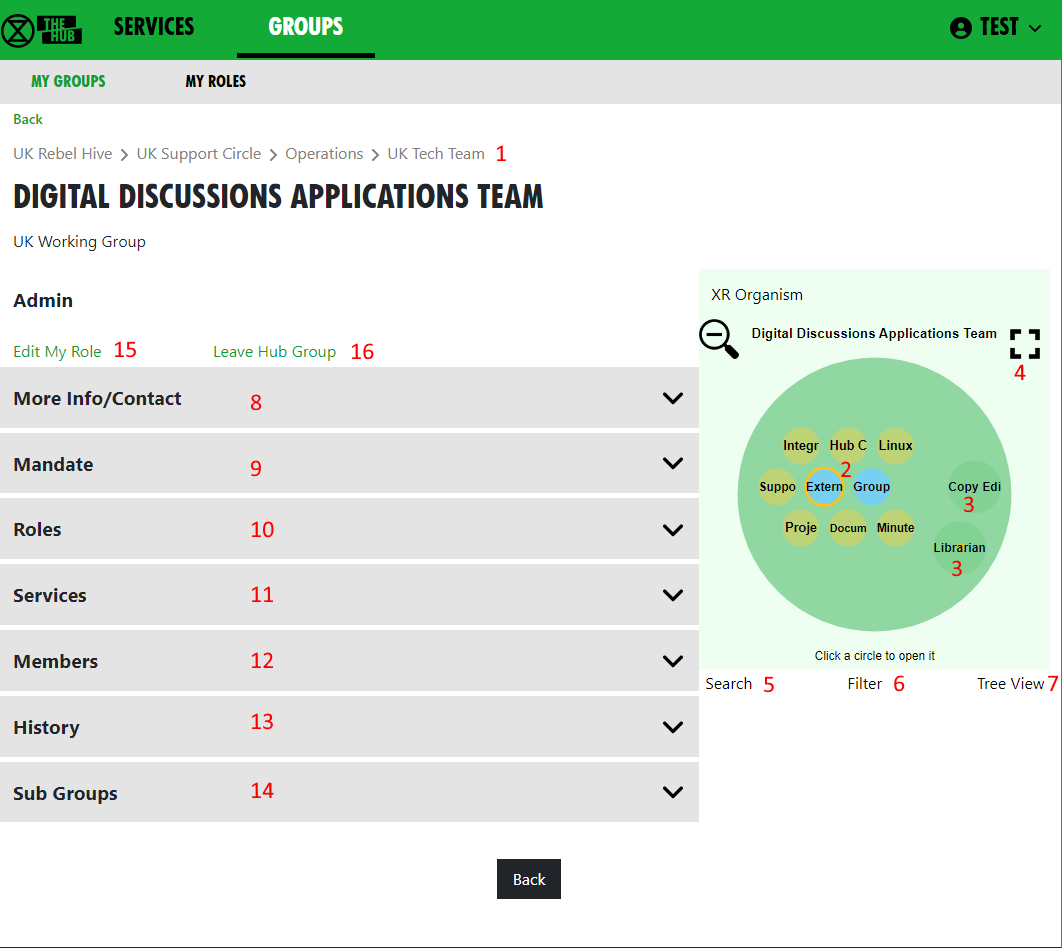
This screen is showing the Digital Discussions Applications Team UK Working Group. It also shows the parent groups (1) – click on one to go to it.
The Hub Circles display shows the group's Roles (2), and any child groups (3). This has a full-screen button to make it larger and easier to navigate (4). To find your way about the structure, you can click on any group to go to it, or on the background to go up a level.
If you want to find another group, you can use the search button (5).
You can click the Filter button (6) to hide some of the detail, to make the diagram less busy. If you set a filter, it is remembered and used every time you open this view.
You can also display the groups in a Tree View (7) instead of the Circles Display.
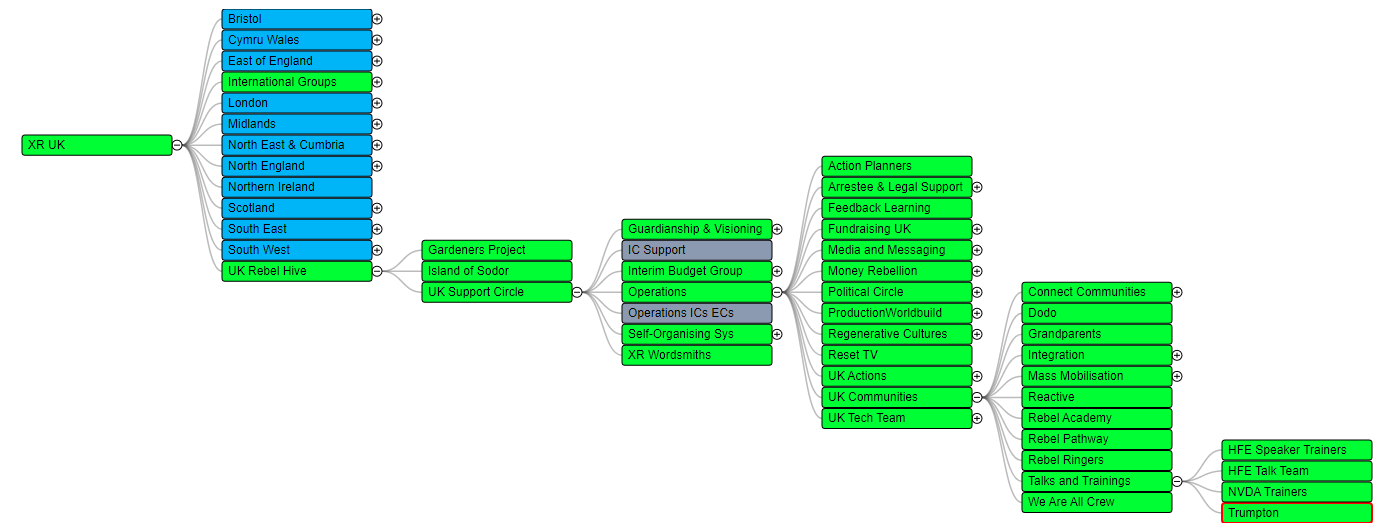
Click any of the grey bars to reveal more information:
- More Info/Contact (8) shows info about the group, links to social media, group email address, etc.
- Mandate (9) shows the group's Mandate within the XR SOS structure
- Roles (10) shows the specific roles within the group, and who holds them. Click on a person's name to send them a direct message
- Services (11) shows all the group's Mattermost Teams and Channels, Forums and Cloud space. Those you have permission to join are shown as clickable links.
- Members (12) only appears if you are a member of the group, and shows a list of all the other members
- History (13) only appears if you are a member of the group, and shows you any changes that have been made to the group or roles within it
- Sub Groups (14) shows any subcircles/subgroups
- Admin only appears if you are a member of the group, and contains links to allow you edit your role(s) (15) in the group, or leave the group (16). Group Admins will have more options here, e.g. to invite other people, and create or edit Channels, Forums and group information.
Editing your roles
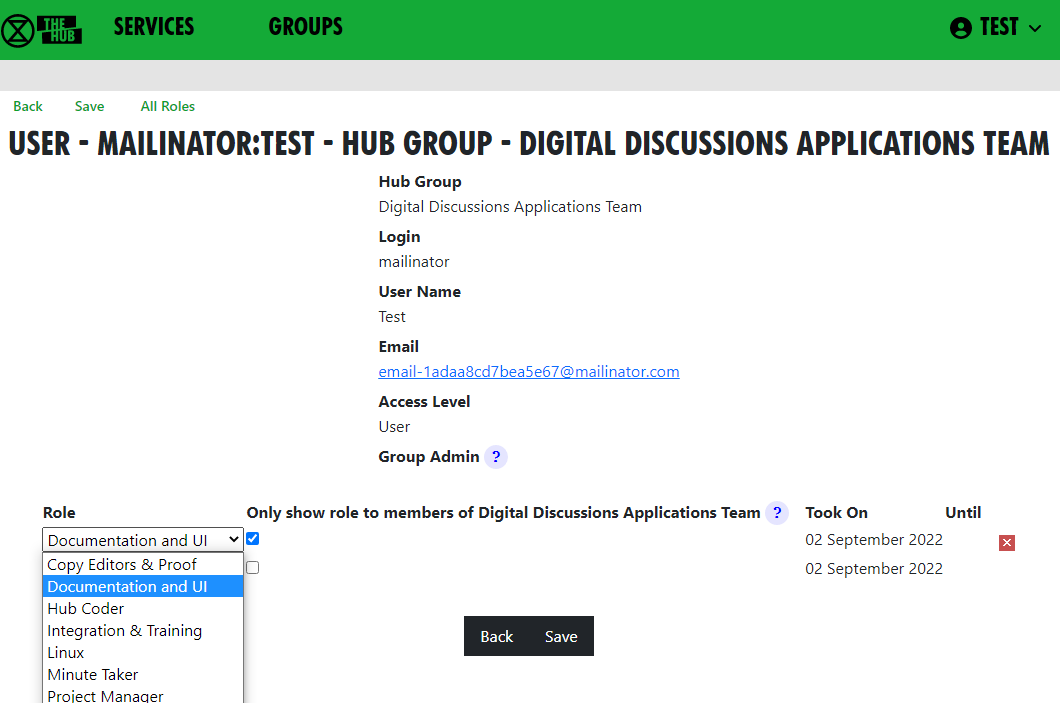 Select your role from the list your Group Admin has created, and choose whether to show it to everyone (the default), or only to other members of the group. For example, External Coordinators may want to show their role to everyone, and
Action Planners may want to remain a little more anonymous.
Select your role from the list your Group Admin has created, and choose whether to show it to everyone (the default), or only to other members of the group. For example, External Coordinators may want to show their role to everyone, and
Action Planners may want to remain a little more anonymous.
You cannot add yourself to Core Roles (shown in blue on the screen and diagram) or Linked Roles (shown with a yellow border) – only your Group Admins can add people to these.
Your group can ask your Group Admin to create new roles, or edit the mandates of existing ones.
Leaving a group
If you want to leave a group, click Leave Hub Group. This will remove you from the Hub Group and from all the private areas belonging to that Hub Group. It will not remove you from public channels and forums, but you can do this yourself in Mattermost and Forums respectively, if you wish.
Seeing all your Roles in all groups
Click on My Roles in the grey menu at the top to see a list of all the roles you hold. There is a History option to show you all the changes to your role holding.
Stepping back from roles
Click on My Roles in the grey menu at the top to see a list of all the roles you hold. Then click on Step Back From Roles.

This shows all your roles, all with Step Back ticked, and gives you the following options:
- Assign another user to the ticked roles
- Remove yourself from the ticked roles
- Leave the groups the ticked roles are in.
Bear in mind the following:
- Make sure only those roles you are stepping back from are ticked – untick the ones you want to remain in.
- If someone else has agreed to take on these roles, select that person from the drop-down list in Replacement User.
- If you want to remain in the role for a while (e.g. to train your replacement), leave Remove from Role unticked. But if you want to step back straight away, tick it.
- If you have Inviter or Group Admin permission in any of these groups, tick Remove Group Permissions to remove those permissions.
- If you are stepping back from the groups altogether, tick Remove From Hub Group.
Then click Save.
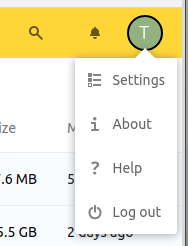
Your menu

Click on your user name to see your menu (in the top-right corner, here TEST).
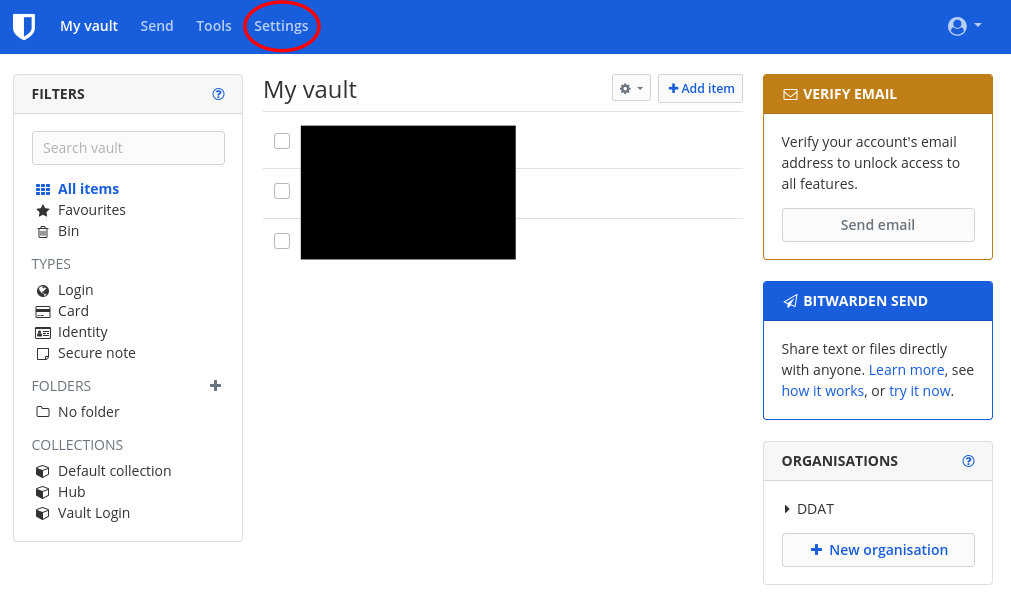
Settings

This form lets you change your name, secret codeword, phone number and external contact. This just changes the information we hold on the Hub, not on the other services. It also lets you change who can see your email and/or phone number.
Normally, people who wish to contact you about XR business will send you a message on Mattermost. It is therefore important that you check Mattermost regularly, particularly if you hold a role in a group, otherwise you may miss these messages. If you really can't do that, then please put some other means of contacting you in the External Contact box, so people can get in touch. Note that this contact information is available to everyone on the Hub (i.e. bona fide verified XR members, not the general public).
There is an edit button next to Login and Email. Clicking the button takes you to a form to change your login details or email. These forms require you to enter your Mattermost password (as the Hub does not store your password, and it needs it to update your username or email address on Mattermost). A few people have different Hub and Mattermost passwords – if that is the case, you will be asked to confirm that they are different.
Once you save the form, the Hub will try to change everything on all services (Hub, Mattermost, UK Forums and UK Cloud) to be the same.
If it is unable to do so, it will tell you which ones went wrong. The main reasons for this happening are:
-
You put in the wrong Mattermost password
-
Someone else is already using the login name or email you chose (Mattermost is global, so there are lots of users on Mattermost who aren't on the Hub).
If any errors occur, you can go back to My Settings and try different details.
Note: It is not possible to change a username on UK Cloud. As a result, the Hub deletes your old user record and creates a new one, joined to the same groups as the former. This is usually fine, but if someone shared something with you by name or you created personal calendars, decks or forms, they will be lost.
Change my password
This is reached from Settings. Here, you can change your password on the Hub only. To change your password elsewhere, you need to use the facilities on each other service.
Deactivate me
This is reached from Settings. Here, you can deactivate your login – e.g. if you have been arrested and/or your phone has been siezed. You won't be able to log in to the Hub, Forums, Cloud or Mattermost until you get your Group Admin to reactivate you.
Logout
This lets you log off, e.g. if you are using a shared computer and don't want the next person to be able to access your Hub account. Note this only logs you out of the Hub, and not from the individual services which you may have open in other tabs or apps.
Adding additional contact info to groups on the Hub
On the Hub, you can add public contact details so that users can stay connected with your group, including a "Public Contact Email", Facebook Groups, Twitter accounts, etc. Most of the information is public (published to anyone on the Internet), but if people want to keep information (like Signal, Telegram or WhatsApp channels) to Hub members only, they should add it in External Contact Info (at the bottom of the edit screen).
To add this contact information, you have to be a Group Admin of the relevant group (otherwise the relevant box won't appear). On the Hub, select the group you are looking to add contact info to and click Edit Contact Info to bring up the editing screen. You can add public contact details on this screen.
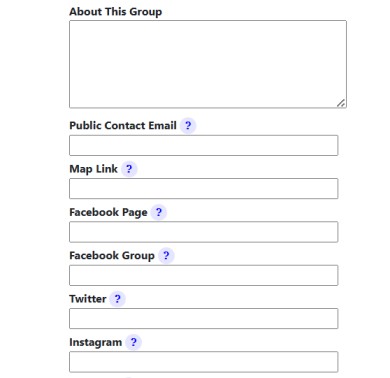
Every Hub Group (including local groups) that doesn't check Mattermost regularly should also add external contact info to their Group Info/Contact tab on the Hub. This is so that people on the Hub can contact the group. In the box at the bottom of the page (External Contact Info), you can add contact info such as WhatsApp and Signal details.

UK Forums
What are UK Forums?
UK Forums have a slightly different purpose to Mattermost – here's a summary:
Mattermost is for:
- instant chat, that may sometimes be lost in the stream of messages
- asking someone for help
- finding a person or Group
Forums are for:
- focused discussions
- asking specific questions or finding a specific topic
- searching for information easily
So, if the issue needs more in-depth attention, where contributions go towards making decisions, perhaps, or where differences of approach need closer examination, a Forum Topic can act as both a focus and catalyst for discussion. Also, you can look back through the topic's contributions to see how a decision was made – this often helps to promote ideas and help to reach agreements.
Getting access
Important: You should have already completed the steps outlined on the READ THIS FIRST page before attempting to access UK Forums. Otherwise, you will not have an account to log in to.
To access UK Forums:
- Click on the UK Forums icon on the Hub homepage. It will look like this:
![]()
- Type https://base.extinctionrebellion.org.uk into the URL bar of your browser and hit Enter.
You will then see a screen that looks like this:
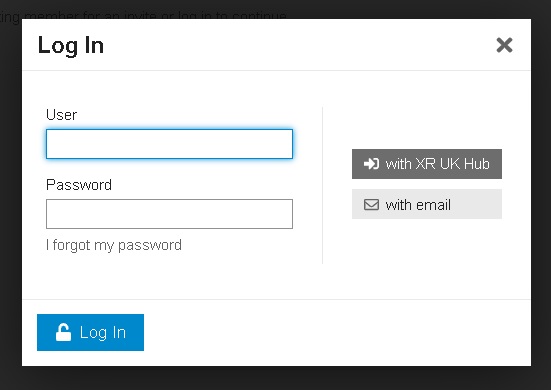
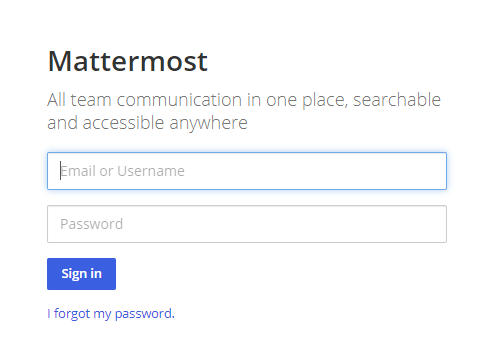
The easiest option is to click the log in 'with XR UK Hub' button. Or, you can enter your username and password (same as for the Hub) and hit Log In.
Note: We recommend adding UK Forum to your browser's Bookmarks/Favourites so that it's easier to find in future.
Our Forums are organised in much the same way as Mattermost, but the format is not quite the same. Here's what you'll see when you first join UK Forums.
Basic Functions
Forums 'Landing Page'
On the Forums' 'Landing Page', you will find a complete list of the Forums you're part of as per your Hub Group Membership. For ease of reference, your Forums are classified into Eight Categories which reflect the different Regions/Nations and Working Groups (or Circles) that make up XR UK. Here's a typical Landing Page showing all Eight Categories:
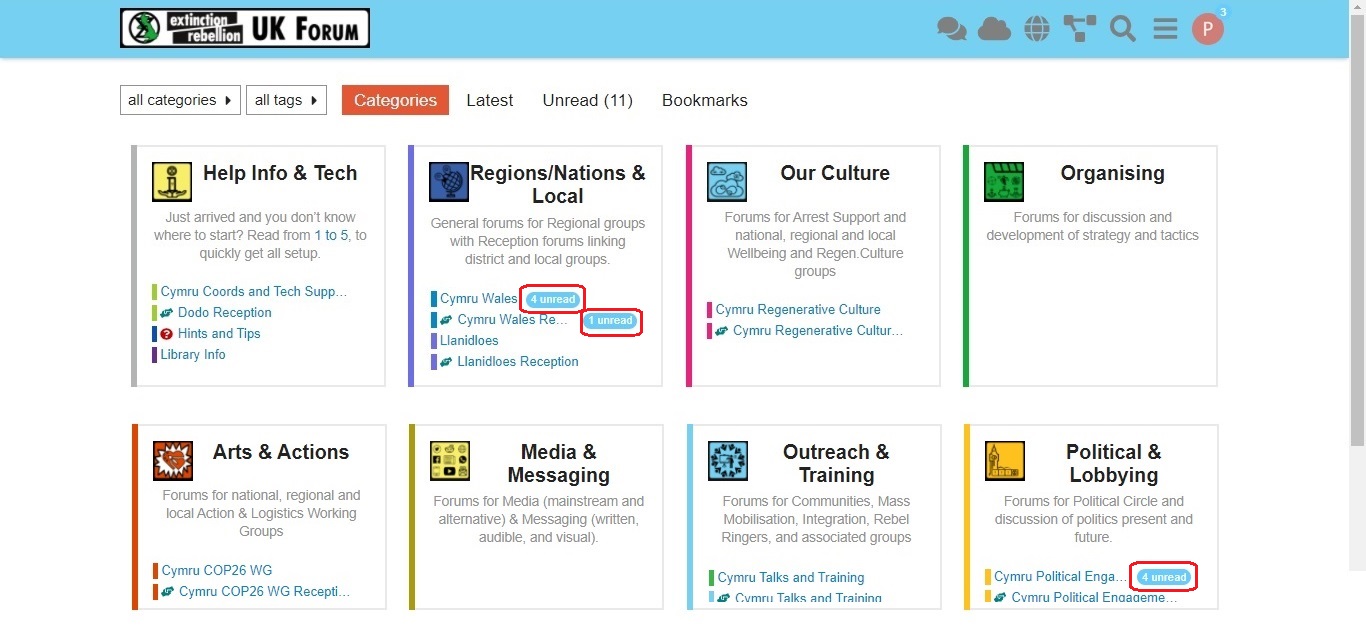
On the Landing Page, you'll find the Forums from each of your Hub Groups as clickable link names in the different Categories. If there's a new post waiting for your attention, you'll see an 'unread' or 'new' button – click on this to go to the flagged post. There are several other functions, which are descibed in more detail below; but, first, let's see how replies can be posted.
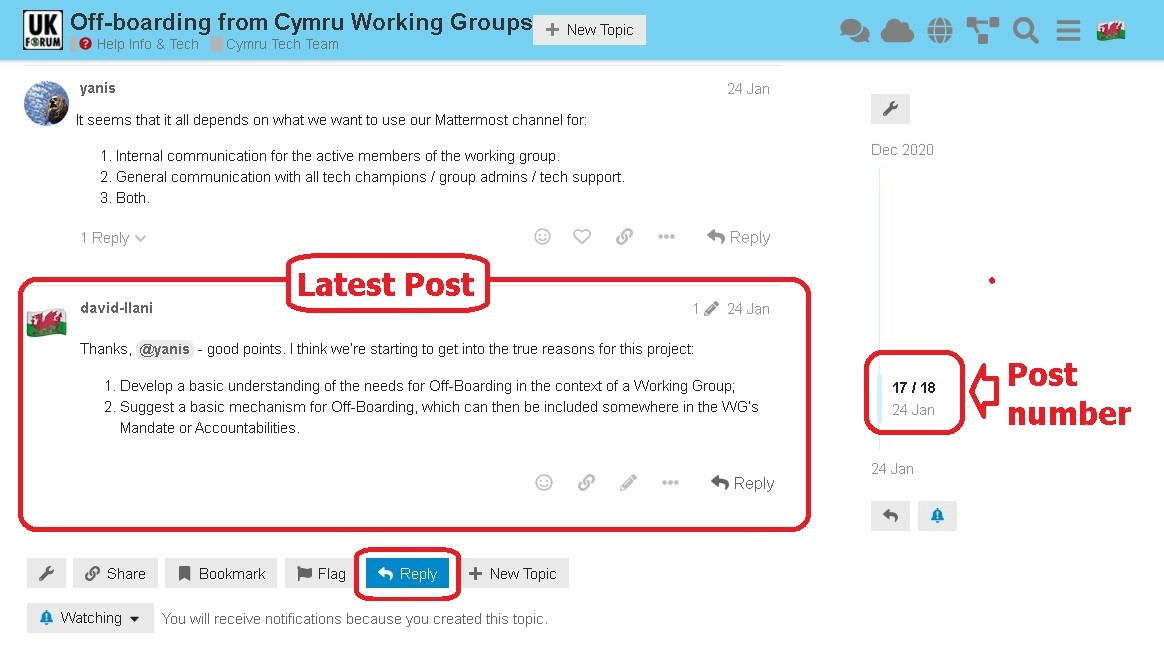
Reading and Replying to Posts
When you click on new or unread, you will be directed to the specific topic, where individual posts are listed in chronological order. If visiting the topic for the first time, you will see the initial post. If you've visited this topic before, you will see the post immediately after that visit. In the image, below, the "17/18" figures denote the 17th of 18 posts.
You may reply to any individual post, or make an additional post using the 'Reply' button. When you reply, you enter your text in the left-hand box – and you will see how the text will be displayed when your reply is posted, to the right. This is very useful for text formatting (Bold, Italics, Markdown formatting, etc.).
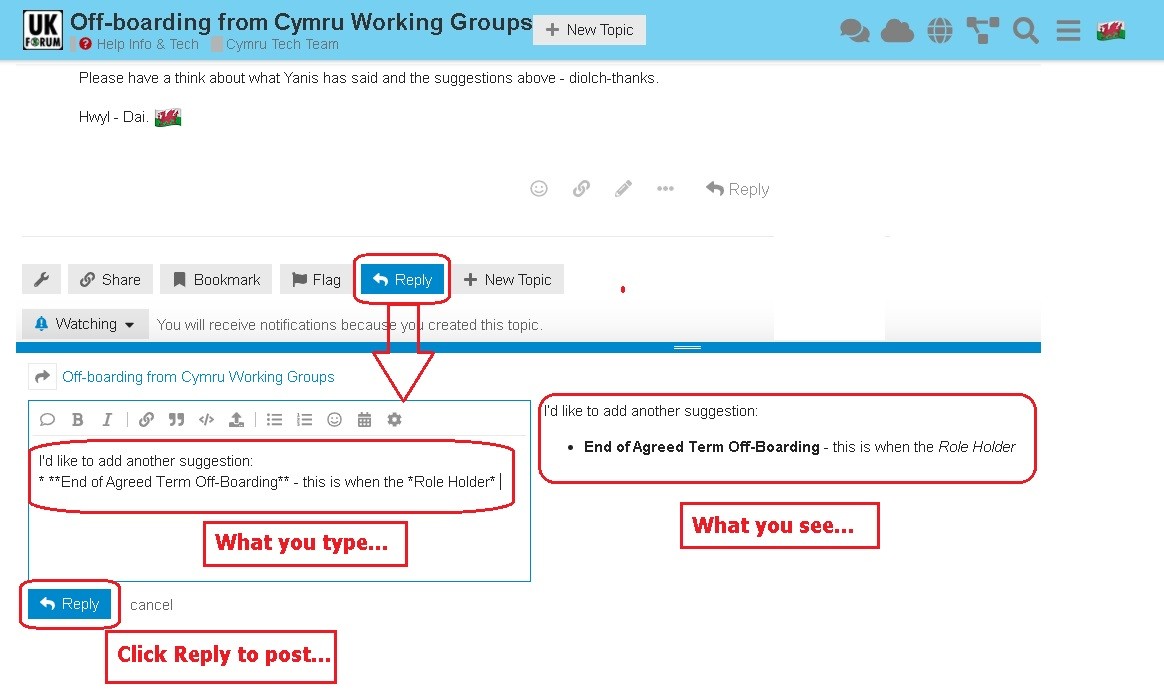
When you've finished your post, click the Reply button below the text box, and your reply post will be added to the Topic. It really is that simple – and, if you need to edit your after it has been posted, click the Pencil icon to re-enter the text box.
Now you know how to Post a Reply, it's time to look more closely at some of the Advanced Functions.
Advanced Functions
Using the Landing Page
Here, we have highlighted seven of the functions you will find on the Landing Page.
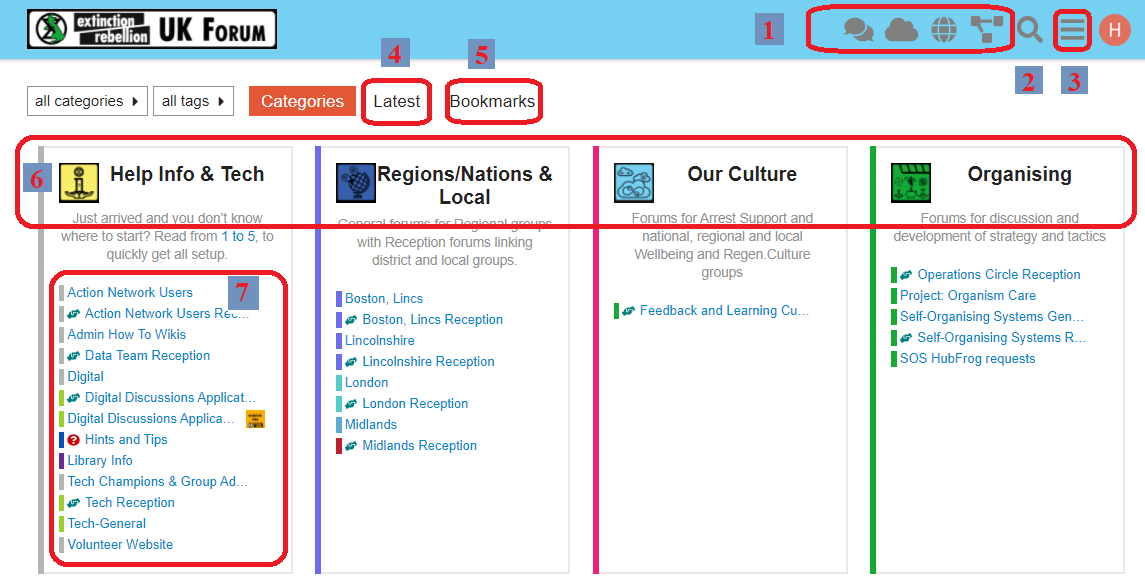
-
Communicatons tools links
Click on the icons to go to Mattermost, UK Cloud, XR UK's website and the Hub. -
Search
Click the Magnifying Glass icon to search for keywords, etc. in the Forums.
-
Main menu
The three bars ('hamburger') icon brings up the main (drop-down) menu:
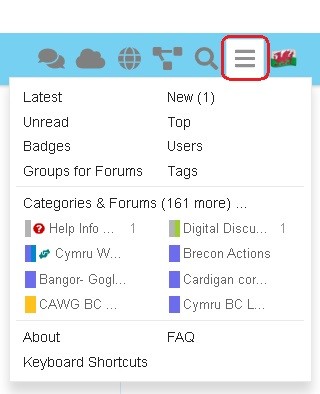
-
Latest
This takes you to a list of the latest posts in all your topics in each category.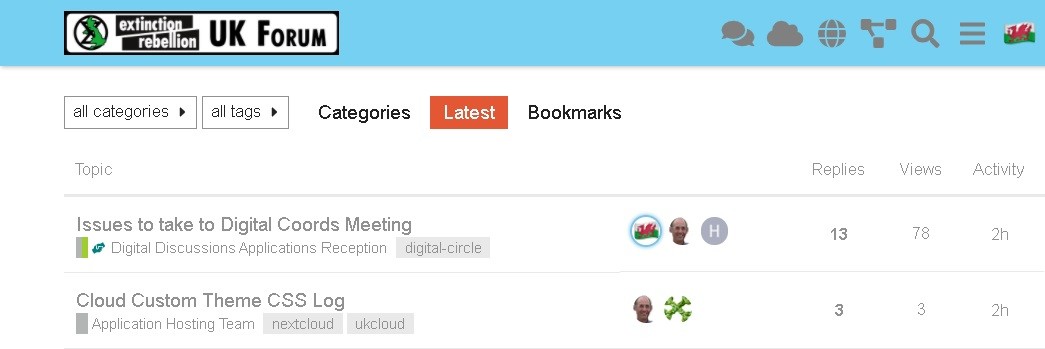
-
Bookmarks
This takes you to a list of the topics you have bookmarked.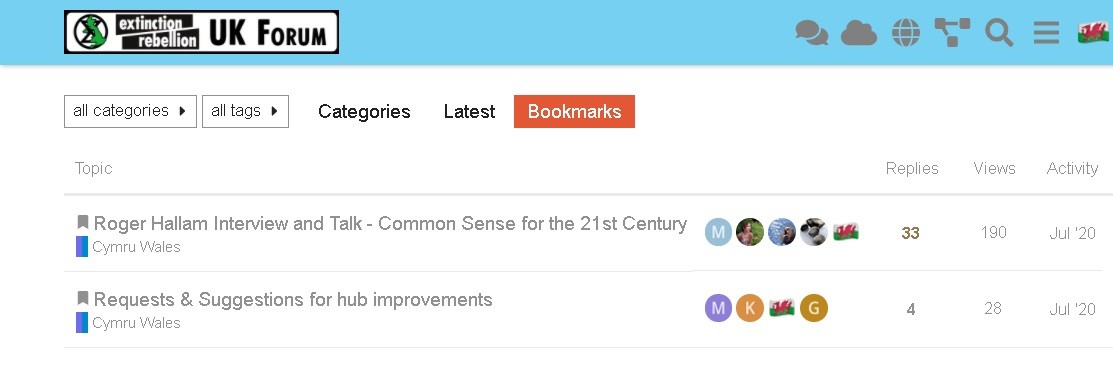
-
Categories
These include:- Help Info & Tech
- Regions/Nations & Local
- Our Culture
- Organising
- Arts & Actions
- Media & Messaging
- Outreach & Training
- Politcal & Lobbying
-
Forums
These are your Hub Group Forums where you can see and reply to posts in various topics.
Using my Forums
Overview
The eight top-level Categories - Help, Regions/Nations, Culture, etc. - are visible to everyone, but your membership of Hub Groups will determine the individual Public and Private Forums that are available to you.
Join other Public Forums
You can join any Public Forum by searching for the associated Hub Group by clicking on the hamburger icon in the top-right corner and selecting 'Groups for Forums'.
This will give you the Hub Groups list. You can search by entering text in the box at the top, or simply scroll down to find the relevant Group name. Click on Join to join the Group and get access to its Public Forums, or click on the name for more info. See the page Join groups for more information.
Join a Private Forum
To join a Hub Group's Private Forums, you will have to be invited into the Hub Group, so you will need to ask one of the Group Admins to join you via the Hub.
Read-only Forums
Some discussions may be read-only for most people, with only certain people able to contribute (e.g. Hints and Tips).
Help - 'Page does not exist'
Sometimes, you will see a page like this:
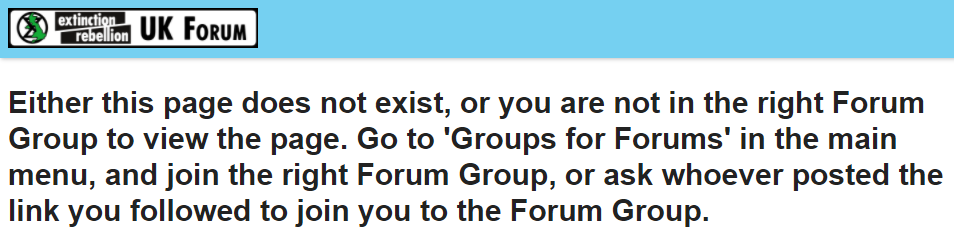 You may see this because you have clicked a link on another Platform, like Mattermost, which takes you to a Forum that you are not part of. To fix this:
- If you know the Forum is Public, and you also know the Hub Group, you can find it yourself (see above).
- If you can't find the name of the Forum, then you'll need to ask the person who posted the link to give you its name and that of the Hub Group. If the Forum is Private, this may involve you being invited to the Hub Group that owns the Forum.
Making your post
When to start a new topic
Before starting a new topic, it is always worth checking whether the issue has already been discussed (by looking through the previous topics) – it can be very frustrating when someone begins a fresh topic with a question that has already been answered.
Quote text from other posts
To do this, simply highlight the relevant text in the source post. The 'Quote' button will appear above the highlighted text:
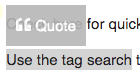 \
\
If you have not yet started editing your reply, click the 'Quote' button to open the editing pane in the bottom half of the screen. The selected text will be inserted as a quote with the source post and contributor linked to it. You can then carry on and edit your reply as normal.
If you are already editing a reply, or starting a fresh topic, then in the top half of the screen, above the editing pane, you can browse around as normal and select text from any post, and the 'Quote' button will insert it in the editor for you.
Add a link to a document or image
Links are inserted by writing the [text to display] in square brackets, immediately followed by the link itself (https://www.fulllinktext.com/blah) in round brackets. For example:
[Link to XRUK Website](https://extinctionrebellion.uk/) displays as: Link to XRUK Website.
Formatting posts
There are simple ways to make your message more readable:
- **bold** displays as bold
- _italic_ displays as italic
- ~~strikethrough~~ displays as
strikethrough - ```typewriter style``` displays as
typewriter stye - >quote displays as
quote
Alert someone to a post
If you want to draw the attention of another team member to a post you are making, type @ followed immediately by their username, e.g. '@username'. They will be notified of the mention.
Link to another topic or post
Simply copy the address from your browser and paste it into your new post. The Forums will automatically find the title of the topic and add that as the link text.
If you want to link directly to a particular post within a thread, copy the URL whilst the target post is on your screen. The link will have a post number added to the end and will link direct to that post.
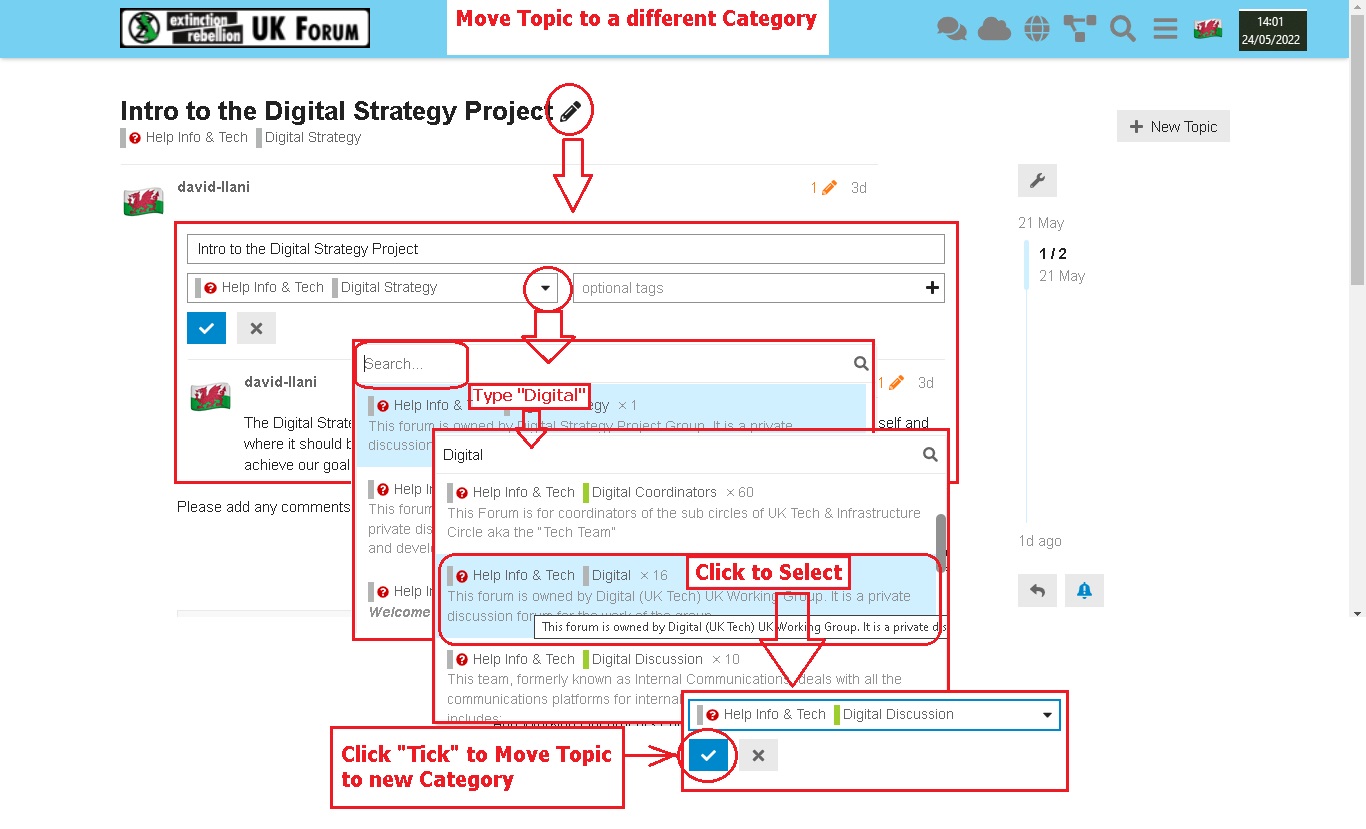
Move a Topic to a new Category
If you have set up a Topic and wish to move it to another Category, follow these steps:
- Click the "Pencil" by the title of your first post
- The current Category is displayed – open the drop-down menu
- In the search box, type in the text to help identify the new Category
- Select the appropriate Category from the drop-down menu
- Confirm your selection by clicking the "Tick"
Create a Poll
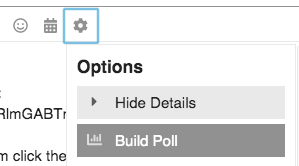
You can create simple polls directly in a post.
Polls are only visible to the other members of the particular Forum in which the topic (or reply) is created with the poll embedded. To create a poll, click the cog wheel icon while editing your post, and select 'Build Poll'.
Bookmarks and Tracking
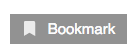
Bookmark a post to view it later
There are three ways to do this:
-
At the bottom of each post, there is a line of icons:

Click the three dots to bring up more options:

Click the bookmark icon (circled in red in the image above) to bookmark the current post within the topic.
-
At the bottom of the whole topic, after the last post is a row of buttons. Click the
 button to bookmark the whole topic.
 -
If you have a keyboard, you can use the shortcut keys. First, [j] to select the post – this will mark it with a red bar on the left), then [b] to bookmark the selected post. Use keys [j] and [k] to move the highlight to the next/previous post.
How to find bookmarked topics
There are two ways to do this:
- Click on your picture/avatar at the top-right of the screen, and then click the bookmark icon to access your most recent bookmarks list:
- If you are on a device with a keyboard and are not currently editing, then you can use the keyboard shortcut [g] followed by [b] to jump straight to your bookmarks page.
Follow or track a discussion
When you are viewing a topic, at the bottom of the screen, just above 'Suggested Topics', you will see a grey button with a coloured dot in it most likely marked 'Tracking'.
Click on that button, and then set the level of alert on that particular topic.
(To stop following, select 'Muted'):
![]()
Your Profile
You will have a 'profile' where you can set useful information about yourself that others can see, and upload a simple picture (an 'avatar') by which others can easily identify your posts. You will also be able to set preferences for notifications and how they are sent to you.
Find and edit my Forum Profile
Click on your picture/letter/avatar in the top-right corner of the screen:

Click on the person icon:

Select 'Preferences' from the menu:
There are several pages of preferences listed on the left on the browser screen, or in a selection box at the top on a mobile screen.
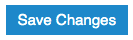
Be sure to scroll down through each page to find the topic you want – and remember to click the Save Changes button at the bottom of the page: otherwise, any changes you make will not take effect.
- Do set your name (full name) to something recognisable (especially if you have an obscure username) so that people who know you can find you. XR UK is an open community; we take ownership of our actions and do not hide behind aliases or masks.
- Do upload a simple picture as your avatar to replace the default initial-letter-in-a-coloured-circle avatar.
Change the Landing Page
-
Go to your profile page (click on your picture/letter/avatar in the top-right corner, click on your name, and then select 'Preferences').
-
Select 'Interface' in the menu at the left (or in the select-box that says 'Account' if you are on a mobile device).
-
Scroll down and find the Default Home Page setting. Select your desired home page in the box from 'Categories | Latest | New | Unread | Bookmarks'.
-
Remember to scroll down to click the Save Changes button, or your changes won't take effect.
Change the page layout/colours
The default home page shows you all of the top-level Categories with their short descriptions, and any Forums that you are joined to in each Category.
There are two alternative layouts (called 'themes') available. These can be found under 'Themes' in the 'Interface' section.
XR UK Lightis the default theme with three columns of boxesXR UK Light 3colis the version with three columnsxxDiscourse Lightdisplays the categories with a selection of the recent topics in all their Forums.
There are also 'Dark' variants of each theme if you prefer a layout with a black background.
UK Cloud
What is UK Cloud?
UK Cloud is a place for Extinction Rebellion members to create, store, and share documents securely with each another. With it, you can collaboratively edit Office documents, making it a great alternative to tools such as Google Docs or MicrosoftOffice.
By 'Office' files, we mean files created in Microsoft Office programs, e.g. Word, Excel, etc.
UK Cloud can also be used to do a number of other things. For example, you can:
Important: Individual users have no personal storage area in UK Cloud. Instead, all files are the property of an XR group.
Getting access
Important: You should have already completed the steps outlined on the READ THIS FIRST page before attempting to access UK Cloud. Otherwise, you will not have an account to log in to.
To access UK Cloud:
- Click on the UK Cloud icon on the Hub homepage, which looks like this:
![]()
- Type https://cloud.extinctionrebellion.uk into the URL bar of your browser and hit Enter. You will then see a screen that looks like this:
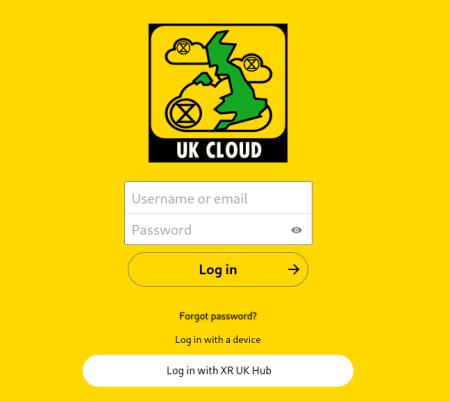
- Log in. The simplest way to do this is by clicking Log in with XR UK Hub.
Note: We recommend adding UK Cloud to your browser's bookmarks/favourites so that it's easier to find in future.
Note: UK Cloud can also be accessed via an app that can be installed on your smartphone or tablet. Please read this guide for instructions on how to do this.
Landing page
Once you have logged in, you will see a screen that looks like this:
![]()
We will refer to the parts of the screen circled in red throughout the rest of the document by referring to them by number in red font, e.g. 1.
Managing files
Basic tasks
Finding files
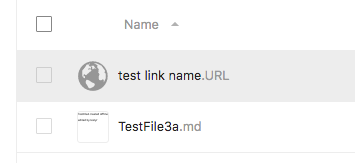
On the landing page, you should see a number of folders that you have access to (14). This will include public folders that everyone can see (e.g. Library) as well as folders that are private to your XR groups.
To find a file, simply click on the folders to navigate between them until you are in the right one. You can always go back to the landing page by clicking the Cloud icon (1) at the top left of the page.
Uploading files
To upload a file, first click on the relevant folder. Files cannot be uploaded directly to the landing page (as indicated at 13). Then:
- Click the
 button at the top of the screen
 - Select Upload file
- Choose the file to upload
Important: Although we do our best to keep the data in these tools reasonably secure, you must not post incriminating material of any kind here. By doing so you risk the authorities taking down the server, which would upset our communications severely. Not only would you risk your own arrest, but the arrest of the system administrators.
Deleting files
To delete a file, click on the three dots to the right of the file and select Delete File.
Editing Office documents
To edit Office documents such as spreadsheets and presentations, click on the document name as it appears on the Cloud. This will open the file in your browser for you to modify.
Editing Office documents can even work collaboratively, meaning that other people should be able to work on the document at the same time as you.
For more information on how to use the different editors, please refer to the ONLYOFFICE user guides.
Note: Unfortunately, Office documents cannot be edited on a mobile device. Please see here for more information.
Advanced tasks
Uploading files from Google Docs
Obviously, the ideal method is to move a document from Google Docs to the Library – download it from Google, upload it to your shared Library area, and then delete it from Google Docs. The Library is the shared part of UK Cloud.
However, it may be desirable to leave the document in Google's care and simply have a link to it in the Library. In this case:
- Get a link from Google Docs – with whatever options you require
- Navigate to the folder where you want the link to appear (in your shared library folder if you want all XR members to have access to it, or in your group folder if it is private to your group)
- Click the button at the top of the screen and select New Link
- Enter the name for the link as it will appear in the file list (this doesn't have to be the filename, so it is better keep it fairly short). Don't delete the ".URL" at the end of the name
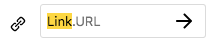
- Press enter or click the arrow
- In the box that pops up after a second or two, enter the link URL from step 1 (or any other link you want) and click Save

And that's it. Your link will appear in the list of files, with a globe icon to indicate that it is an external link:
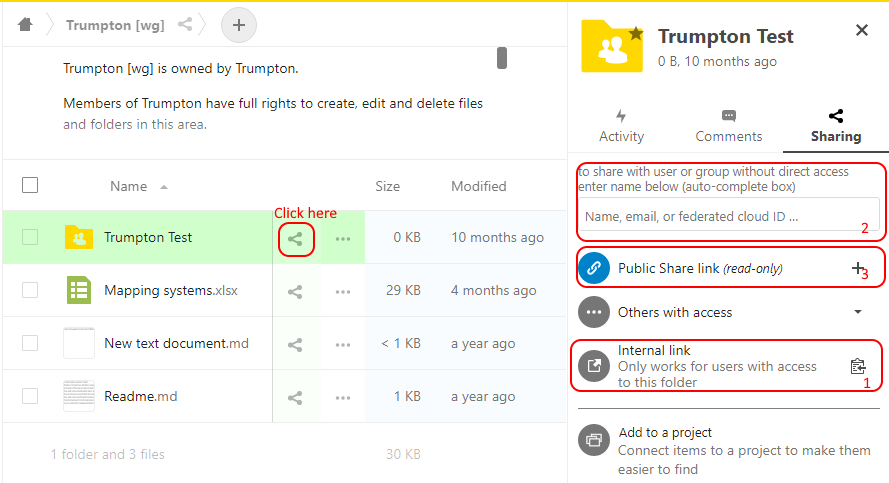
Sharing files or folders
The different types of sharing are:
-
Share with someone else in your group
To share a file with people in your group, click the
 icon next to Internal link (1 in the screenshot below). This will copy the link to your clipboard where it can then be pasted into an email, Mattermost message, etc.
 -
Share with a particular user or group
To share a file or folder with a specified user or group, type the name of the user/group into the box (2 below). As you type, a list of different users/groups should appear below where you are typing. Click on the user/group that you want to share the file or folder with. A new share should appear below, and you can copy the share link the same way as for internal links (see above).
Note: We don't recommend sharing files this way as it will clutter up the home page of the person you are sharing the file/folder with.
-
Share with everyone
If you would like to share a file so that anybody with the link can access it, even if they don't have a UK Cloud account, create a new Public Share link (3 below). This will create a link that can be copied and shared just like the other types of shares described above.
Important: Be careful when sharing documents publicly that you are not sharing anything that should be kept private (e.g. personal details).
Creating and editing text files
To create a text file:
- Navigate to the folder you want to create the file in.
- Click the button at the top of the screen and then click New document.
- Enter the name for this document (
e.g. minutes.md).
The empty file will now open in your browser for you to edit. You can click on the icons at the top of the page to do things like create headings and lists and make text bold or italic. If you prefer, you can also use Markdown to add formatting, which lets you change text to headers, add lists, etc. This is very similar to what you can do in Mattermost.
The file will be automatically saved when you close it.
Undeleting files
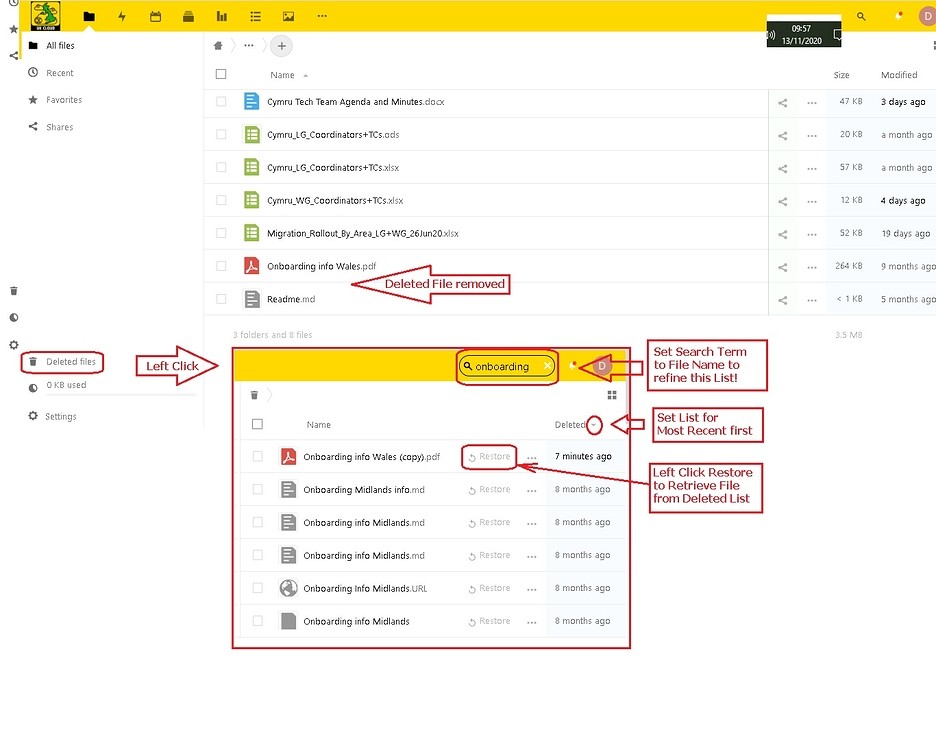
- If you want to find a deleted file, click "Deleted files" at the bottom left of the UK Cloud screen, and then search the resulting list of deleted files
- You may need to put the file name into the search bar to help, as the list of deleted files can be long
- Also, if it is a recently deleted file, then ensure that the list is sorted by the most recent files first (toggle the up/down arrow)
- Find the file, click "Restore" and the file will be returned to its folder
Changing the order of UK Cloud's header icons
In the browser view of UK Cloud, there is a row of icons on the left-hand side of the yellow header bar:
![]()
These link to the internal Cloud apps (files, polls, forms, etc.) and some external websites.
If the screen width is reduced, the icons will instead be displayed in the three-dots drop-down menu.
![]()
The default order of the icons is: Files | Calendar | Deck | Polls | Forms | UK Hub | UK Forum | Mattermost | UK website
If you would prefer a different order, this can be customised:
- Click on your avatar/circle with your first initial in the top right-hand side of the yellow header bar and select Settings.
- In the panel that appears on the left, select App Order. Uncheck any apps that you don't want displayed, and drag the remaining ones into the order you want.

Click away to something else and your ordering will be saved.
Other tools
Calendar
You can access the calendar by clicking on the correct icon at the top of the screen (2 in the original screenshot at the top of this page). For information about how to use the calendar, please take a look at the official documentation.
Deck
Deck is UK Cloud's project management/Kanban tool. You can access it from the top of the screen (3). Documentation about how to use the tools can be found here.
Polls
This is a tool for creating simple polls. It can be accessed from the top yellow header (4).
Forms
Forms is a tool for creating questionnaires. It can be accessed from the top yellow header (5).
Help on how to use Forms can be found here and here.
Forms can be filled in from anywhere, with results available on the Forms Tab in the UK Cloud.
Further information
Why don't we have personal storage space?
Everyone’s Cloud account has 0 bytes of storage in their personal folder. This is for security reasons – if everyone had personal space, there would be nothing to stop someone uploading illegal material to their (fake) account, then reporting it to the police so that they raid XR and shut down the servers.
Everyone has access to the read-only Library, and people in an XR group that has requested storage have full read-write access to their group’s storage (where we trust other members of the group would spot suspect files, and remove them).
The Vault
The Vault is a password manager hosted by XR. It is a place for rebels to securely store the passwords to their online accounts.
What is a password manager?
A password manager is a tool that lets you store all of your passwords together in a safe place. Browsers such as Firefox have this facility. It allows you to generate and securely store passwords that are very strong (e.g. cj*XknvKPgg9b5) because they are not guessable but you don't have to remember them. Instead, you have to know the one master password to access them. This makes life easier for you and much harder for hackers.
You can store lots of passwords, even ones you created years ago if you wish. And you can also store other codes like bike locks and notes you don't want to lose or leave lying around.
How do I join the Vault?
Ask your XR group's Group Admin to send you an invite to your group's organisation in the Vault. If your group doesn't yet have an organisation see here
-
Check your emails. You should have received an email:
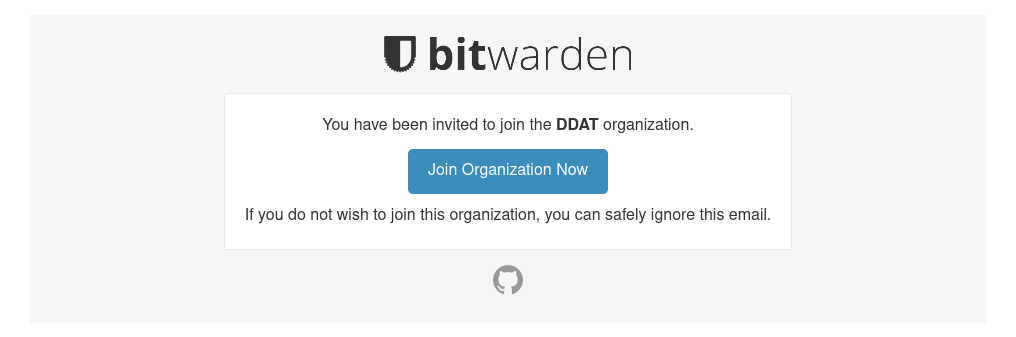
-
Click on Join Organization Now.

You will see:
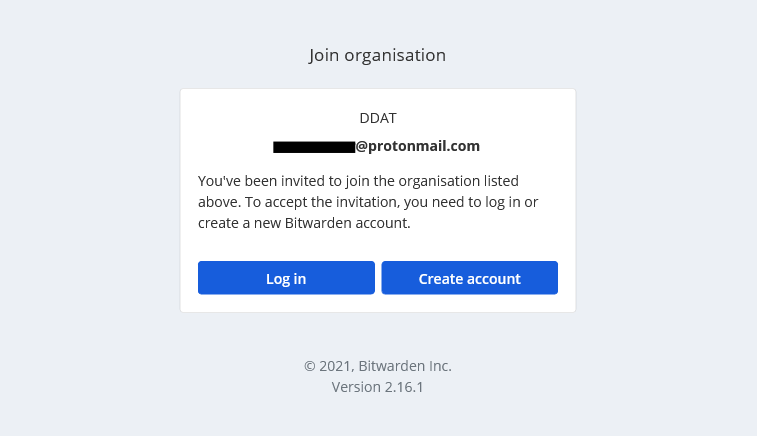
- Click on Create account
You will see:
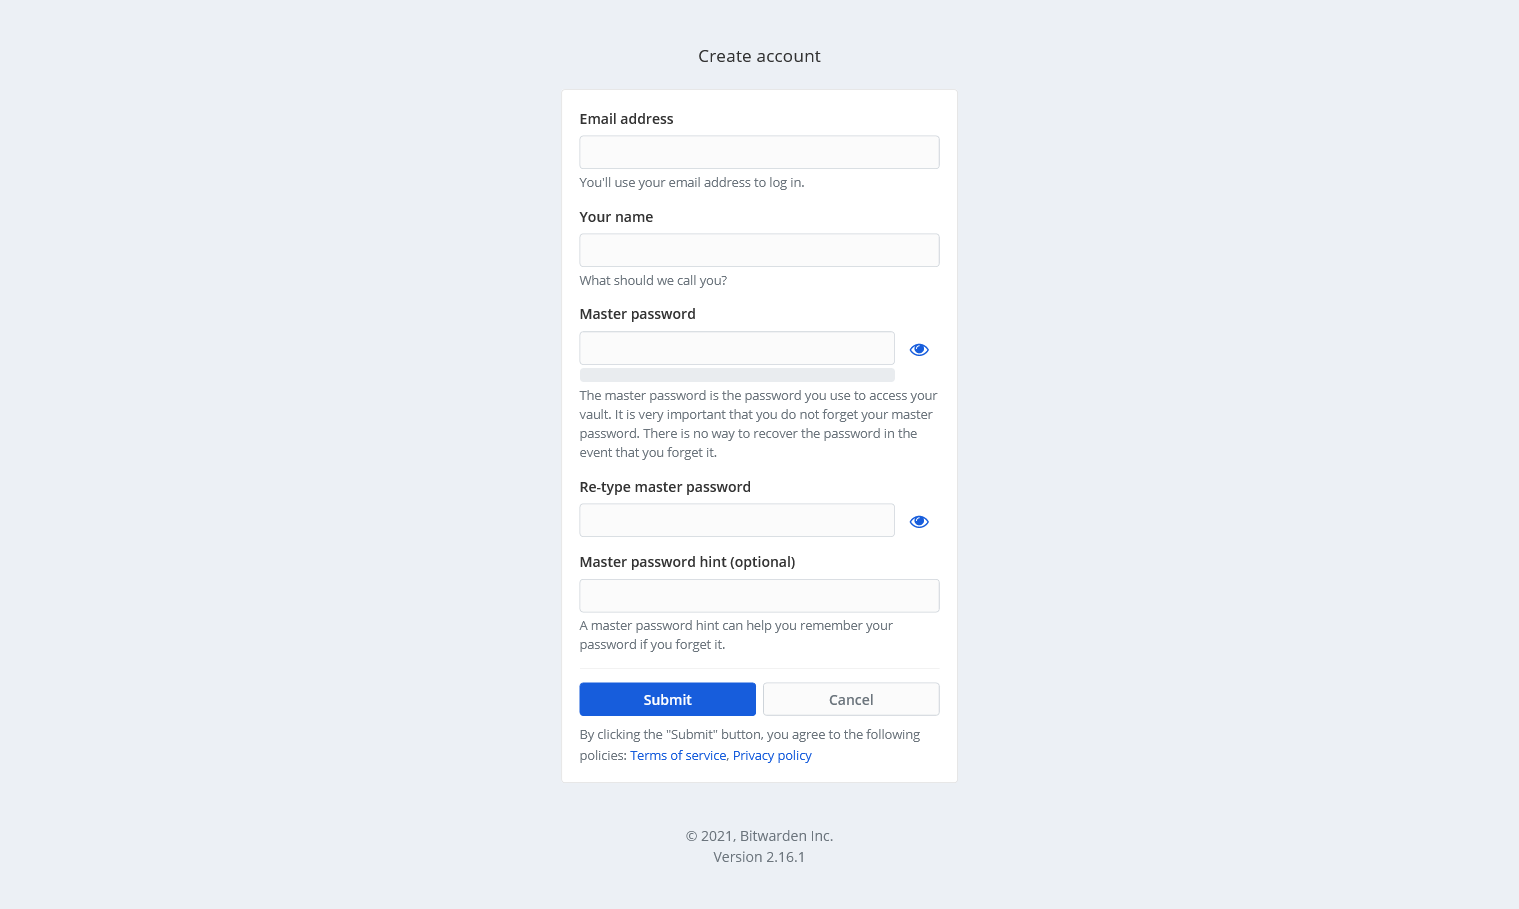
Fill in your email address and name (an alias is fine)
It is important to choose a master password that is really hard to guess (the Vault will tell you whether it is a strong password or not) and you shouldn't use this password anywhere else.
Type your master password then click **Submit**.
You have now created an account on the Vault and can begin to use it to store your passwords.
If you want access to the passwords shared by your group you need to do an additional step:
-
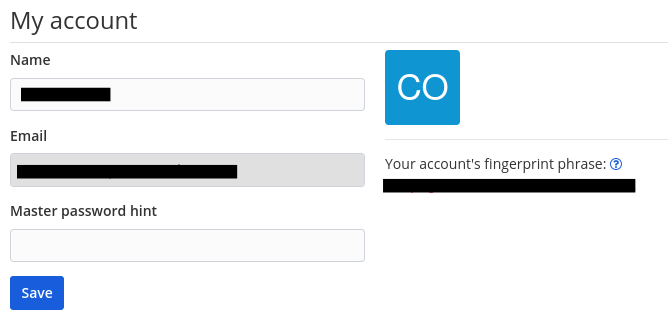
From the Vault homepage click on Settings at the top of the page (circled in red).

-
Under the My Account section note down your account's fingerprint phrase. This will be a string of five random English words (e.g.
alligator-transfer-laziness-macaroni-blue).
-
Send this fingerprint phrase to your group admin. This will help them to identify you and give you access to the group's passwords.
What if my XR group isn't already using the Vault?
If you want your group to be able to use the Vault, have your group's Secretary, Internal Coordinator, External Coordinator or Group Admin get in touch with the Digital Discussions Applications Team using this Mattermost channel. They can then create the Vault organisation and give you access so you can begin sharing passwords within your group.
How do I use the Vault?
If you want to use the Vault on a mobile phone please refer to the page Accessing the Tools Using a Smartphone or Tablet.
The most straightforward way to use the Vault on your computer is by using a browser extension. To install one of these:
- Go to the Download part of the Bitwarden website and scroll down to the Web Browser section:
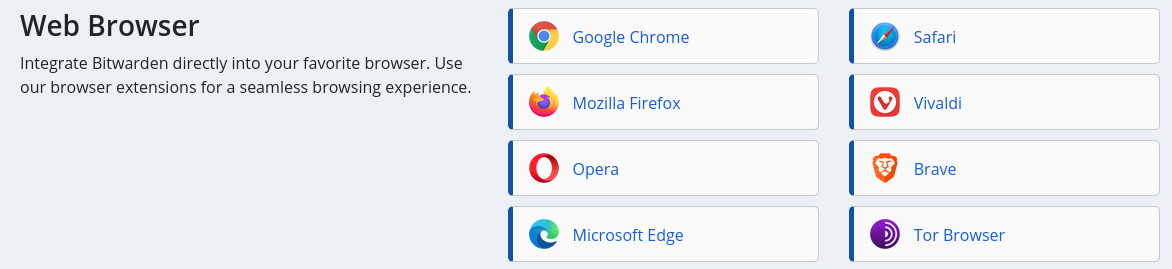
-
Click on the browser that you are using and install the extension.
-
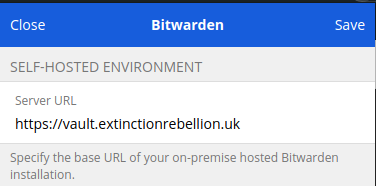
You should now see a small shield icon at the top-right of the browser window:

If you click on this the following screen should pop up:

Click on the gear icon in the top-left corner (circled in red).
-
Under SELF-HOSTED ENVIRONMENT, set the Server URL field to
https://vault.extinctionrebellion.ukand click Save.
-
Click Log in, enter your email address and master password and then click Log in (top-right corner).


Adding new passwords
To add new passwords to the Vault for either new or existing accounts:
-
Click on the small shield icon at the top right of your browser window:
-
You should see a screen like this (without the black squares):
-
Click on the + icon in the top-right corner (circled in red). You will see:
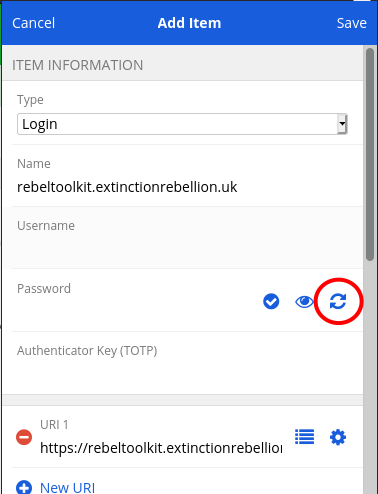
-
Enter your username and password. If you want to generate a random secure password (strongly recommended!), click on the generate password icon circled in red.
-
Click Save (top-right).


Filling existing passwords
To access the information in the Vault when you want to log in to a website:
-
Click on the small shield icon at the top right of your browser window:
-
You will now see a screen like this:

-
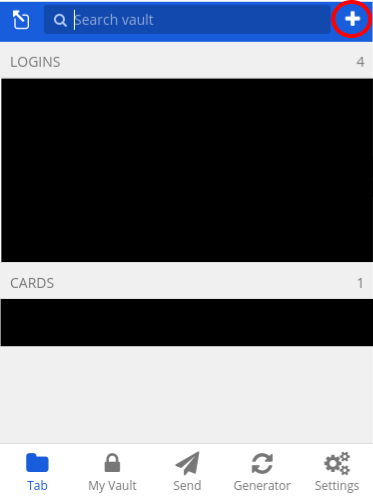
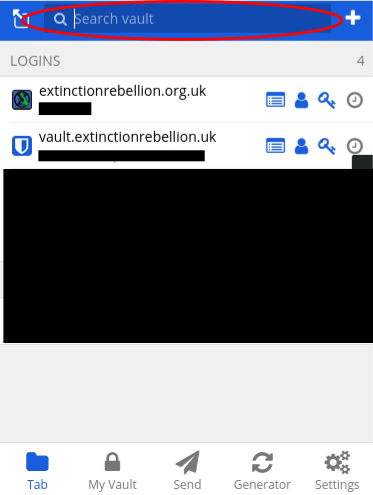
If the correct account appears under LOGINS then click on it and the username and password fields on the website page should automatically be filled.
If the account is not there then you will need to search for it in the search bar circled in red. Once you have found the correct account you will have to copy and paste the username and password into the website.
Accessing your password history
If you generate a password and forget to save it to the Vault, you can retrieve it:
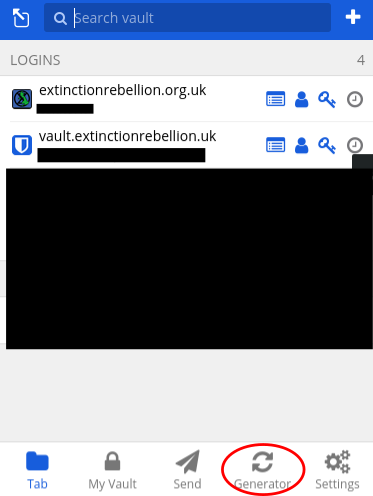
-
Click on the small shield icon at the top right of your browser window:
-
Click on Generator (circled in red):

-
Click Password History to access previously generated passwords.
Sharing passwords
All this is documented in Get Started with Organizations in the Bitwarden docs. Be aware that our Vault is a self-hosted installation, and there are no charges for using it - always use our Vault, rather than the commercial Bitwarden one.
Removing access
If someone loses their phone, gets arrested, or has their devices compromised, you should remove their access as soon as possible.
The group owners can remove someone's access to the group, or change which collections they have access to, by going to the group, and clicking Manage, People.
What to do if someone leaves your group
If the person has had access to important passwords, you should assume they have a copy of them. So, as well as removing them from your group on the Vault, you should also CHANGE ALL THE PASSWORDS they had access to.
Where else can I find information?
Making Forms with Cryptpad
This page shows you how to make a customised form to collect data, using our secure, hosted version of Cryptpad.
How do I access Cryptpad?
https://cryptpad.organise.earth/
Do I need to log in?
Yes, you must create an account in order to use Cryptpad collaboratively (although you can test it as a Guest user). You can't log in via the XR Hub, so you will need to set up your own login.
What is Cryptpad?
CryptPad is used for collaborative editing (a bit like a secure, safe version of Google Docs).
It synchronises changes to documents in real time. Because all data is encrypted, the service and its administrators have no way of seeing the content being edited and stored.
Why should I use Cryptpad?
Because it is safe and secure.
What can I do with it?
You can create documents (like Word) or sheets (like Excel), as well as forms.
Introduction to Forms on Cryptpad
Say you want to create a survey for your local group to find out which action people wish to participate in. First, log in to Cryptpad and then click on 'Form', which will bring up the following screen:
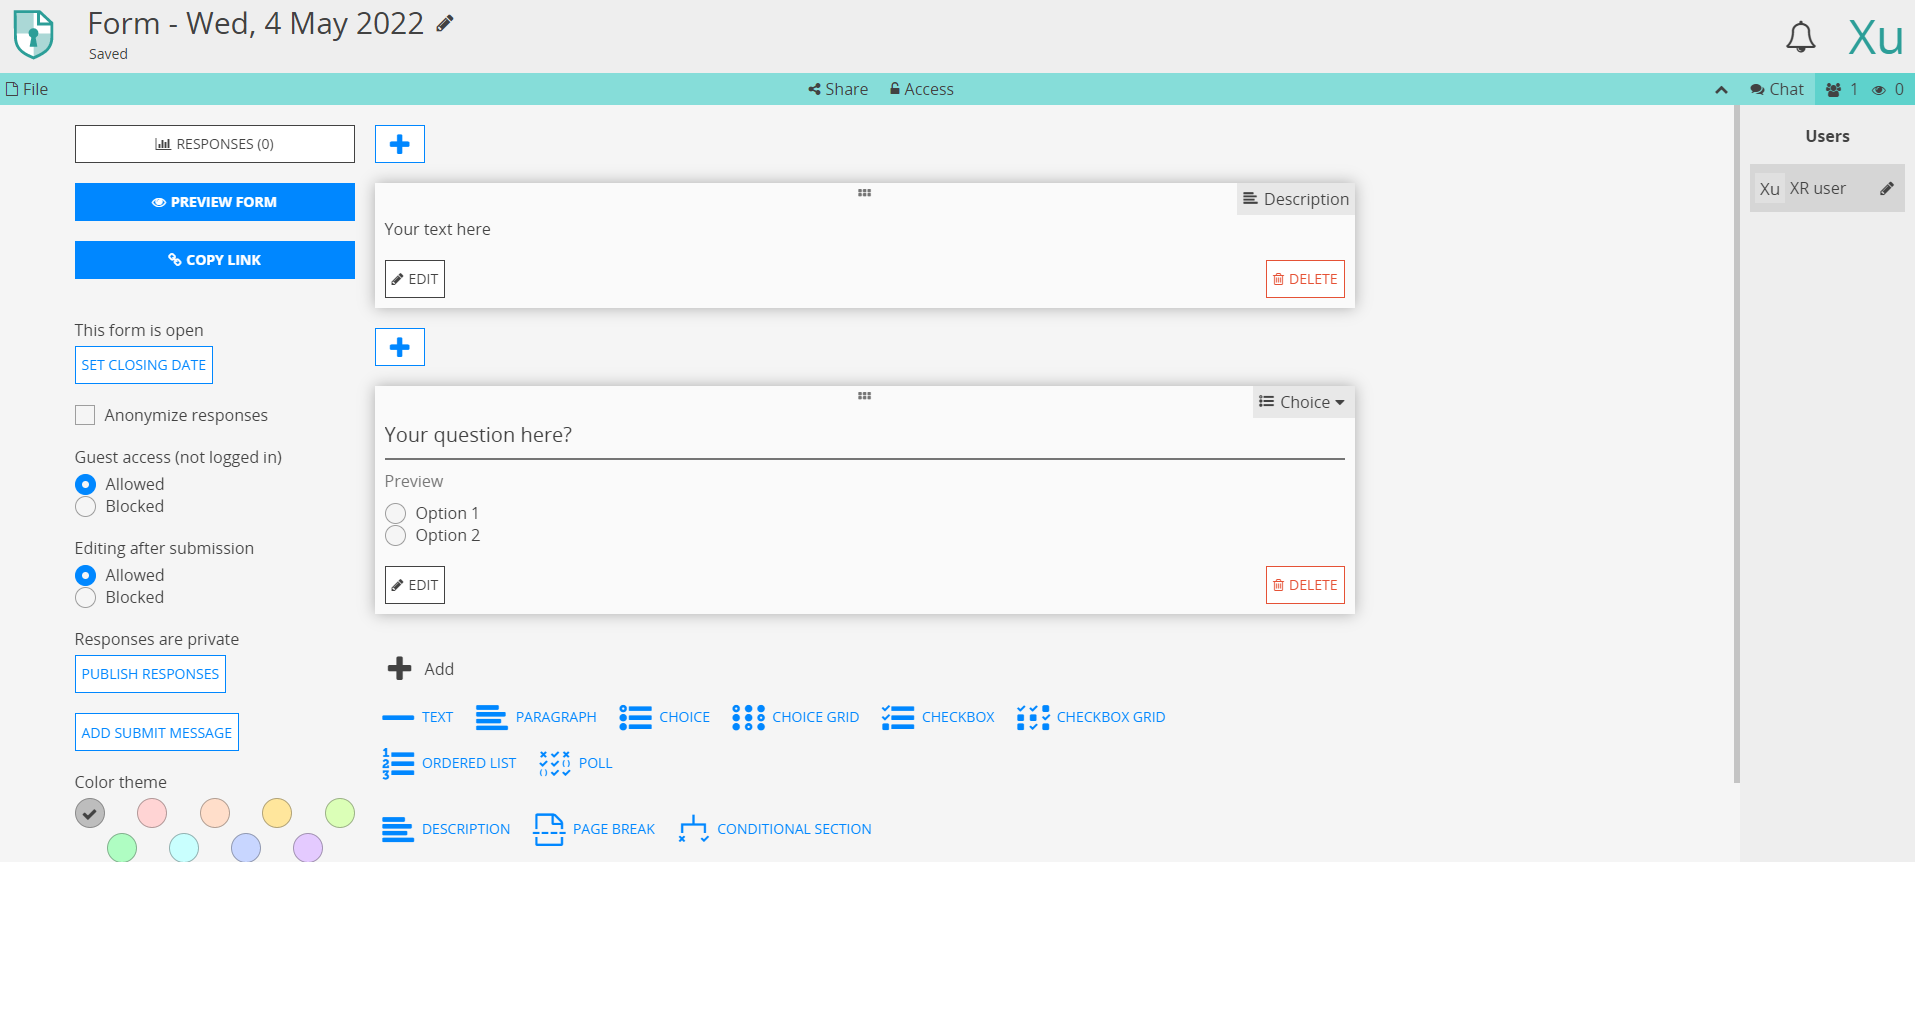
You can name your form on the top left. Click 'EDIT' in the Description box (first box in the centre of the screen) to write a description, or a question (second box) – use the 'Choice' selector to choose the available responses and to add more options at the bottom.
After you have finished, the form may look something like this:
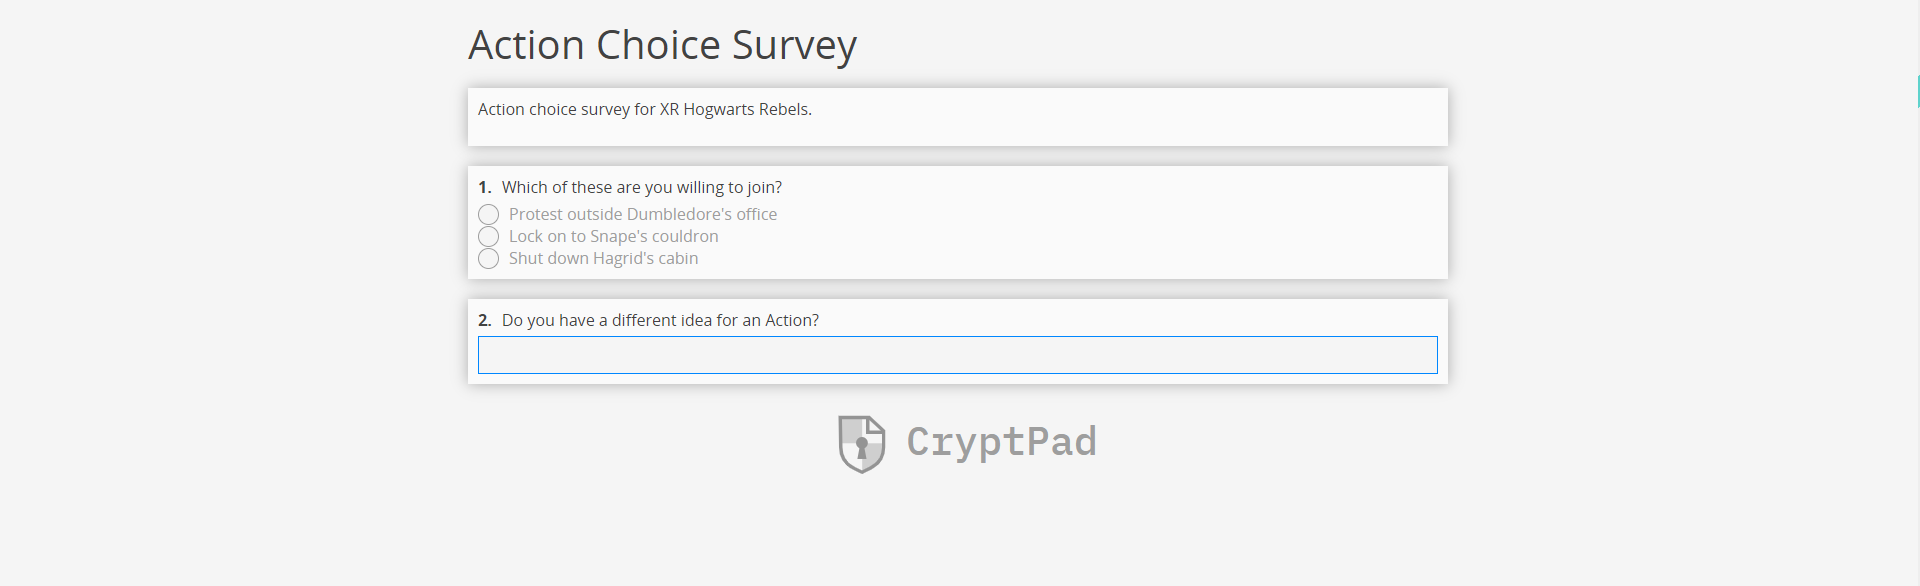
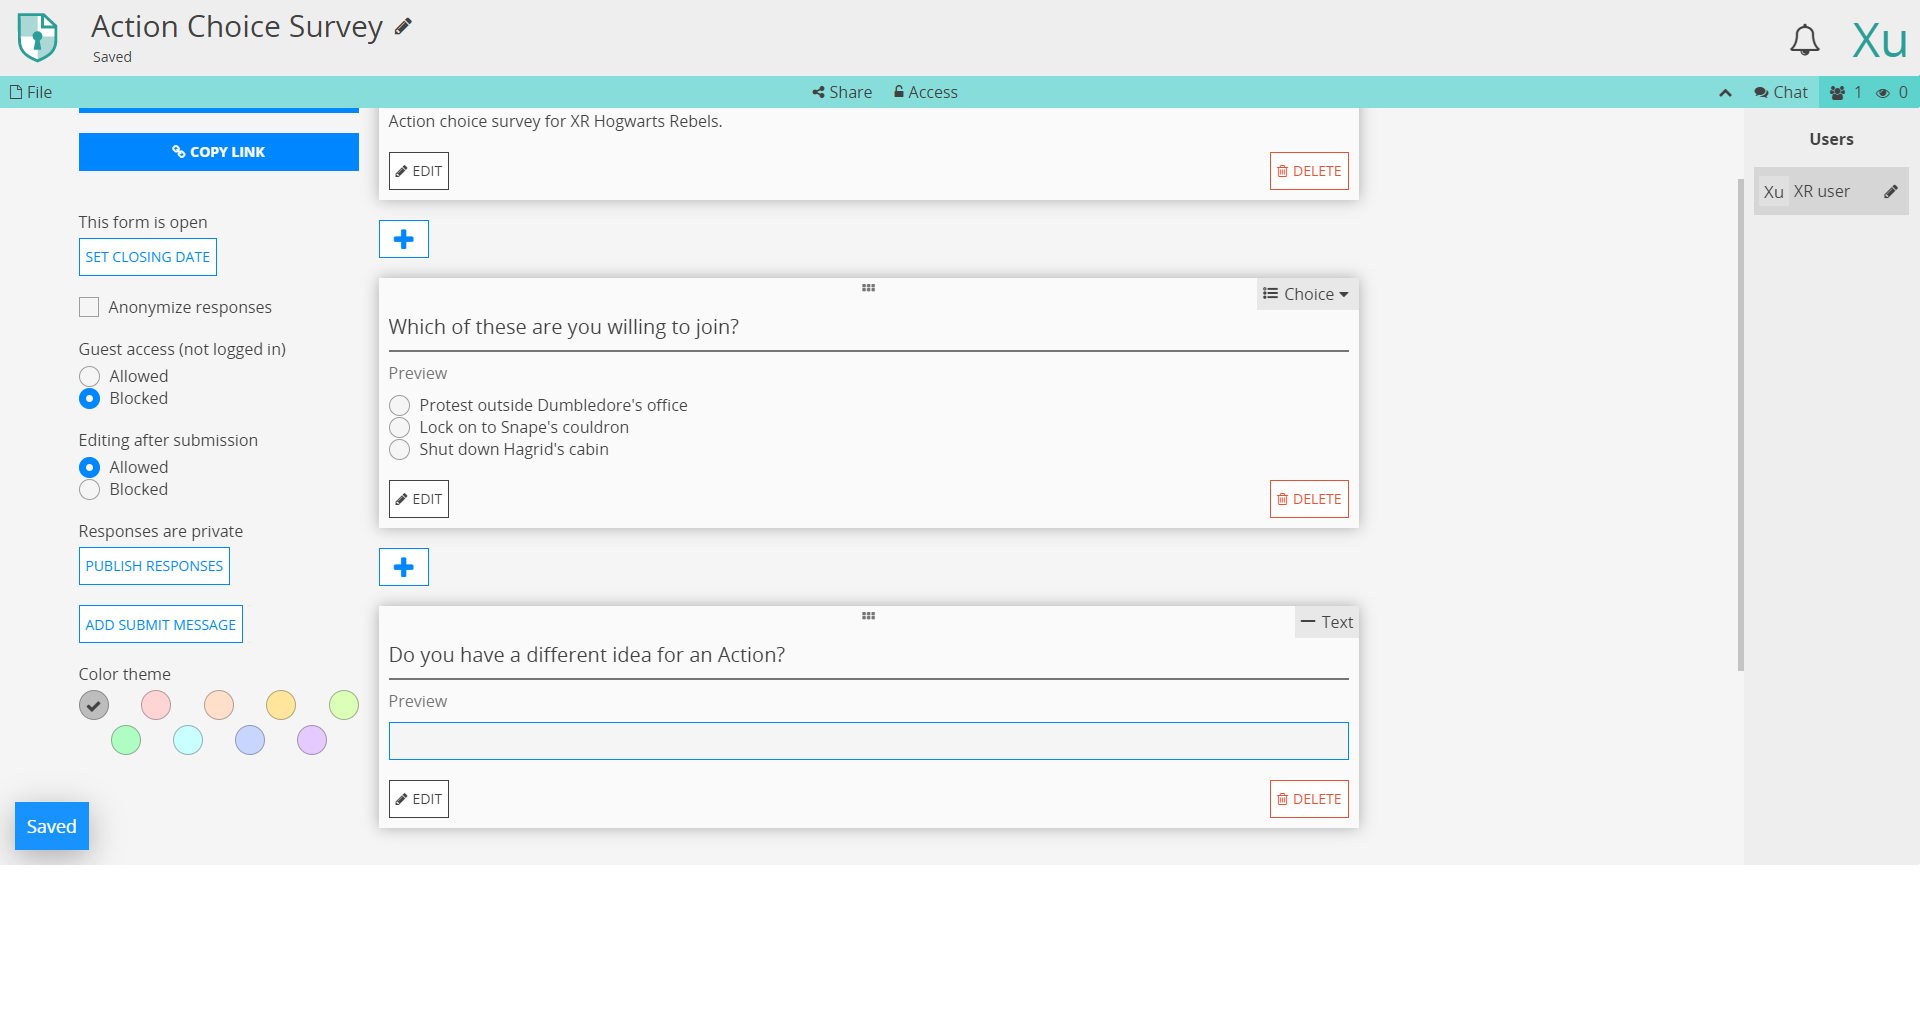 Click 'Preview Form' (near the top left-hand side) to see how the survey will appear:
More Information
There are further instructions and help available here.
Extinction Rebellion UK Privacy Policy
Extinction Rebellion UK Terms of Service
Accessing the Tools Using a Smartphone or Tablet
Lots of rebels do not have access to a computer and instead rely on a smartphone or tablet to do their XR work. While the tools are designed primarily for use with a computer, they can also be accessed on a mobile device either by downloading an app or by using an ordinary web browser.
This guide aims to explain:
- How to access the tools using an app (if one exists) and the device's browser
- Any key differences between the mobile and the desktop versions of the tool
The guide assumes that you are using either an Apple or Android device. If you are not, then you are unlikely to have an app that you can download, but the browser approach should still work.
Note: Before following the steps below, you must already have an account set up on the Hub. To do this, please follow the steps outlined in this guide.
Mattermost
Note: For a detailed explanation on how to use Mattermost, please read this guide.
App
Note: A common mistake rebels make is to assume that all they need to do to "get on Mattermost" is to download the app. To access via the app see the instructions below, but if you would rather not download the app, read this guide. Mattermost will work perfectly well in your device's browser.
To access Mattermost via the app:
- First, install Mattermost from either the Google Play Store or the Apple App Store. Please see this video for a guide to doing this.
- Open the app. You will see a screen that looks like this:
- Enter
https://organise.earthand click Connect - On the following screen, enter your username and password and click Sign in
For a quick video guide to installing the Mattermost app on your smartphone, click here.
Web browser
To access Mattermost using your browser:
Key differences
Switching teams and channels
To switch between teams and channels using either the app or browser, click on the three-line icon at the top left of the screen (circled in red below):

UK Forums
Note: For more information about UK Forums, please read this guide.
App
To access UK Forums via the app:
-
Install Discourse Hub from either the Google Play Store or Apple App Store
-
Open the app. You will see a screen that looks like this:
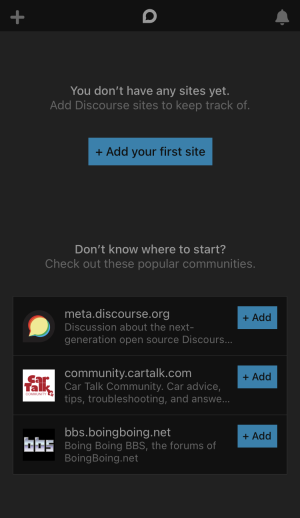
-
Click + Add your first site
-
Enter
base.extinctionrebellion.org.uk. You will then see a screen that looks like this:

-
Click connect (circled in red)
-
Follow the remaining instructions to log in using your username and password
Web browser
To access UK Forums via the browser:
UK Cloud
Note: For more information about UK Cloud, please read this guide.
App
To access UK Cloud via the app:
-
Install the Nextcloud app from either the Google Play Store or Apple App Store
-
Open the app. You will see a screen that looks like this:
- Click Log in (circled in red). You will then be taken to a screen like this:
-
Enter
https://cloud.extinctionrebellion.ukin the URL field (as shown above) then click Log in -
Click Log in one additional time and you should now see this screen:

- Either enter your username and password and click Log in or alternatively you can click Log in with XR UK Hub to use your hub credentials
Web browser
To access UK Cloud via the browser:
Key differences
Editing Office documents
Although it is possible to read Office documents on your mobile device, it is unfortunately not possible to edit them, as this is restricted by OnlyOffice's licensing requirements. This applies both to the app and in the browser.
However, the simple text editor provided by Nextcloud works well, so we encourage using this over an Office document wherever possible.
If you absolutely must be able to edit Office documents stored in the Cloud, you can: download the files to your device, edit them with an external tool (e.g. Google Docs, Office), and then re-upload them. Take care when doing this, as using these tools will effectively destroy many of the security guarantees that you get from using UK Cloud.
Vault
Note: For more information about the Vault, please read this guide.
Note: Before following the instructions below, you need to have already created an account on the Vault. See this guide for instructions on how to do this.
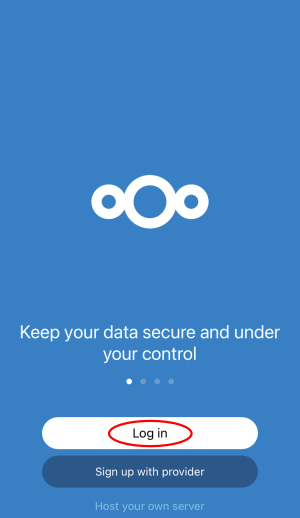
To access the Vault on your mobile device:
-
Install Bitwarden from either the Google Play Store or Apple App Store
-
Open the app. You will see a screen that looks like this:

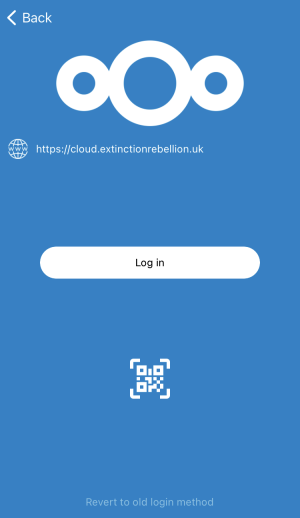
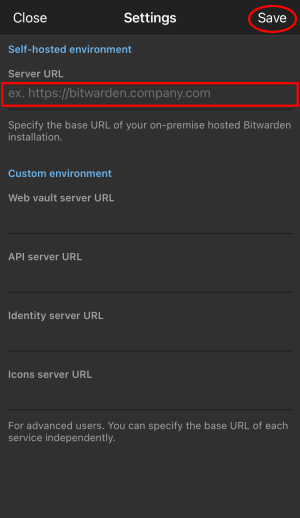
- Click on the Settings icon in the top-left of the screen (circled in red). This will bring up a screen that looks like this:
-
Enter
https://vault.extinctionrebellion.ukin the Server URL field (red box) and then click Save (circled in red) -
Click Log in
-
Enter your username and master password and click Log in
Online Behaviour Guide
XR's Regenerative Culture
We owe each other a duty of care to make our presence on our communications platforms a comfortable and beneficial experience. This includes a healthy focus on mutually supporting through:
- Self care – how we take care of our own needs
- Mutual care – how we take care of each other
- Interpersonal care – how we take care of the relationships we have, being mindful of how we affect each other
- Community care – how we take care of our development as a community
Etiquette and Standards for Posts
When posting messages we recommend that contributors:
-
Be respectful – people are different; we all have strengths and weaknesses and different backgrounds – consider your audience
-
Use 'I' statements
-
Practice compassion by putting themselves in others' shoes
-
Take the time to read, re-read, and reconsider before posting
When using the chat channels and forums, we ask all contributors to have care for the community, offering a harassment-free space for all to participate, embracing our unique differences. We then cultivate this respect for each other, both within project spaces and in the wider public arena where we represent the XR community.
Positive Behaviours
- Use welcoming and inclusive language
- Be respectful of differing viewpoints and experiences
- Be willing to engage with feedback (constructive criticism)
- Focus on what might most be in service of the community as a whole
- Cultivate curiosity and an empathic awareness towards other community members
Negative Behaviours
- Avoid sexism, racism, classism, and any other prejudices
- Be aware that we all have things to learn and we all make mistakes
- Avoid making assumptions and be open to listening and learning if challenged
- Do not employ harassment, either public or private, including trolling insulting/derogatory comments, bullying, personal or political attacks
- Do not publish others' private information without explicit permission
- Avoid conduct which could reasonably be considered inappropriate in a professional setting
Maintaining good behaviour falls to all of us
If we find a post that strays from the above guidelines, it's up to each of us to feed back our concerns, initially to the originator of the post and, if necessary, to a Moderator/Group Admin, by Direct Message. Either way, we should be sensitive with any language, but, as our regenerative statement says: "[we have] cultures of respect and listening, in which people deal with conflicts when they arise, feeding back quickly and talking about disagreements and issues without blaming and shaming." If you find a post that you believe needs moderation, reply directly to it and explain why and, if appriate, suggest to the poster a potentially more acceptable way of making their point.
How do I join the Hub
This document is a quick guide to get you started with using XR's online communication tools for the first time.
In this guide, you will:
- Set up an account on the Hub.
- Log in to Mattermost and send a message to your XR group.
- Find out where to find more information.
Note: This guide assumes that you will be using a desktop computer, although if you are using a smartphone the steps should be the same. You can use either your smartphone's browser app (e.g. Chrome or Safari), or you can download the Mattermost app. For a guide on using the online tools with a smartphone, please read this page.
Note: If you have any trouble with this guide, please contact your XR group's group admin. If you don't know who this is or if your group doesn't have one, then please email tech@rebellion.earth.
1. Joining the Hub 
What is the Hub?
The Hub is the key to accessing the other online tools. It does two main things:
- When you join the Hub you will automatically have accounts created for you (with the same username and password) on all of the main tools that we use (including Mattermost).
- You are encouraged to create a username that is recognisably related to you – some rebels are happy to use their Local Group as part of their username – like
tom-bangor– while others may align with their Working Group – likerose-creatives. However, should you wish to remain anonymous, you are free to choose a username that totally conceals your identity. - The Hub acts as a phone directory – you can use the Hub to find and contact other groups.
For more information on the Hub, please read this guide.
How do I join the Hub?
To sign up to the Hub:
- Ask the group admin of your XR group to send you an email invite to the Hub.
- Open the invite and click on the link (you may need to check your spam folder). This will open a webpage containing a form that looks like this:

- Fill in the form with your name (this is visible to other users, so you can use a nickname if you like), phone number (optional) and password.
- There is a list of groups you have been invited to. You can choose whether or not to reveal your phone number and/or email address to members of each group.
- When you are done, click Confirm.
Video
This video takes you through the steps outlined above.
Any problems?
If you are encountering any issues, read this page for information on how to fix the most common problems, as well as where to go to ask for help.
2. First steps on Mattermost 
What is Mattermost?
Mattermost is a secure chat application that your group can use to communicate instead of using a program like WhatsApp, Signal or Telegram. It can be used both on a desktop computer and a smartphone.
The main advantage Mattermost has over other chat tools is that it is MUCH easier to get in contact with other rebels. Most groups in XR UK are already signed up to Mattermost and it is simple to find and message them. Also, Mattermost is used by XR Global so you can even get in touch with rebels across the world!
Getting access
Video
For a video guide through these steps, see here.
Mattermost basics
Once you have successfully logged in to Mattermost, you should see a screen that looks like this:

On the left-hand side (5) are the public and private Channels that you are in. When clicking on the Channels, note that the messages shown on the right (15) will change.
Below the Channels are your Direct Messages (6). These are private conversations that you can have with up to six other people.
If someone replies to a message you posted, or are following, the Threads (4) will light up - click here to see the replies.
At the far-left of the screen (1), you may see two or more blocks. These are Mattermost Teams and can be used to group Channels together. If you navigate between the different Teams, notice how the Channels shown change.
For a more detailed guide to using Mattermost, see this page on the Rebel Toolkit.
Sending your first message
To message your group for the first time:
- Find the correct Channel to post a message in. To do this, click through your Channels and Teams until you find a Channel with the same (or similar) name as your group.
- Write a hello message in the box at the bottom of the screen (16).
- Hit Enter to send the message.
3. Next steps
If you are interested in learning more, there are more advanced guides on both the Hub and Mattermost as well as XR UK's other tools. In particular, you might want to look at the guides for UK Forums and UK Cloud.
We also strongly encourage you to read our Online Behaviour Guide.
Lastly, if you have any trouble at all with these tools, please contact your group admin. They are there to help!
If you need support with:
- How to use Mattermost
- Getting onto Mattermost
- Using the Hub (and XR's other services including the UK Cloud, UK Forums),
please join one of the weekly sessions:
Mondays 17:30–18:00 (quick questions)
Thursdays 18:30–19:30 (longer training)
Join Zoom Meeting https://us02web.zoom.us/j/89528558324?pwd=R0JWZUovZk8zUy9RMXRjZGFGTmJaUT09
Meeting ID: 895 2855 8324 Passcode: 278766
Or post queries or problems in the Hub Help Desk channel on Mattermost.
Extinction Rebellion UK Privacy Policy
Extinction Rebellion UK Terms of Service
Problems Getting on the Hub
Listed below are several of the most common problems people have when they sign up to the Hub. If you are still having problems after reading this document, you should ask your Group's Admin for help.
It says that an account with my username already exists
Watch this support video
If there is already an account on Mattermost with the same username that you have chosen, you will see this screen:
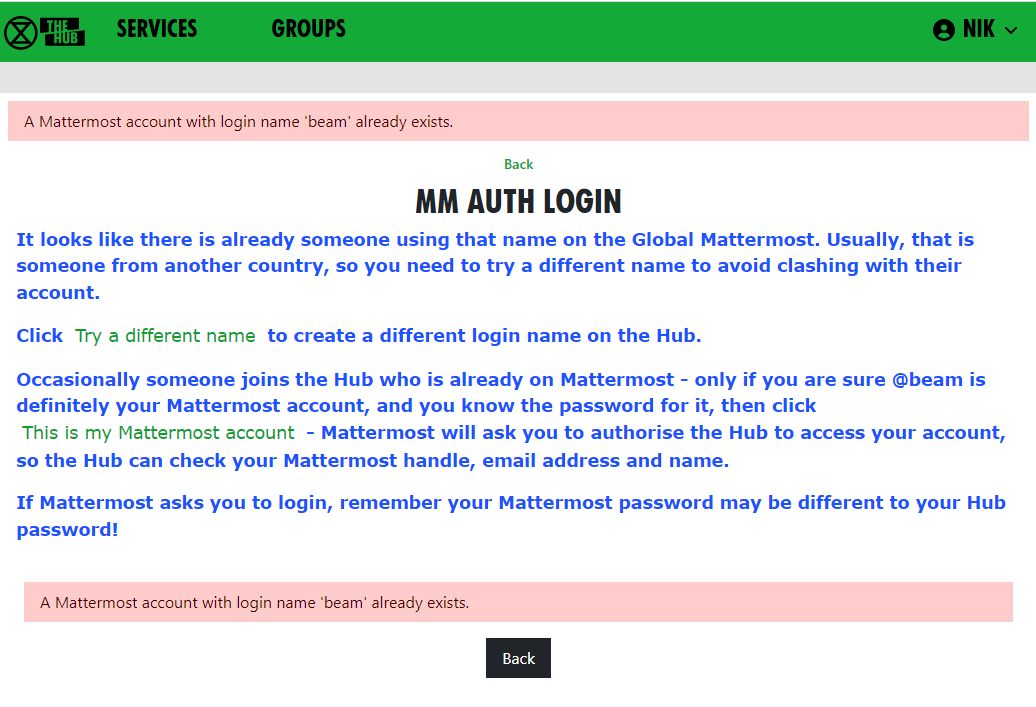
If you know you do not have an account on Mattermost, it just means you have chosen the same login name as someone else – click Try a different name to go back to the form, so you can try a different login name.
If you do have a Mattermost account under this name, click This is my Mattermost account to link the Hub to this account. If you are not already logged in to Mattermost in your browser, Mattermost will ask you to log in – you must use your Mattermost password here, which may be different to the one you just
entered for the Hub:
Mattermost will ask you to allow access:

It says that I already have a Mattermost account
If there is already an account on Mattermost with the same email address as your Hub one, you will see this screen:

You need to press the Continue button to link the Hub to this account.
I cannot remember my Mattermost password
If you have forgotten your Mattermost password, there is a password reset button, which will send you an email to reset your password.
It says my Mattermost account has not been validated
When your Mattermost account is first created, Mattermost will send you a verification email. You must click on the link in the email to validate your account. If you don't get the email, look in your junk email. If it is not there, there is a button to resend the verification email.
Compromised Account Procedure
All rebels with an account on the UK Hub, UK Forum, Global Mattermost and UK Cloud – which gives them access to material that should not fall into unfriendly hands, or that may compromise the legal position of themselves or others, for example, through providing evidence for conspiracy charges – need to be aware of these procedures.
Precautions to Take when Access to an Account Is Compromised
The steps below allow for the rapid temporary suspension of a compromised account on all XRUK services, to be followed either by reinstatement of the accounts with fresh passwords, or permanent deletion of the account as appropriate.
-
Set up, on the UK Hub, a secret codeword or phrase which you can easily remember and speak without having to spell it out, and that does not have ambiguous spelling.
- Log in on the UK Hub and click on the 'Set My Codeword' icon.

-
Enter your phrase or word in the box.
-
Once set, you can find and change your codeword by clicking on the Admin button and navigating to 'My Settings'.
-
Follow the advice available through the links below to secure any device that you use to access XR services and email (these were written for an October Rebellion but are still relevant):
This should include any desktop devices you may leave at home that could be subject to a search warrant and seizure in your absence.
There is not yet a specific general guide to securing desktop devices against seizure – much of the laptop advice applies. Don't forget any memory sticks or CD/disc backups you may have lying around.
-
DO NOT take any device, which has general access to your Hub accounts, into an arrestable situation! Please use a 'burner' phone and only install and use secure apps on it. See the Phone Security Guide above.
-
If you have operational reasons for needing access to XR online services (other than Signal and Telegram and areas like the public website that do not require a login and can be viewed by anyone), you must be especially careful to ensure that your device is secure and that you don't lose it.
Loss of Your Device – Arrest, Loss or Confiscation
-
If you are arrested, tell your secret codeword to Back Office (Arrestee Watch) or a friend, ideally before your arrest, or if you are arrested without warning, as soon as possible afterwards (e.g. use one of your custody calls to tell Back Office).
-
If you lose your device, or if it is confiscated by the authorities, immediately let your Group Admin or Interal/External Coordinator know, so that they can inform the Hub Admin team.
-
The Back Office Volunteer, your Group Admin or Hub Admin on being told your secret phrase and that you have been arrested, or had a device(s) confiscated, will cross-check the secret codeword and if it is valid, immediately lock all of your accounts – the Hub, Forum, Mattermost and Cloud – until you are cleared. For Group Admins, here is how to deactivate and reactivate someone.
Restoring Your Hub Accounts
- When (if) you are released, your accounts can be restored. You will need to contact your Group's Coordinator(s) and/or Group Admin for them to restore your account.
- If any of your devices are lost or remain with the authorities, you will need to change the email address you use for the Hub. This change must be done before your account is restored and it is recommended that you change your email even if your devices have been returned. Your new email address should be given to the Hub Admin via your Hub Group Coordinator/Group Admin. A new Hub Password will also be issued, and you should subsequently change this. Once the new email has been registered and the Hub account restored, you will be able to access all of your Hub Group information as before.
- If you are a member of Mattermost channels that the Hub does not know about, your membership of those channels will not be restored automatically. You will need to rejoin these by asking people in them to invite you again.
Non-Hub Services
-
The above ONLY applies to your Hub, UK Forum, Mattermost, UK Cloud and Vault accounts. If you have administrator or moderator access to any service that gives you visibility of others' account details or activity, then it is essential that you follow a similar procedure for those services as well.
-
For social media accounts, it is worth having a trusted close friend/partner who knows your password and can be instructed to change the password immediately should they hear you have been arrested.
Videos to help with getting your local group onto the Hub
This page contains links to video content that can be shared with your local groups to help get them on board with the new systems. Feel free to use whichever you find most helpful.
Accepting a Hub invite and how to access support:
https://tube.rebellion.global/w/dcJb6KYrFXyLzVCxPCTvrM?start=0s
This is useful for anyone who wants to get an overview of Mattermost, or thinks it's all rather complicated.
First Steps on Mattermost:
https://tube.rebellion.global/videos/watch/dbf49eaf-0d92-4af7-accc-489ff0300af8
This video takes you through how to get started on Mattermost, while the following videos cover specific parts of using Mattermost.
https://tube.rebellion.global/videos/watch/fd38312d-5f26-4d6c-a137-24bca1128206
Mattermost Notifications:
https://tube.rebellion.global/videos/watch/0e7e6f19-6ab8-47de-b770-fc19923f47c5
Mattermost Search:
https://tube.rebellion.global/videos/watch/0def354f-557d-411b-950d-bf61a6e6a59b
Mattermost Find and Join Channels:
https://tube.rebellion.global/videos/watch/54f8cf39-8469-4f78-bf30-db685ec9b002
Mattermost 'Threading' Messages:
https://tube.rebellion.global/videos/watch/990bacfe-a3df-4b5f-9870-8818f2ba3db5
Mattermost Save Messages:
https://tube.rebellion.global/videos/watch/0c6a4cdc-94f4-4493-9f1b-d4ad757df710
Mattermost Account Settings:
https://tube.rebellion.global/videos/watch/ad184cf5-f794-4d20-a539-0b26072fe5bd
How to use the Big Blue Button (video conferencing)
HOW TO USE THE BIG BLUE BUTTON
REQUESTING A BBB Account
The advantages to having an account for your XR group are that anyone (irrespective of whether they have a Hub log in or not) can access a BBB meeting. Once you have an account, you can create as many 'rooms' as you like within your account (giving each room a name such as Anchor Group, M&M, Actions etc) and each room has a unique URL. You copy the URL for the room and send that with the date and time of the meeting. Then attendees click on the link at the start of the meeting, add their name and the BBB will open in a windows tab in the same way as it does within MM. So a LG can have a BBB account and then run their XR meetings on it and not worry about using MM - good for new members, or if you have a visitor!
To get an account --
- Email: bbb@organise.earth Use your XR group's email address and not a personal email address, to email from. Tell them which group you are. Once the account's created, they'll email the account details. Your group's email address will be the log-in/sign-in name and the password they give you can be changed to one you want.
Note BBB is at meet2.organise.earth
Joining a call
When you click the link to join the call you will be asked
to connect your audio and webcam. Select Microphone, and check that
if you speak you hear yourself coming back through your device. Don't
worry, no-one else can hear this!

Welcome to BBB! This large Welcome screen takes up most of the window, but if you click the blue box in the top right corner it will go away and there will be more space to see other people on the call. Down the left hand side you can see who else has joined, and if they are connected to video and audio, and the Public Chat column.
If you can't see the columns on the left that look for the little person
icon in the top left corner and click that to open them up.
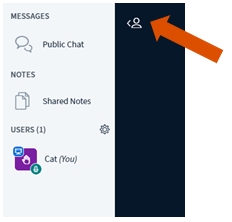
In the main window you will see a few blue buttons, and this is where you can control your Audio and Video. Click the microphone to mute or un-mute yourself.
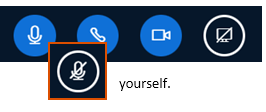
The button that looks like a video camera is to turn on your webcam.
Like your audio when you first use it there will be a pop-up window
where you can choose your settings, and give you a preview screen. It
will automatically detect your camera, so unless you want to choose a
different webcam, just click Start Sharing
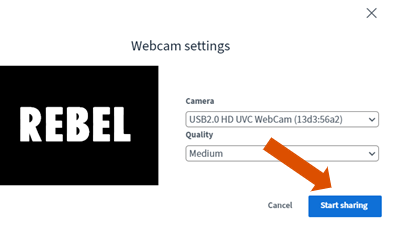
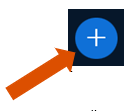

Once screen
sharing begins it will give you a delightful "rabbit hole" effect of
windows within windows -- don't worry, once you switch to a different
tab or window this will disappear -- just don't use the BBB tab to
open the website you want to share, or you will automatically come out
of the session!
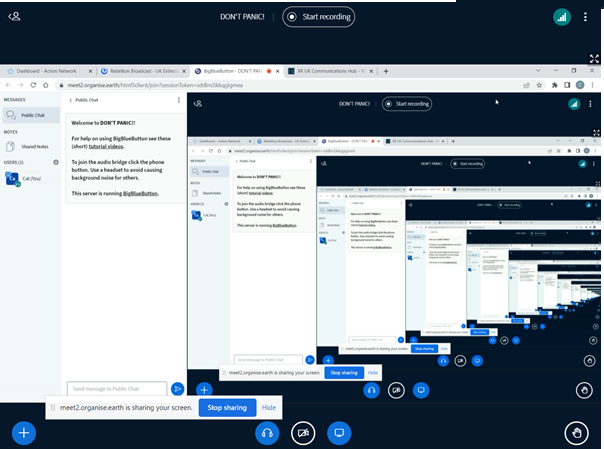
Note that you cannot seem to screen share on a mobile device.
There are a few other options if you click the three vertical dots in the top right hand of the window.
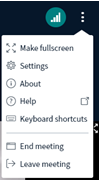
At the end of the meeting you can go here to End meeting or Leave meeting -- or you can just close the tab in your browser and you will have left! Once everyone has left the meeting, even if no-one clicks End, it will automatically finish.
You can have a meeting on BBB for as long as you like, there is no time limit.
You will need to confirm your microphone and camera settings -- it will detect them automatically from your device, so you don't need to change anything.
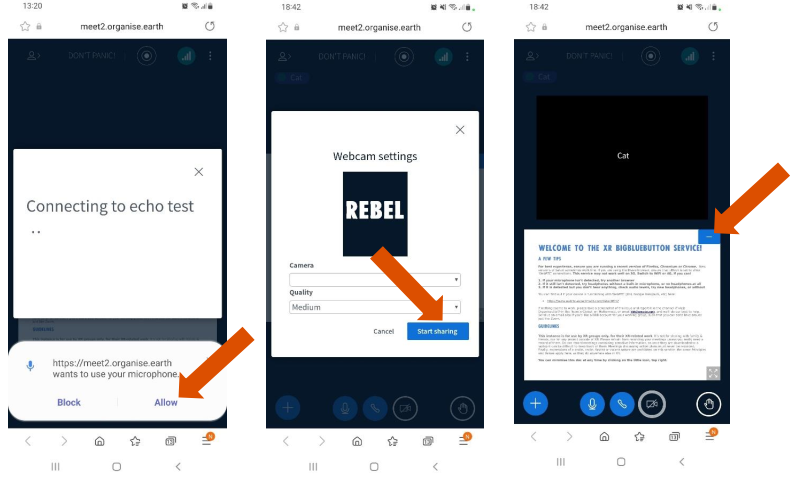
Get rid of the Welcome screen to make more space to see the other folks on your call!
To pull up the list of the other people on the call and the Public Chat click the little person icon in the top left hand side of the screen. Click the same icon to minimise this column so you can see who you are speaking to again.
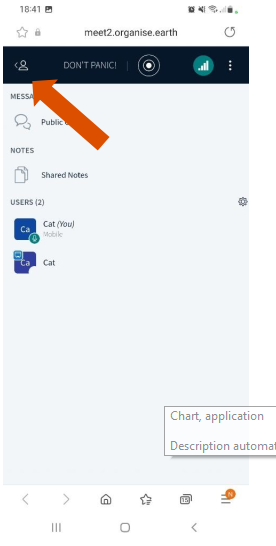
Click on the three vertical dots on the top right hand of the screen, or close the internet browser to leave the call.
How to Change Your Login Name [Handle]
-
If you want a different login name [known as your Handle on Mattermost], you need to change this on the Hub.
-
n.b Please be aware that if you change your Login name, this will re-create your Cloud account. If anyone has shared files and/or folders with you on the Cloud, then your access to these will be lost.
-
If you change your handle on Mattermost, then this will 'disconnect' your Mattermost account from your Hub account and Group Admins won't be able to find you to send you new invites to other Hub groups.
-
Go to the Hub https://hub.extinctionrebellion.uk
-
Log in [top right]

- Select the drop-down arrow [top right] and then Setttings
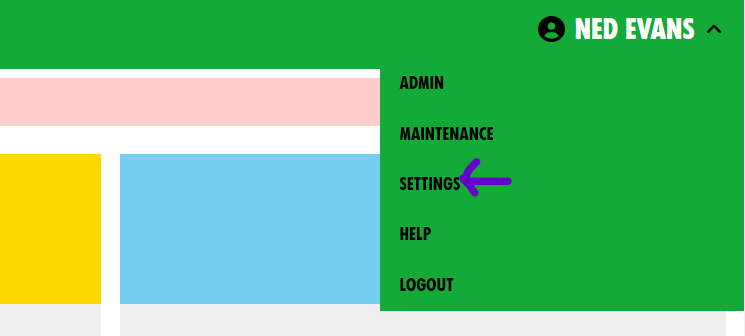
- Select the pencil icon next to Login name
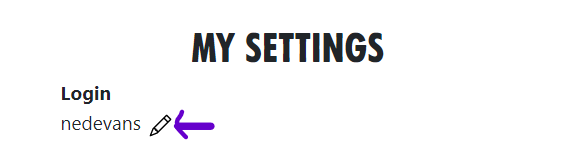
- Edit your Login
- Add your Mattermost password
- Select Save

- That will then change your Login on the Hub, Mattermost, Cloud and Forum
How to get Tech Help!
This document is a quick guide to finding Tech Help. All of us find difficulties in remembering exactly how to do things and, often, it's quicker to ask a question than plough through interminable documentation. So, what can you ask and who is best placed to answer? Read on ...
What can I ask and where?
If you have a problem with Posting on Mattermost, then Start a Post in the Tech Reception channel in the UK Team. Outline the issue and add any specific detail that explains your difficulty.
If your problem is with Mattermost Itself, then you might raise the issue with the IT Help team at XRGlobal. If you're not already a member of the XRGlobal Team, the link will automatically join you.
For queries relating to The Hub, UK Forums or UK Cloud, then place a post on the Hub Help Desk channel. Again, describe the issue as best you can to get help. Often a Screen Shot will help the support team identify and resolve the issue.
Sometimes, the question is more general than "simply" technical. In this case try the Any Question Answered channel.
And, if you are Group Admin and you have a specific Hub Group/Circle question, then go to the Hub Group Admins channel. Here your post will be answered by other Group Admins, who have most likely encountered the problem before and can offer advice.
If your query relates to Action Network, then raise the issue with the Action Network Data Team Reception.
For those of you who are Action Network Admins, post on the Action Network Admins channel.
If you want to create a website for your group, contact The Web Team - more info
Lastly, please note that posting a request in any of the above channels may not result in a satisfactory resolution of the issue. In this case please email tech@rebellion.earth and raise a ticket on the XR FreshDesk system. Your query will be relayed to the appropriate team.