XR Groups, Roles and Mandates
Read this guide to learn how to use the Hub to manage your group's mandates, roles, members, etc.
XR Groups screen
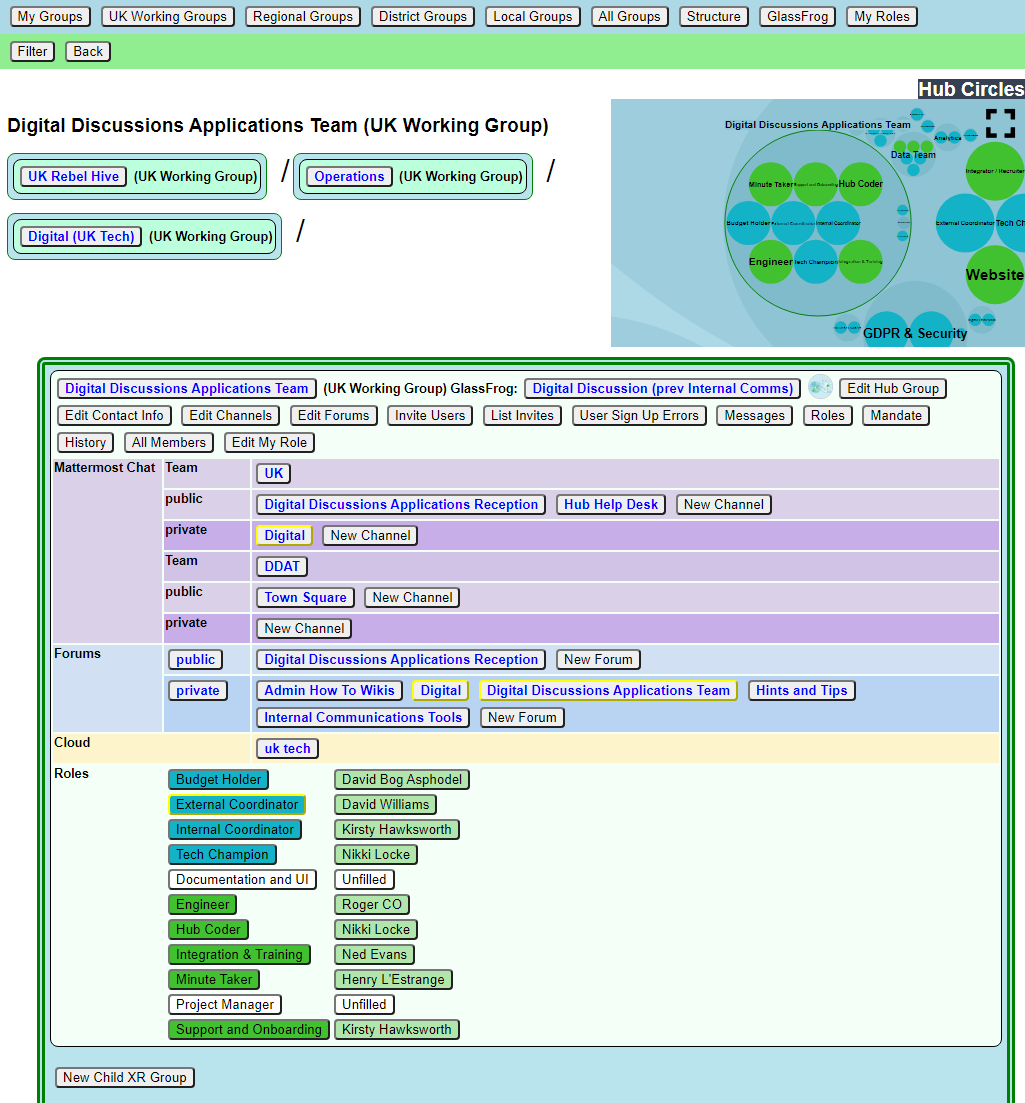
If you click 'My XR Groups' on the Home page, you will see a screen like this:
Choose a group to see all its details in context.
This is the Group Admin view – ordinary users can see this screen, but won’t have the buttons to change things.
This shows the group in context. You can click on any of the group names to see its parent and children.
Each group is displayed the same way. Public links are always clickable. If you are a member of the group, the private links are clickable too. If you are a Group Admin, the buttons also appear.
The graphic display shows the group in context – you can click the full screen icon to make it bigger, and you can click on groups within it to move the display to a different group.

Structure - to find your way about XRUK, you can click on any group name on the screen to show that group, with its parent and children. Or you can click on a group in the Hub Circles graphic display at the top right. This has a full screen button to make it larger, and easier to navigate.
If you are using the Hub Circles display, you can click the Filter button to hide some of the detail, to make the diagram less busy. If you set a filter, it is remembered, and used every time you open this view.
GlassFrog
We used to use GlassFrog to make our organisation transparent. We are gradually moving to organism.extinctionrebellion.uk, which is a public view updated from the Hub every night.
But linking to and from GlassFrog is still supported at the moment.
If your group is linked to a circle on GlassFrog, a button will appear to see the information the Hub imported from GlassFrog, and a GlassFrog icon to let you go to GlassFrog itself.
How to change people's Roles in your group
How to change my group's Mandate
SOS principles say that all working groups should have a Mandate, but some Hub Groups were created without one.
The sections include: Purpose, Accountabilities and Domain, together with an optional section on Policies. As a guide to completing the Mandate, you might research those of similar Groups in your region, or UK wide (WGs and Circles). Such existing Mandates may assist with arriving at your own wording. See also Mandates and how to write them.
How to see changes made to roles, members, mandates
How to see people in my group
'All Members' shows you a list of everyone, and allows you to set their roles, and make them Group Admins or turn Group Admin status off. From there, you can click 'All Roles' to see all the roles the person has, and from there you can click 'Step Back From Roles' to pass those roles on to someone else.
If you remove someone from one or more roles which are linked to another group, and that is the only role they hold in that group, you will see another screen where you can confirm whether or not they should also be removed from the other group.
How to change My Role
'Edit My Role' lets you edit your own role in the group. Everyone in your group can edit their own role. Note that only Group Admins can assign people to core roles (those shown in blue on the diagram).
GlassFrog Children not on Hub
If your group is linked to the corresponding circle in GlassFrog, but the GlassFrog circle has child circles that haven’t been linked to Hub groups, they are shown here. If you want to link one of these to an existing Hub group, or create a new Hub group for it, see Linking GlassFrog Circles to Hub Groups in the 'Setting up a new group on the Hub' document.
Edit Messages screen
How to change default Welcome Messages
To add/edit messages click the 'Messages' button in the XR Groups screen.
Welcome messages are sent via MM Direct Message to people who have just joined your organisation on the Hub. They come from xrukadmin (the Hub's Mattermost login), which does not read replies, so you will probably want to include instructions to contact your own Mattermost handle in the message. E.g. "Do not reply to this message, contact @fred-xrtrumpton if you have any questions".
Just enter the message text (you can use Markdown formatting, like you can in Mattermost, Forums and Cloud), and click Save. Subsequently, anyone who accepts an invite to your organisation will receive that message overnight (as the Hub runs updates in the early hours of the morning.)
How to set Reminder Messages
Reminder messages are useful for regular events (like a weekly meeting). They are posted to your channel of choice on Mattermost, by xrukadmin (the Hub's Mattermost login) each night.

Edit Role screen
When a new group is created on the Hub, it gets a set of 3 standard roles: Internal Coordinator, External Coordinator and Tech Champion. If it is created from (or linked to, either manually or automatically) an existing GlassFrog Circle or Working Group, it also gets all the Roles that had been set up for the group in GlassFrog.
There are an additional 8 roles, suggested by the Self Organising Systems Circle, which may be selected by the Group Admin when adding new Roles to the original set.
To add a new role for your group, select 'Add Role' and type the role name you require. As you type, you are offered any Default Roles which match the input text, and, if you then select a Default Role, the form is prefilled with the details (including mandate) of that role - which can then be edited, if necessary. This is just to save typing, and to help any Group Admin who may not know the exact wording of the Mandate for the desired Default Role. Note that any new Role will have a blank Mandate (Purpose and Accountabilities), which may be completed at a later time.
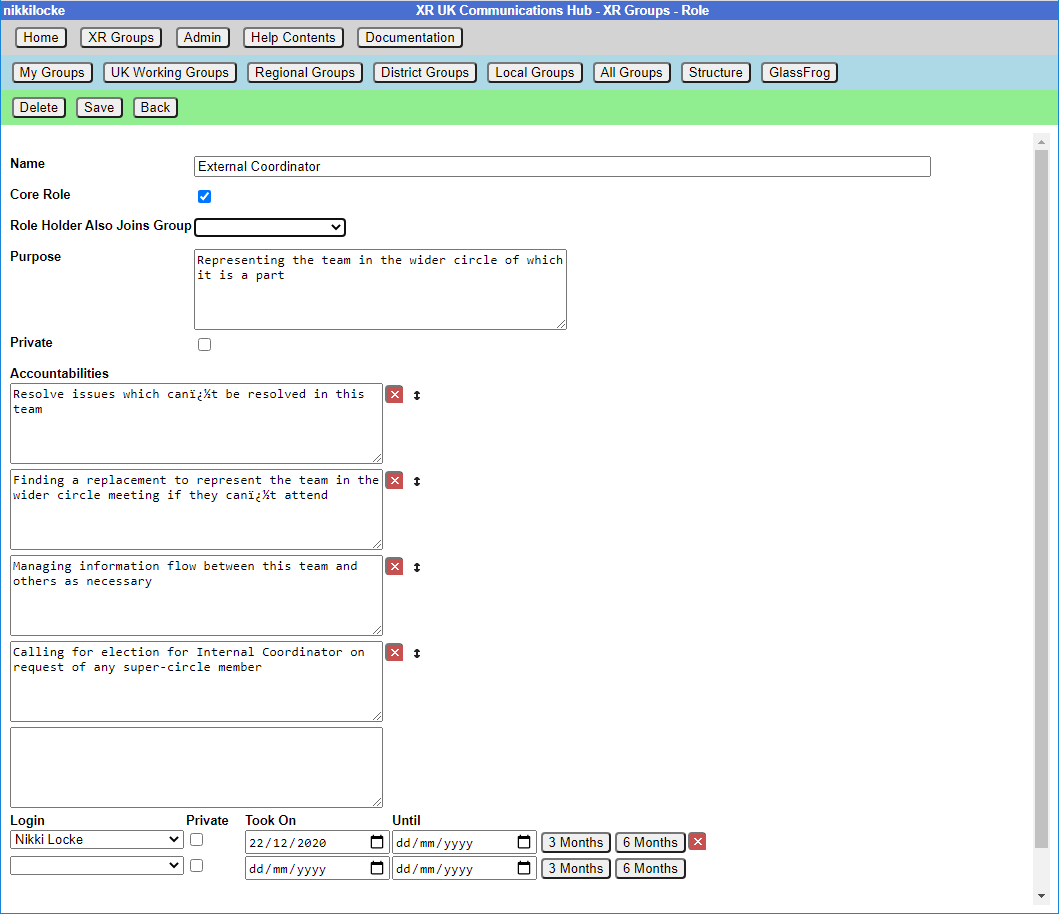
Ticking Core Role shows the role in blue instead of green in the diagram, and prevents users from assigning themselves to that role (only Group Admins can assign people to Core Roles).
You can add Accountabilities, or drag them using the handle to reorder them.
You can place users in their role by selecting their names from the drop-down list. You may also remove them by clicking the red ‘X’ next to their name. The Private setting by each user should be ticked if the user does not want anyone outside the group to see that they hold this role.
The Private setting under Purpose is the default for the role – if this is ticked, then users will have Private ticked by default (but they, or you, can change that).
You can set an 'Until' date for each person assigned to a role, which is the date their holding of that role will be reviewed. This allows people assigned to a role for a limited time to be confident that they won’t be left holding that role for ever. Roles where the Until date has passed will show in red on the group diagram.
Linking a role to another group
You can link a role to another group. Then, when people join that role, they are automatically joined to a linked role in the other group. Usually, you will do this for the External Coordinator role – the external coordinator of a working group automatically joins the parent group as the sub group’s representative. But it doesn’t have to be the parent group – for example, Cymru Wales have a "Local Group Coordinator’s" group that all their local group coordinators join. The only limitation is that you have to be a Group Admin of both groups.
Normally such a linked role will also be a Core Role (so that users cannot appoint themselves to it, thus joining the other group).
Normally a Group Admin of one group will create a child group (which automatically makes them Group Admin of the child group). They will then link the External Coordinator role in the child group to the parent group. They may well also appoint other Group Admins of the child group, and may remove themselves from the child group when this has been done. If nobody is Group Admin of both groups, Coordinators or Group Admins of both groups will have to ask a Hub Admin to do it for you. If you don't know a Hub Admin, ask in DDAT Reception on Mattermost.
If you remove people from a role which is linked to another group, and that is the only role they hold in that group, you will see another screen where you can confirm whether or not they should also be removed from the other group.
Converting a role to a Working Group
Clicking on any role shows the details for the role. There will be an Edit Role button in the blue menu at the top to edit it. If the role is not already linked to a working group, there will also be a 'Create Working Group For Role' button – click that to set up a new working group to perform the original role. The new group will inherit its mandate from the original role, and the External Coordinator will be linked to it.
What happens when a role gives people access to more than one Hub Group?
When someone does one of the following things:
- Edits the Auto Join Roles screen (Hub Admins only)
- Edits the people in a role
- Edits the roles a person is in (+)
- Deletes a role
- Steps a person back from a role (+)
- Creates a group
- Deletes a group
- Admin edits a group (Hub Admins only)
- Removes someone from a group (+)
The change could entitle some people to be in different Hub Groups - e.g. if they join or leave a linked role, or a role with a support group.
The joining or inviting happen automatically, but any groups they should probably be removed from are first listed in a screen with tickboxes against each one, so the person making the change has a chance to untick people they do not want to be removed.
(+) The removal screen is simpler in these cases, because only a single person is affected, so it just shows a list of groups the person could be removed from. In the other cases, it has to show both person and group, as there is no reason why the same person might not be joined to two or more groups - e.g. all the Cymru Tech Champions will be joined to the UK level Tech Champions group, as well as the Cymru one.
Here is the simple screen:
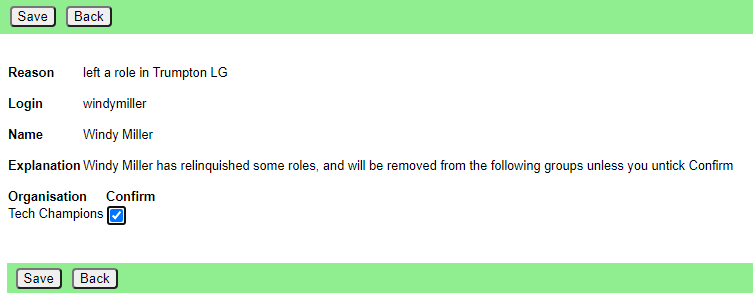
And the more complicated one:

Please click Save in this screen to carry out the removals. If you think a person should not be removed, first untick the corresponding Confirm box.
Step Back From Roles screen
You reach this screen by finding a person with a role in All Members, clicking on 'All Roles', then clicking on 'Step Back From Roles'.
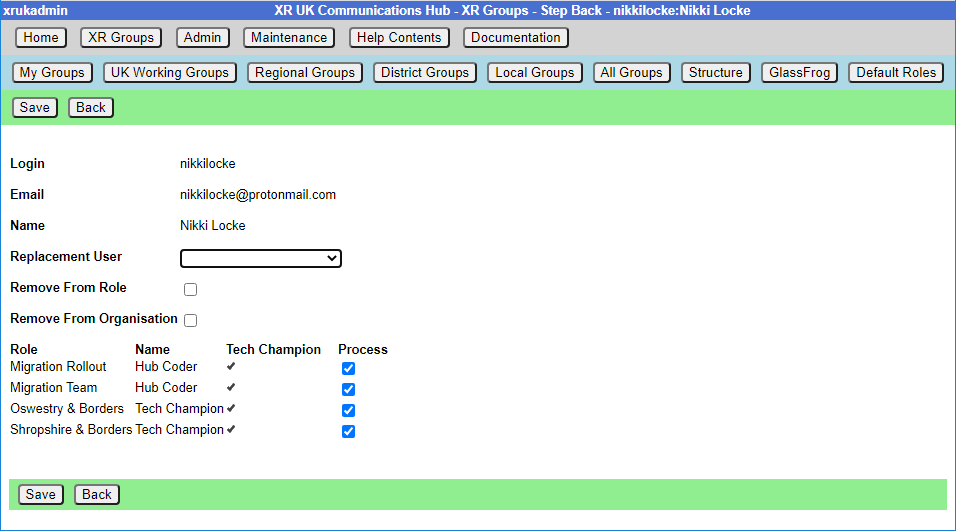 If you choose a replacement user from the dropdown, that person will be assigned to all the roles with Process ticked (being joined to the organisation if they are not already in it).
If you check Remove From Role, the original person will be removed from the roles with process ticked.
If you check Remove From Group, the original person will be removed from all groups with Process ticked.
If you remove someone from one or more roles which are linked to another group, and that is the only role they hold in that group, you will see another screen where you can confirm whether or not they should also be removed from the other group.
So, for example:
| Change Required | Action |
|---|---|
| Join a new person to the roles, to be trained by the original person | Select the new person in Replacement User. Leave Remove From boxes unticked. Tick all the roles you want them to be added to, and untick the others. |
| Pass the roles on to someone else because the original user has already stepped back. | Select new person in Replacement User. Tick Remove From Role. Tick all the roles they are stepping back from, and untick the others. If the person has left the group(s) altogether (rather than just stepped back from the role to become an ordinary member), also tick Remove From Group. |
| Step someone back from their roles, without appointing anyone else | Leave Replacement User blank. Tick Remove From Role. Tick all the roles they are stepping back from, and untick the others. If the person has left the group(s) altogether (rather than just stepped back from the role to become an ordinary member), also tick Remove From Group. |

